Markdown syntax guide
This guide describes using the Visual Studio Code editor (VSC) to write and format content in markdown. Use this guide to create the various elements used in a typical course, like headings, text, lists, and tables.
Note: The markdown syntax in this guide is described in the Microsoft Docs Markdown reference. Don’t use markdown elements from the Microsoft Docs Markdown reference that are not described in this guide, unless your project manager asks you to.
GitHub also provide a helpful guide to Basic writing and formatting syntax.
Start with the Important considerations for creating content in markdown, and then choose a markdown element from the list of Markdown elements in this guide.
Prerequisites
Before you proceed complete the following:
- Install Visual Studio Code
- Install Docs Authoring Pack
- Install Word Count extension
- Install Pull Requests extension
- Install Azure Repos extension
- Install Git client
- Set Git credentials
- Terminology and concepts
- General project workflow
- Download course files (clone repo)
- Project branching policies
- Create new branch in VSC
- Send (push) files
Markdown elements in this guide
- Important considerations for creating content in markdown
- Generate markdown elements in VSC
- Headings
- Text styles
- Bulleted lists
- Numbered lists
- Tables
- Images
- Hyperlinks
- Code blocks
- Smart apostrophes and quotation marks
Video
The following video covers the contents of this guide. Watch the video (optional), read this guide or both. If you cannot access the video, contact your project manager.
Important considerations for creating content in markdown
Consider the following key points before you begin creating your course content in markdown.
-
Don’t apply the markdown syntax arbitrarily. Depending on the requirements for project you are working on, the markdown files you create might be converted into Microsoft Word documents (in DOCX file format). To facilitate the file conversion process, you must use the markdown syntax exactly as it is described in this guide.
-
Don’t spend time attempting to apply styling to elements within the markdown files (like lists or tables, for example). The correct styling will be applied to these elements later in the process. If you encounter problems with the markdown files, bring the problems to the attention of your project manager.
-
Don’t add HTML or CSS into the markdown files. Adding HTML or CSS inside markdown files is generally not permitted. Using HTML and CSS in markdown can cause issues when the course content is published, especially on platforms that are built on HTML and CSS (like online courses, for example). Check with your project manager if HTML and CSS are permitted inside the markdown files for the particular course you are working on. The following HTML elements are particularly problematic and must not be used: <br>, <hr>, <p>, <img>.
-
Don’t copy unsupported characters or symbols from other documents and paste them into the markdown files (like bullet points, apostrophes, ASCII, etc). Copying and pasting unsupported characters and symbols can result in malformed content and cause issues when the content is published. Details about using particular characters for apostrophes and quotation marks are provided in Smart apostrophes and quotation marks.
Generate markdown elements in VSC
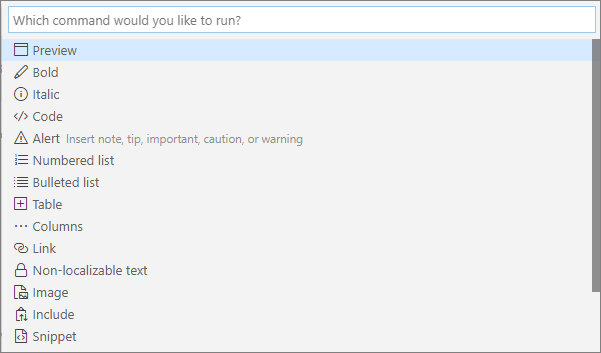
When you have a markdown file opened in VSC, press ALT + M for a menu of basic markdown elements.

VSC will ask you to provide details to add certain elements into the markdown file, like table and links.
Headings
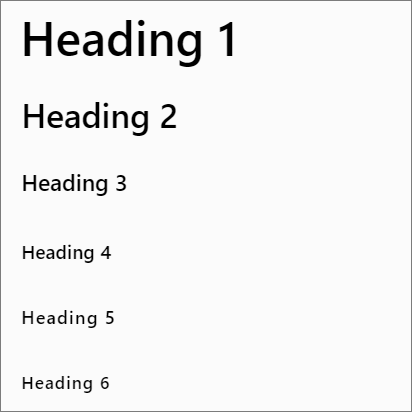
In markdown, you can create headings at different levels.
For example, to make the following headings at different levels:

Add the following into your markdown file:
# Heading 1
## Heading 2
### Heading 3
#### Heading 4
##### Heading 5
###### Heading 6
Markdown headings quirks
- Use an octothorpe symbol (
#) to denote a heading. - The heading level is determined by the number of octothorpe symbols (
#) that precede the heading text. - Use a single space between the
#symbol and the heading text. - Don’t wrap headings with a closing octothorpe symbol (
#), for example## Heading ##. - All heading text must be sentence case.
- Apply heading levels consistently.
- Always add an empty line before and after a heading.
- Don’t terminate heading text with a punctuation mark (like a full stop, or period, comma, exclamation mark, question mark, or colon).
- Don’t leave trailing spaces at the end of heading text.
Text styles
The markdown syntax allows you to create different text styles.
For example, to make the following italic and bold text styles:

Add the following into your markdown file:
*italics*

**bold**
Markdown text quirks
- Apply italics to a portion of text (or word) by placing a single asterisk at each end (the
*symbol). For example,*use this syntax for italicized text*, but_do not use this_. - Wrap the text that is to appear in bold between two
**symbols at each end of the text. For example,**use this syntax for bold text**, but_do not use this__. - Be consistent with the markdown syntax you use for bold and italics.
- Don’t deviate from the syntax in this guide, even if the text appears correct. Minor syntactical variations can cause issues when converting markdown files to DOCX.
- Be mindful of possible syntactical variations when you copy and paste markdown from external sources.
- Escape special characters. A special character is a typographical mark that has a specific purpose in the markdown syntax (for example,
#,*,_,', and-.). Escaping a special character ensures the character will render as it is written. To escape a special markdown character, add a backslash (i.e.\) immediately before the character. For example, if the content you are writing requires an asterisk*, place a backslash before the asterisk to ensure that the asterisk will be displayed correctly (i.e.*thisbecomes\*this). The use of\in the following example ensures the angled brackets will display correctly:\<and\>. - Fix syntax errors. Most software tools for authoring markdown, like VSC, will highlight syntactical errors. For example, in VSC, spelling errors are underscored by a blue colored line, and syntactical issues are underscored by a yellow colored line.
- Use a theme to help spot spelling and syntax errors. Consider using a dark colored theme for your markdown editing software to make the error flags more visible. Try different themes until you find one that helps you to spot errors easily.
- Don’t place long horizontal lines using underscores inside markdown files, for example
______________________. Horizontal lines will be added into the course content later in the process. - Remove all unnecessary trailing and leading (“white”) spaces, tabs, and empty (blank) lines. Only use empty lines, spaces and tabs where they are required syntactically or for formatting purposes.
- Don’t use double spaces after a period mark (full stop). Writing from experience, this can be a tough habit for some content authors to break!.
Bulleted lists
Add the following markdown syntax into your markdown file to create different types of bulleted lists (unordered lists).
Simple bulleted list example
For example, to make the following bullet list:

Add the following into your markdown file:
- Animal
- Fruit
- Clothing
Indented bullet list example
Add a another level to the bullet list by indenting items on the second level by two spaces.
For example, to make the following bullet list (two-level):

Add the following into your markdown file:
- Animal
- Fruit
  - Pear [Indent = two spaces]
  - Lime [Indent = two spaces]
Multilevel bullet list example
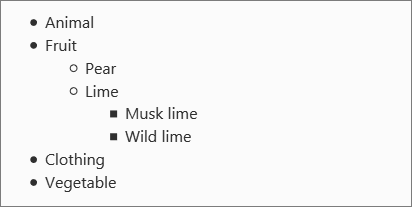
Make a complex, multilevel bullet list by indenting items on each subsequent list level by two additional spaces.
For example, to make the following bullet list (multilevel):

Add the following into your markdown file:
- Animal
- Fruit
  - Pear [Indent = two spaces]
  - Lime [Indent = two spaces]
    - Musk lime [Indent = four spaces]
    - Wild lime [Indent = four spaces]
- Clothing
- Vegetable
Markdown bulleted list quirks
- Place each item in the bullet list on a new line.
- A list must be surrounded by blank lines, i.e. a list should have a blank line before it and a blank line after it.
- Remove unnecessary spaces and blank lines from around and within a list.
- Use
-to denote each item in the bullet list. - Don’t use
*or+to denote list items. - Remove any unintended, stray
-characters from within and around the bullet list. - Use a single space between a list item marker and the item text; don’t use double spaces.
Numbered lists
Add the following markdown syntax into your markdown file to create different types of numbered lists (ordered lists).
Simple numbered list example
For example, to make the following numbered list:

Add the following into your markdown file:
1. What is a question?
1. Discuss questions with a colleague.
1. Additional numbered list item
Indented numbered list example
Add another level to a numbered list by indenting the items on the second level by four additional spaces.
For example, to make the following numbered list (two-level):

Add the following into your markdown file:
1. Answer the following two questions.
    1. Does markdown support lists [indent = four spaces]?
    1. How easy is it to create a list in markdown [indent = four spaces]?

1. Consider making a list.
Multilevel numbered list example
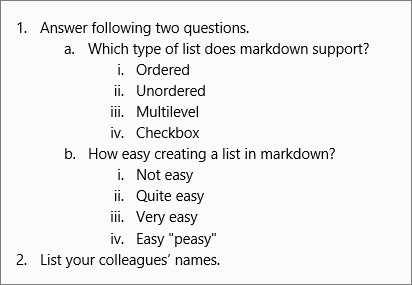
Make a complex, multilevel numbered list by adding a third level. Indent items on the third level by four additional spaces.
For example, to make the following numbered list (multilevel):

Add the following into your markdown file:
1. Answer following two questions.

    1. Which type of list does markdown support [indent = four spaces]?
        1. Ordered [indent = eight spaces]
        1. Unordered [indent = eight spaces]
        1. Multilevel [indent = eight spaces]
        1. Checkbox [indent = eight spaces]

    1. How easy creating a list in markdown [indent = four spaces]?
        1. Not easy [indent = eight spaces]
        1. Quite easy [indent = eight spaces]
        1. Very easy [indent = eight spaces]
        1. Easy "peasy" [indent = eight spaces]

1. List your colleagues' names.
Markdown numbered list quirks
- Use the number 1 to denote each item in a numbered list. Using any other character causes issues with screen readers and software tools. The correct number sequences will be applied later in the process.
- Don’t manually add numbers to lists in markdown.
- Don’t use letters to denote items in a numbered list.
- Place each item in the numbered list on a new line.
- Indent by four additional spaces for each new list level. For example, indent by four spaces for the second level, and then by eight spaces for the third level, and so on.
- Don’t use tab to indent list items.
- Don’t use more than four additional spaces to indent each list level.
- Only use empty (blank) lines around lists, and between list items, where is it syntactically required or for formatting.
Tables
Add the following markdown syntax into your markdown file to create different types of tables.
Table with header row example
For example, to create the following table with a header row:

Add the following into your markdown file:
|Table header A|Table header B|
|--------------|--------------|
|Table cell A01|Table cell B01|
|Table cell A02|Table cell B02|

*Table 1: Table caption text*
Table without header row example
It is possible to make a table without a header row in markdown.
For example, to create the following table without a header row:

Add the following into your markdown file:
|||
|--------------|--------------|
|Table cell A01|Table cell B01|
|Table cell A02|Table cell B02|

*Table 2: Table caption text*
Markdown table quirks
- Place a pipe character (i.e.
|) at the beginning and the end of the data in each table cell. - For tables with a header row, the first row will be the table header row
- Each table row requires a new line.
- Add at least 3 dashes to separate the cells in the header row from the rest of the table.
- Outer pipes (
|) are optional. - Be mindful of malformed tables.
- Always add a new empty line before a table.
- Always add a new empty line after a table.
- Use spaces, not tabs to add space within a table.
- Remove any stray tabs and spaces from inside table cells.
- Avoid using spaces between the text in a cell and the table cell wall.
- Use spaces minimally for empty table cells.
- Use an asterisk
*inside a table cell for bullet points, where the cell is empty. - Don’t use HTML, CSS, or paste copied bullet points into table cells.
- Apply bold text to table headings, where required.
- Tables must have caption text below the table.
- Table caption text must be italicized.
- Always add a new empty line before a table caption (i.e. between the last row of the table and the caption text).
Graphics and images
Add the following markdown syntax into your markdown file to link to graphics and images using different layout options (wrapping).
In-line image example
To embed an image within text (in-line), like in the following example:
 Paragraph text.
Add the following into your markdown file:
 Paragraph text.
Stand alone image example
To display an image like a (“stand alone”) paragraph of text, as in the following example:

Figure 1: Image figure caption text
Paragraph text.
Add the following into your markdown file:

*Figure 1: Image figure caption text*
Paragraph text.
Markdown image quirks
- All images must have “alt image text”.
- Alt image text should use mixed casing, as per standard sentence case (i.e. not all lower case and not all upper case).
- All standalone images must have a figure caption.
- Do not hot-link to an external image by using a URL, even if the image file is on a Microsoft website.
- Copy all images you use into the media folder that corresponds to the module you are working on, then link to the image in the media folder. The process for adding images to a media folder is explained in the guide Add/ edit images in VSC).
- If you want a spot illustration/ reader aid to display in-line with the text (i.e. as an initial letter), don’t put an empty line between the image and the paragraph text.
- Use a suitable name for the image files you add, like
m01-l04-image.png, so that other contributors can identify the module that an images belongs to.
Hyperlinks
To create a hyperlink, for example, to the Microsoft Docs Website, add following markdown syntax into your markdown file.
[Microsoft Docs Website](https://docs.microsoft.com/)
Markdown hyperlink quirks
- Don’t use exposed URLs (i.e. do not make the URL in the link visible in the content, unless making the URL visible is essential to the purpose of the link). When necessary, use exposed URLs in the format
[www.microsoft.com](https://www.microsoft.com). - Don’t include language specific references in the URL, where possible, like en-us for example.
Code blocks
If you use example of computer code (code blocks) in your markdown file, use “syntax highlighting” by specifying the computer language the code is written in to ensure the code displays correctly.
For example, to display the following block of Ruby language programming code:

Add the following into your markdown file:
    ```ruby
    require 'redcarpet'
    markdown = Redcarpet.new("Hello World!")
    puts markdown.to_html
    ```
Code block quirks
- Specify the computer language at the start of the code block to enable highlighting for a particular syntax, like powershell, bash, python, html, yaml, sql and shell for example.
- If you don’t add a language name, syntax highlighting will not be applied.
Note: A list of supported languages for code blocks, and how to specify them in markdown, is available from the page GitHub linguist languages.yml. Further information about code blocks is available from the page Creating and highlighting code blocks.
Smart apostrophes and quotation marks
Only use the apostrophes and quotation marks from VSC.
If you paste formatted text into VSC, copied from a Microsoft Word document, for example, the text might contain “smart” (curly) apostrophes or quotation marks. These pasted characters must be changed into the apostrophes and quotation marks used by VSC. Otherwise, anomalies like It’s can appear later in the process when a text is published.
If you must use non-VSC apostrophes and quotation marks, encode them in markdown to ensure they render correctly during publication.
The following is a table of “smart” apostrophes and quotation marks and their corresponding markdown encodings.
| Character | Encoding | Rendered example |
|---|---|---|
| Left (opening) double quotation mark | “ |
“ |
| Right (closing) double quotation mark | ” |
” |
| Left (opening) single quotation mark | ‘ |
‘ |
| Right (closing) single quotation mark or apostrophe | ’ |
’ |
Table shows “smart” apostrophes and quotation marks (left), their corresponding markdown encodings (center), and examples of how the characters render in markdown (right).
Appendices
Check the following supplementary Appendices for more details and context.
