General project workflow
This guide provides an overview of the flow of work (or workflow) throughout a typical project lifecycle.
Note: To understand the project’s workflow, you must be familiar the terminology and concepts associated with version control and how they apply to the project. The terminology and concepts used in this guide are described on the page Terminology and concepts and summarized in the Appendix C: Glossary.
Prerequisites
Before you proceed complete the following:
Topics in this guide
- Simplified project workflow
- Comprehensive project workflow
- Key points to remember about the project workflow
Video
The following video covers the contents of this guide. Watch the video (optional), read this guide or both. If you cannot access the video, contact your project manager.
Simplified project workflow
The following diagram shows a simplified version of a typical project’s workflow.

The previous workflow diagram applies to most projects, but you should also consult with your project manager to ensure that you:
- understand the specific requirements, structure and design for the course you are working on (like main stakeholders, intended audience, number of modules, etc.).
- know where the files and resources that you need to complete your work are stored and how to access them. For example, does the project use Teams, SharePoint, GitHub, Azure DevOps, etc.
- have access to the resources you need to complete your work.
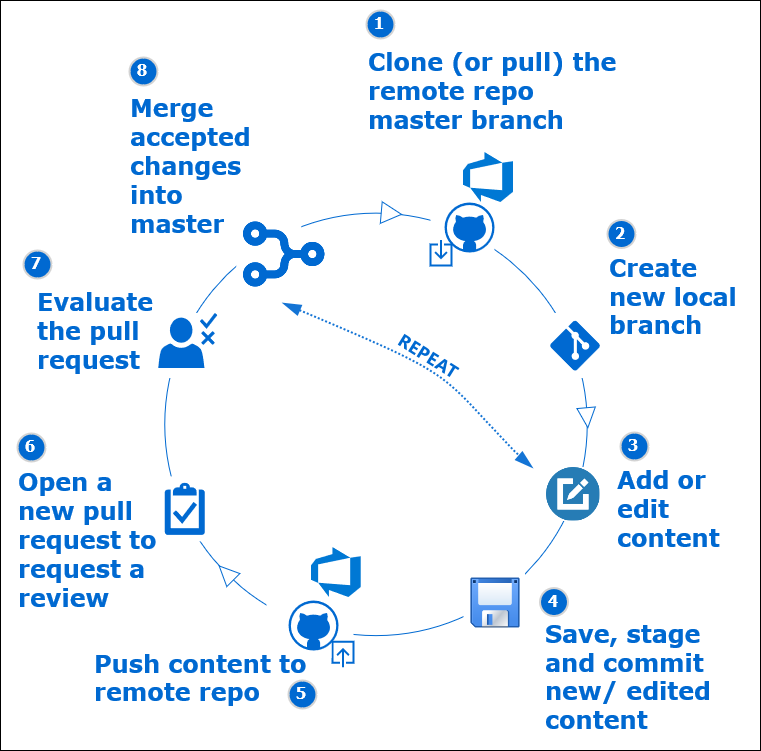
Comprehensive project workflow
The following diagram uses the terminology associated with Git and version control (explained in the guide Terminology and concepts) to provide a more comprehensive representation of the project’s workflow.
Key points to remember about the project workflow
The following points summarize the main aspects of the project’s workflow. Clarify the details of how the workflow applies to the course you are working on with your project manager.
- Each author develops content on their own (Authoring) branch
- An author must create a new Authoring branch for each module they work on
- Authoring branches are created from master
- A reviewer creates a new branch for each review they conduct (“Reviewer branch”), and on a per module basis
- Reviewer branches are generally created from master, but you should check which processes apply to the review you are conducting or requesting with your project manager
- Branches created by authors and reviewers must adhere to the project’s branch naming convention. For specific details read Create new branch
- All proposed changes to content must be added to a pull request (PR). Create PRs as soon as you can, to facilitate reviews earlier in the process. See the page Create pull request for more details
- Authors and reviewers should work together to evaluate and discuss the changes that are proposed within a pull request. Additional details are available from the page Work in a pull request
- Generally, a reviewer will merge a PR whenever they complete a review. But, always ask your project manager about the specific processes that apply to the review you are conducting or requesting
- Typically, a reviewer will delete their Reviewer branch after a PR is merged, i.e. whoever created a branch deletes it. Again, check which specific processes apply to the review you are conducting or requesting with your project manager
- When all content for a module is fully completed, the repo Admin creates a PR to merge all branches back into master
Appendices
Check the following supplementary Appendices for more details and context.