Terminology and concepts
This guide explains the key technologies, terms and concepts that are relevant to the content development and review processes described throughout this website.
Authors, reviewers and other contributors will find this guide useful to understanding how Version Control, Git, branching, Pull Requests, and related concepts, are used to manage the flow of work (or workflow) throughout a typical project’s life cycle.
Note: The terminology and concepts described in this guide are summarized on the webpage Appendix C: Glossary.
Prerequisites
Before you proceed complete the following:
Topics in this guide
- Overview of version control
- Introduction to Git, GitHub and Azure DevOps repositories
- How changes to files are tracked using branches
- Using pull requests to share your work
- How branching and pull requests apply to the content review process
Overview of version control
The project (course) you are working on contains many files. For example, within a project, there might be image and markdown files for each Student Guide and Lesson Plan, etc. As the project progresses, the project files change as contributors to the project add, edit or remove files, text and image content.
Version Control refers to managing the changes made to the project’s files whilst ensuring that multiple contributors can work with the correct (or most current) version of the project’s files concurrently. Specialized software applications, like Git, implement version control by keeping track of the changes made to every file within a project by each contributor.
Note: For more information about version control and Git see What is version control?
Introduction to Git, GitHub and Azure DevOps repositories
Git allows you to compartmentalize a set of files on your computer within a Repository (or repo). For example, the set of files for the course you are working on can be contained within a Git repo. A Git repo can store different versions of the same file, like a text file, a document or an image file. Even when there are different versions of the same file in a Git repo, each version of the file can use the same filename and file contents.
Whenever you modify a file in a Git repo, like editing the words in a text file, you can tell Git to set the modified version of the file as the “correct” (or current) version. In other words, Git allows you to set which version of a file should be used.
Git implements version control by keeping track of the changes you make to a file in a repo. If there are multiple files in the repo, Git tracks the changes you make to every file.
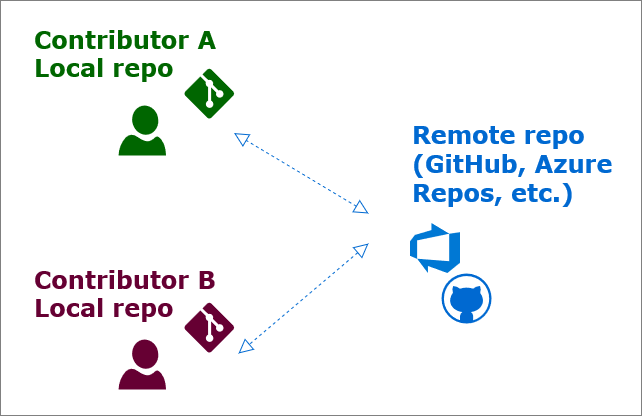
Sharing a repo with multiple contributors on GitHub or Azure DevOps
You can upload a Git repo from your computer to the GitHub website or to Azure DevOps. By uploading a repo, you can share the repo’s contents with others. Other contributors can then download (or clone) the shared repo, modify the files in the repo, and upload (or push) the modified files back to GitHub or Azure DevOps.
A repo on your computer or network is called a local repo. A repo on another computer, like a GitHub or Azure DevOps server, is called a remote repo. Services like GitHub and Azure DevOps make it possible for multiple contributors to clone the same remote repo onto their (local) computers. Git will track the changes made to every file in each contributor’s local repo. Contributors then push changes from their respective local repos back to the remote repo to share their work.
How changes to files are tracked using branches
A repo can contain different versions of the same files. Within a repo, each version can be stored in its own compartment called a branch. Branches allow each contributor to view and edit files in an isolated environment, without affecting the files of other contributors. You create a branch so that your edits will only change the files on your branch.
Note: More information about using branches is available from the webpage About branches.
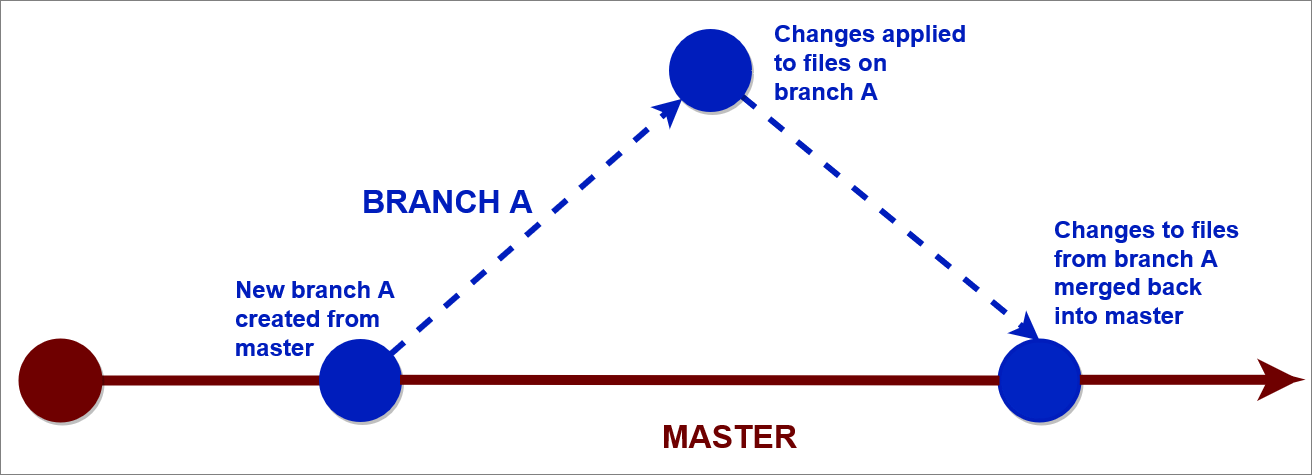
Master branch
A common practice is to maintain a master branch within a repo, like “clean copy”. A contributor to the repo can create a new branch from the master (or any other) branch. For example, authors and reviewers can create their respective “Authoring” and “Reviewer” branches from the master branch.
The contents of all contributors’ branches will be combined with (or merged back into) the master, after all development and editing work has been completed. Then, the finalized files from the master branch will be converted into Microsoft Word documents (DOCX).
Services like GitHub and Azure DevOps make it possible to share and combine the work of many contributors, from across multiple branches and local repos, into the master branch of a single remote repo.
Note: For more information about creating a new branch, read Create new branch.
The project’s remote repo
The files for the course you are working on are stored in a remote GitHub or Azure repo. To add or edit course content, you must clone the project’s remote repo to your computer and create a new branch to work in. Ask your project manager for the URL link to the project’s remote repo, and follow the guides in the Workflow and processes section of this website that are relevant to your role to help you develop your course content.
Using pull requests to share your work
Whenever you add or edit content on your branch, save your changes and add your changes to the remote repo in three steps. The three steps are:
- Staging: adds new or updated files to a holding or staging area in the current repo.
- Committing: puts or commits changes made to staged files onto the current repo’s file history/ timeline.
- Pushing: sends or pushes changes committed to the current repo to the remote repo (e.g. from a local repo on your computer to a remote repo on GitHub or Azure DevOps).
Stage and commit the changes you make to files in your local repo regularly, then push your changes to the remote repo. Regularly committing and pushing your changes creates a backup of your work, and makes your work visible to other contributors. In general, make small and regular commits, rather than one large commit at the end.
Note: More information about Saving changes is available on the Atlassian/ BitBucket web site.
Pull requests and merging
When you have finished modifying files on your branch, and you have staged, committed and pushed your changes to the remote repo, your changes must be added (or merged) back into the originating branch. For example, changes made on an author’s or reviewer’s branch can be merged back into master.
You must ask to have the contents of your branch merged into another branch, and this requires opening a new Pull Request (PR). A pull request is a request to approve merging the contents of one branch into another. For example, an author might work on their own Authoring branch to add new images into a lesson. By opening a new pull request, the author can ask another contributor (like a reviewer) to evaluate the new images before the images are added to the master branch.
Note: Read more about GitHub PRs on the page About Pull requests.
How branching and pull requests apply to the content review process
All content developed for the project must be reviewed at various stages in the project’s life cycle. For example, some projects require Educational, Technical, Instructional Design and Inclusively reviews, as well as Copy Editing. How and when the reviews are conducted can vary between projects. Ask your project manager about the specific review processes that apply to the course you are working on.
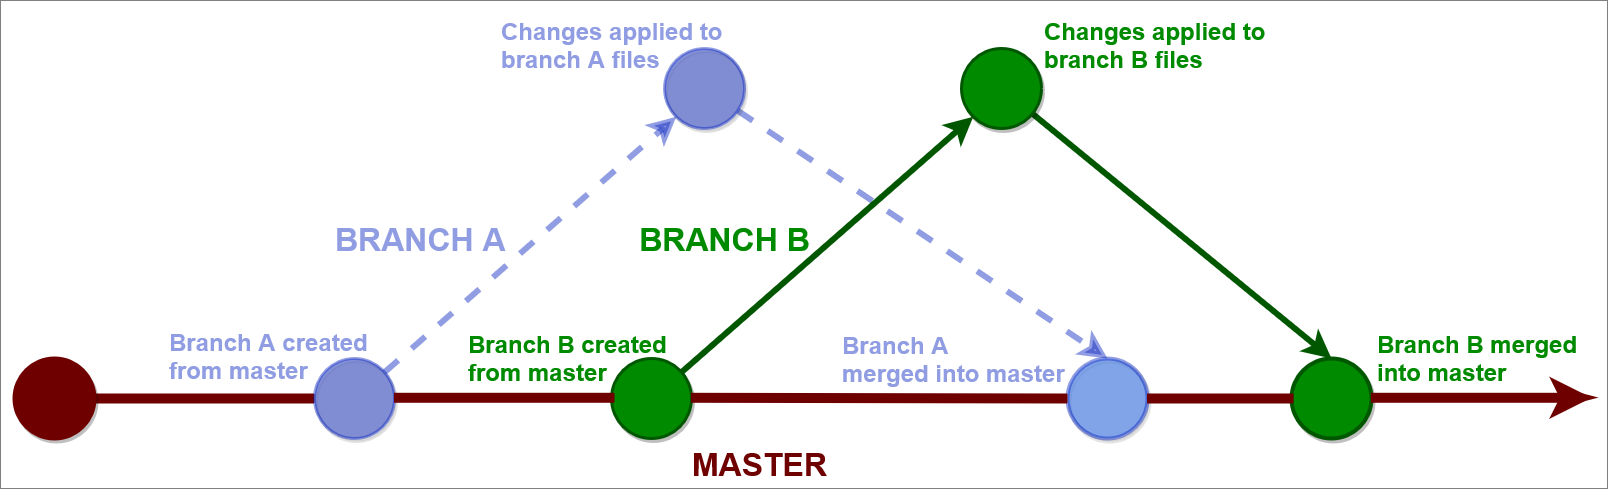
The following image illustrates how branching, pull requests and merging apply to the review process in general.

Note: The previous image is not intended to illustrate the full details of how branching, pull requests and merging apply to the review process. The image shows the general review process instead. The review process can vary in accordance with project requirements and the type of review.
For example, changes made during a Technical Review might be applied directly to an author’s branch by the Technical Reviewer. Another reviewer will apply changes to content on their own reviewer branch, then merge their reviewer’s branch back into master. Furthermore, some reviewers might conduct reviews or apply edits outside of the repo. Ask your project manager about the specific review processes that apply to the course you are working on.
The following diagram exemplifies some of the branching structure required for single module, as part of a typical review process.

Note: The previous image provides an example of how branching applies to the review process in general. The branching requirements can vary between projects. Ask your project manager about the specific branching requirements for the course you are working on.
Appendices
Check the following supplementary Appendices for more details and context.