Install Git client
This guide describes how to download and install the Software Freedom Conservancy (SCM) Git client. The Git client is required for running Git commands in the Visual Studio Code (VSC) editor.
Note: This guide is for users of Windows operating systems; support for Linux and MacOS is included (where possible).
Prerequisites
Before you proceed complete the following:
Topics in this guide
Download and install the SCM Git client
Complete the following steps to download and install the SCM Git client.
-
Close the VSC editor, if you have it open.
-
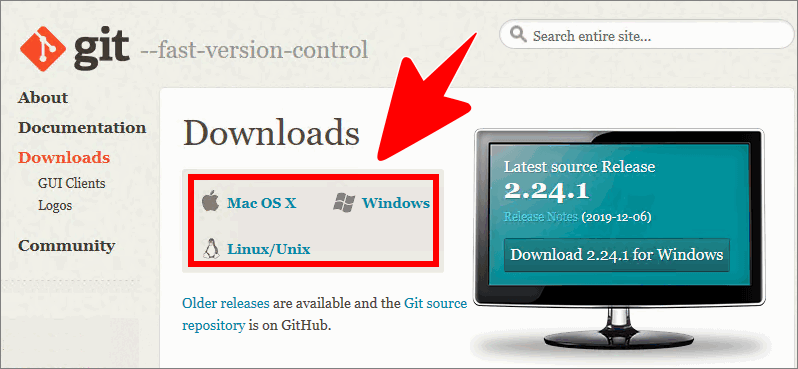
Open a web browser and go to https://git-scm.com/download/.
-
Choose a version of the SCM Git client that is appropriate to your computer’s operating system platform.
-
Download the Git client installation file and save it to a suitable location on your computer.
-
Go to the location on your computer where you saved the Git client installation file, and run the installer as administrator to start the installation.
Note: For step-by-step detailed installation instructions, follow the guide Use Git with Visual Studio Code. Refer back to the Git with Visual Studio Code guide when you need to.
-
Choose Next to accept the terms of the software license agreement.
-
Continue selecting Next to accept each of the default options for the Destination Location, Components and Start Menu folder. Alternatively, specify your preferences and select Next to continue.
-
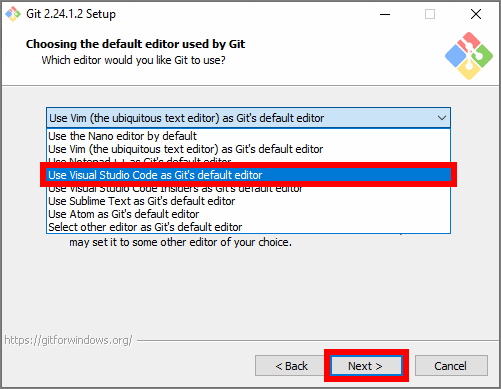
On the Choosing the default editor used by Git page, use the dropdown menu to select Use Visual Studio Code as Git’s default editor, then choose Next.
-
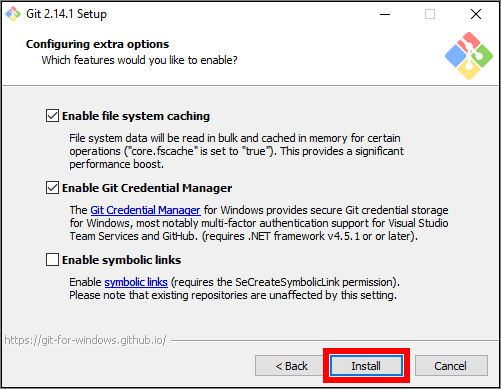
Continue to select Next to accept the default settings for the remaining installation options. As you go, verify that the following options are selected:
- Git from the command line and also from 3rd-party software
- Use the OpenSSL library for HTTPS backend transport connections
- Checkout Windows-style, commit Unix-style line endings
- Use MinTTY (the default terminal of MSY32)
- Enable file system caching
- Enable Git Credential Manager
- Un-check (to disable) the option to Enable symbolic links
- Un-check (to disable) the option to Enable experimental, built-in add -i/ p
Note: Alternatively, you can specify your preferences for each option and select Next to continue. You can also modify the settings after the installation has completed, if you need to. Some installation and configuration options may vary according to your operating system and the Git client version you are installing. In all cases, accept the default settings and values as indicated previously.
-
Select Install, at the end of the Git client Installation Wizard, to begin installing the Git client.
Note: The Install button in the Git client Installation Wizard window may be different to what is shown in the following image. Continue regardless by choosing Install.
-
When the Git client installation has completed, un-check (to disable) the option to View Release Notes and choose Finish.
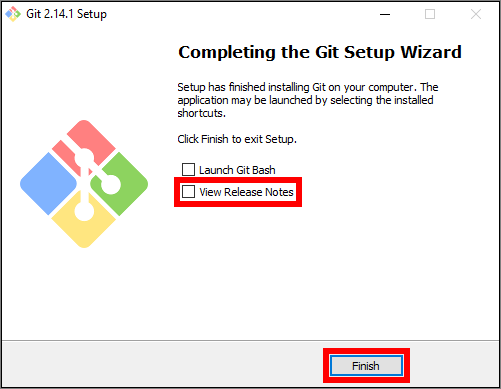
You have downloaded and installed the SCM Git client successfully.
Appendices
Check the following supplementary Appendices for more details and context.