This guide describes the general content authoring process for a typical AzDevOps project.
Note: The authoring process described in this guide is generalized, and is not intended to capture the authoring process entirely. The authoring process varies between projects, and according to the type of review you submit content for. In this guide, Topic 3 describes Submitting your content for review. Information about specific review processes is available from the guides in the section Workflow and processes. If you’re unsure about the content authoring process, consult your project manager.
Topics in this guide
- About the content authoring process
- Authoring branch naming convention
- Submitting your content for review
- Key points about the content authoring process
About the content authoring process
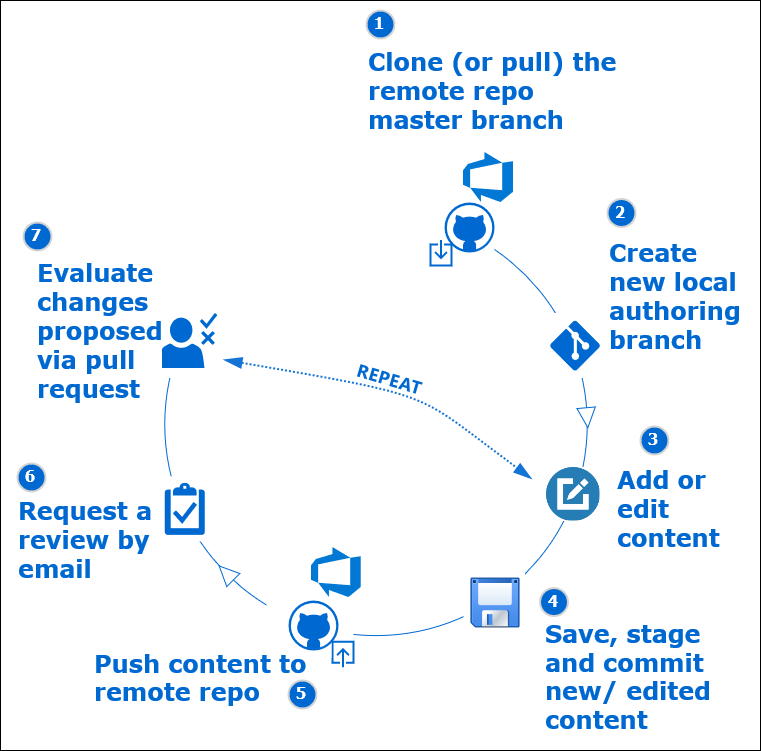
The following diagram, and accompanying steps, describe the content authoring process for a typical project.
-
Download, install and configure the required software according to the guides in the Install software section of the WayPoint Documentation website.
-
Use the Visual Studio Code (VSC) editor to download (or clone) the project’s AzDevOps repository onto your computer by following the guide Download course files (clone repo). The cloned repository (repo) that you create on your computer is your local repo.
-
Open VSC, and create a new branch in your local repo by using the guide Create new branch. The new branch is your local authoring branch.
Note: Apply the branch naming convention
m <module number> auth <author's surname>to your new authoring branch, as described in Authoring branch naming convention.Generally, an author creates a branch from the master branch of the project’s AzDevOps repo by using the guide Create new branch. However, depending on the project’s requirements, author branches might be based on another branch. If you’re unsure, ask your project manager.
-
In VSC, work on your local authoring branch to create a new markdown file, or open an existing markdown file to edit, like an Author outline.
-
In VSC, add your text content into the markdown file by following the guide Add/ edit markdown in VSC. Ensure that your content adheres to the Markdown syntax guide.
-
In VSC, where appropriate, add image links into the markdown file by following the guide Add/ edit images in VSC.
Note: For each new image link that you add into the markdown file, upload a corresponding image file (PNG) to the appropriate media directory by following the guide Add/ edit images in VSC.
-
In VSC, save, stage, and commit the changes you make to the markdown file on your local authoring branch by using the guide Send (push) files.
-
Use VSC to upload (or push) your local authoring branch, with your file changes/ additions, to the project’s AzDevOps repo by following the guide Send (push) files.
-
Send an email to the appropriate reviewer requesting a review of the content that you pushed to the project’s AzDevOps repo.
Note: The topic Submitting your content for review provides details about submitting content for review.
-
The reviewer will create a new Pull Request (PR) for combining your new/ modified content into the project’s AzDevOps repo by using the guide Create pull request.
Note: For some projects, the content author might be required to open a PR. If you’re unsure, check with your project manager. General information about pull requests is available from the guide Pull requests overview.
-
When the reviewer responds to your email, evaluate any corrections/ changes to your content that the reviewer proposes, and determine which corrections/ changes to apply, by following the guide Work in a pull request.
-
If necessary, in VSC, work in your local repo to apply any corrections/ changes that you’ve agree with the reviewer.
-
Repeat steps 4 to 12 for each review type, until you and the reviewer have made all the necessary changes to your content.
-
When all necessary changes have been applied, the reviewer will merge your authoring branch into the project’s AzDevOps repo (usually by merging your authoring branch into the master branch).
Note: For some projects, the content author might be required to merge the PR. If you’re unsure, check with your project manager.
You’ve followed the content authoring process for a typical project successfully.
Authoring branch naming convention
Each author must work in their own authoring branch. A separate authoring branch for each module is also required. This approach keeps the content separated per author, at each stage in the process, and on a module-by-module basis.
Generally, an author creates a branch from the master branch of the project’s AzDevOps repo by using the guide Create new branch. However, depending on the project’s requirements, author branches might be based on another branch. If you’re unsure, ask your project manager.
When you create a new authoring branch, your branch name should describe your branch’s content and make the branch’s purpose, and owner, clear to other contributors.
Authoring branches use the following naming convention (all lower case):
m <module number> auth <author's surname>:
- The prefix
mis for “module”. <module number>refers to the module number that the file you’re authoring belongs to.authis a short code for “content authoring” (i.e. the stage in the process the file is at).- The author’s
<surname>is added as a suffix to distinguish the author’s work from other contributors.
Example authoring branch name
The following explains how the example authoring branch name m6-auth-lee is constructed.
mis an abbreviation for “module”.6is the number of the module that the file belongs to.authis a short code for “content authoring”.leeis a reference to the author’s surname.
Putting the previous items together results in the authoring branch name m6-auth-lee.
Submitting your content for review
All content developed for a project must be reviewed at various stages in the project’s life cycle. Most projects require Technical, Educational, Instructional Design and Inclusively reviews, as well as Copy Editing, and Compliance and Plagiarism Testing (among others). Typically, a content author initiates a review by sending an email to the reviewer to request a review.
The author’s email must provide the following details:
- Module number: The module number that the file for review belongs to.
- Task type: The type of review required (i.e. technical review, instructional design review, copy edit, etc.).
- Source branch name: The name of the branch that the file for review is on. This is also referred to as the compare branch, originating branch, or authoring branch.
- Target branch: The name of the branch that the authoring branch will be merged into, after the review is completed. This is also referred to as the base branch, and examples include the master or originating branch.
How, and when, authors submit their content for review can vary in accordance with a project’s requirements, and type of review. For example, changes made during a Technical Review might be applied directly to an author’s branch by the Technical Reviewer. An Instructional Design (ID) reviewer might work on their own ID reviewer’s branch, to change an author’s content, and then merge their ID reviewer’s branch into master. Furthermore, other reviewers might conduct reviews, or apply edits, outside the repo’s branches.
Note: Ask your project manager about the specific review processes that apply to the course you’re working on. Information about specific review processes is available from the guides in the section Workflow and processes.
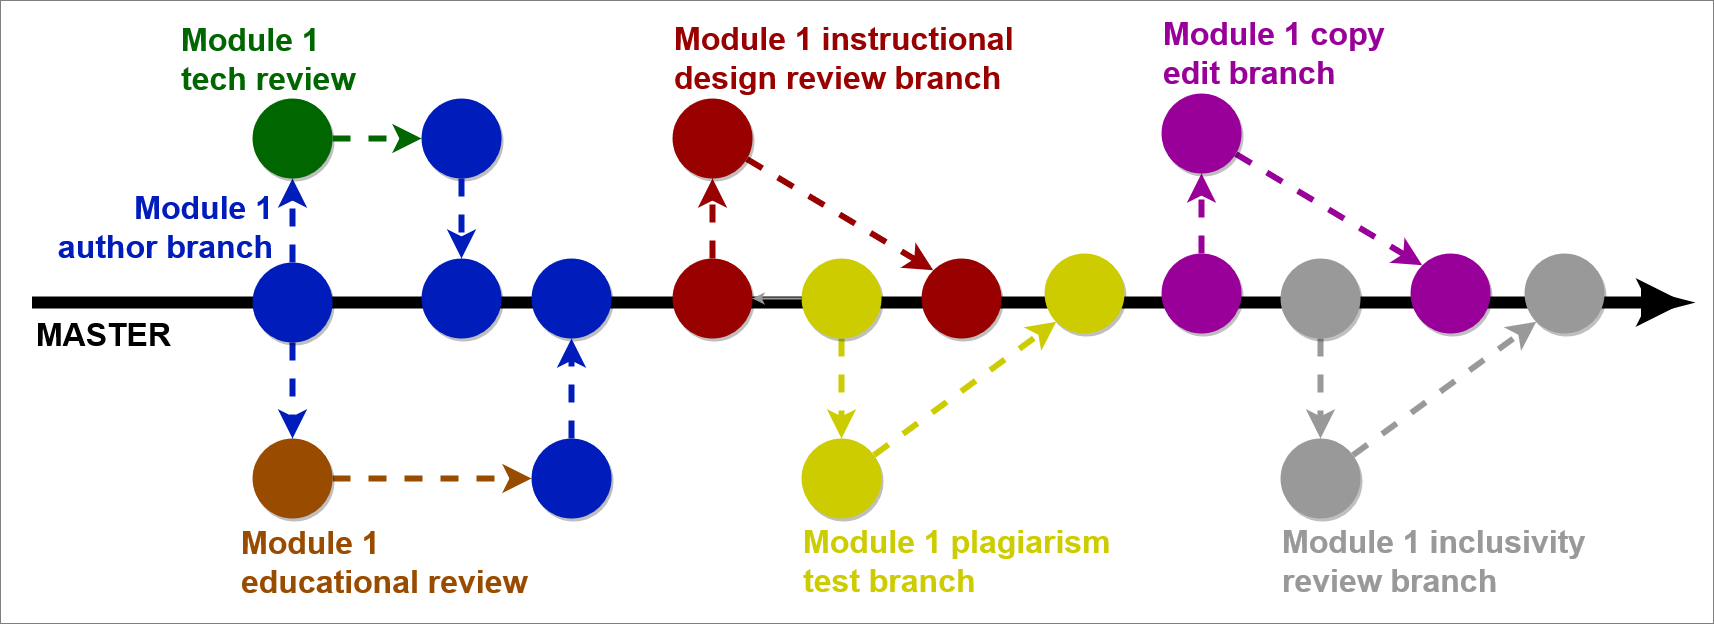
The following diagram exemplifies the branching structure required for single module, as part of a typical review.
Key points about the content authoring process
The following points summarize the content authoring process. Clarify details about how the workflow applies to the project you’re working on with your project manager.
- Each author develops content on their own authoring branch.
- An author must create a new authoring branch for each module they work on.
- Authoring branches are usually created from the master branch of the project’s remote repo.
- Authoring branches must adhere to the project’s branch naming convention.
- For reviews, all new content and proposed changes to existing content must be added to a pull request (PR).
- Request reviews and get PRs created as soon as you can, to facilitate reviews earlier in the process.
- Authors and reviewers should work together to evaluate and discuss the changes proposed within a pull request.
- Reviewers usually create and merge PRs (into master or into the author’s branch).
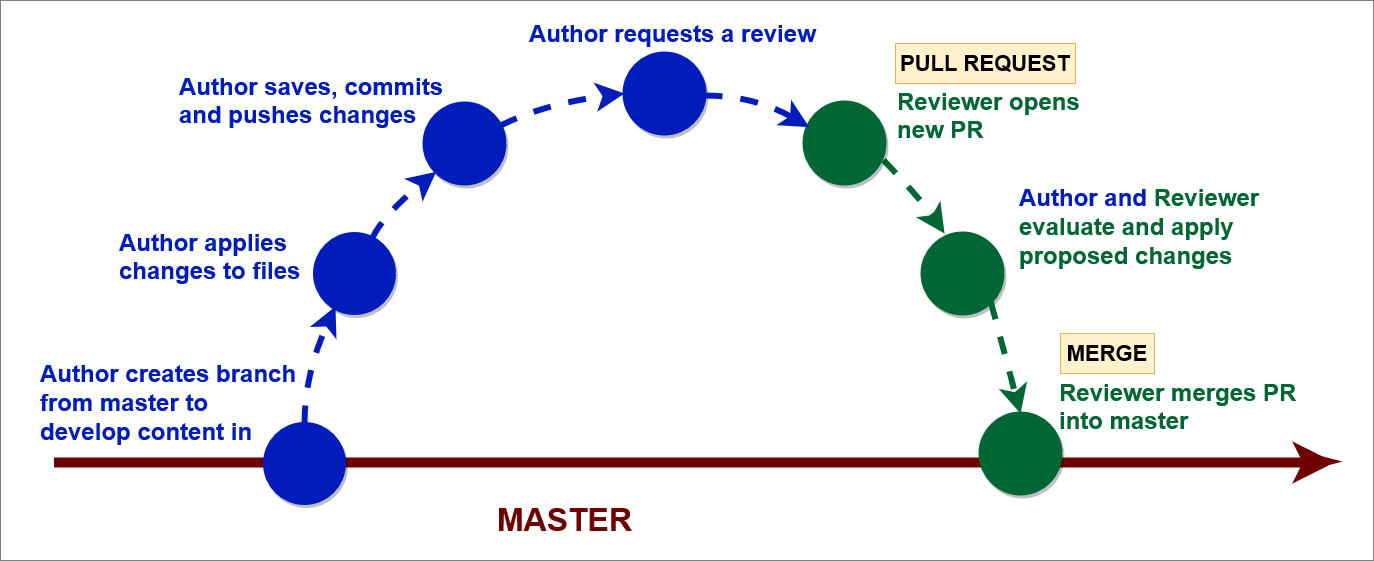
The following image illustrates how branching, pull requests, and merging apply to the general authoring and review processes.
Appendices
Check the following supplementary Appendices for more details and context.