This guide describes the general Instructional Design (ID) review process for a typical project.
Note: The ID review process described in this guide is generalized and is not intended to capture the process entirely. The process can vary between projects and you should ask your project manager about the specific review processes that apply to the course you are working on.
Prerequisites
Before you proceed complete the following:
Topics in this guide
- How an ID review is initiated
- Steps required to conduct an ID review
- ID review branch naming convention
- Key points about the ID review process
How an ID review is initiated
A content author, or subject matter expert (SME), initiates an ID review by sending an email to the ID reviewer to request an ID review.
Note: An ID review is usually requested when the author has completed content for a full course module. However, depending on the project’s requirements, an author might request a review whenever they’ve developed a predetermined unit of content, like a lesson, topic or other component. Ask your project manager about the units of content used for reviews that apply to the project you’re working on.
The author’s email provides the ID reviewer with following details:
- AzDevOps username. The content author’s AzDevOps account username.
- Source branch name. The name of the branch that contains the file(s) for review.
- Module number The module number that the file(s) for review belong(s) to.
- File name The name(s) of the file(s) to be reviewed.
- Task type. The type of review required (i.e. ID review).
Note: Files for ID review are usually on the master branch of the project’s AzDevOps repository (remote repo). However, depending on the project’s requirements, the files for ID review might be on another branch, like an authoring branch. If you’re unsure, ask your project manager.
Steps required to conduct an ID review
The following steps are required to conduct a general ID review as part of a typical project.
-
When you receive an email from a content author requesting a review, note the names of the files to be reviewed, and the name of the branch that the files are on.
-
Use the Visual Studio Code (VSC) editor to download (or “clone”) the project’s AzDevOps repo onto your computer by following the guide Download course files (clone repo). The cloned repo you create on your computer is your local repo.
Note: If you already have a local repo with the course files, update the contents of your local repo using the
git pullcommand by following the guide Update branch (pull). -
In VSC, to create a new ID reviewer’s branch, select the branch icon from the VSC status bar (bottom left), and choose + Create new branch from….
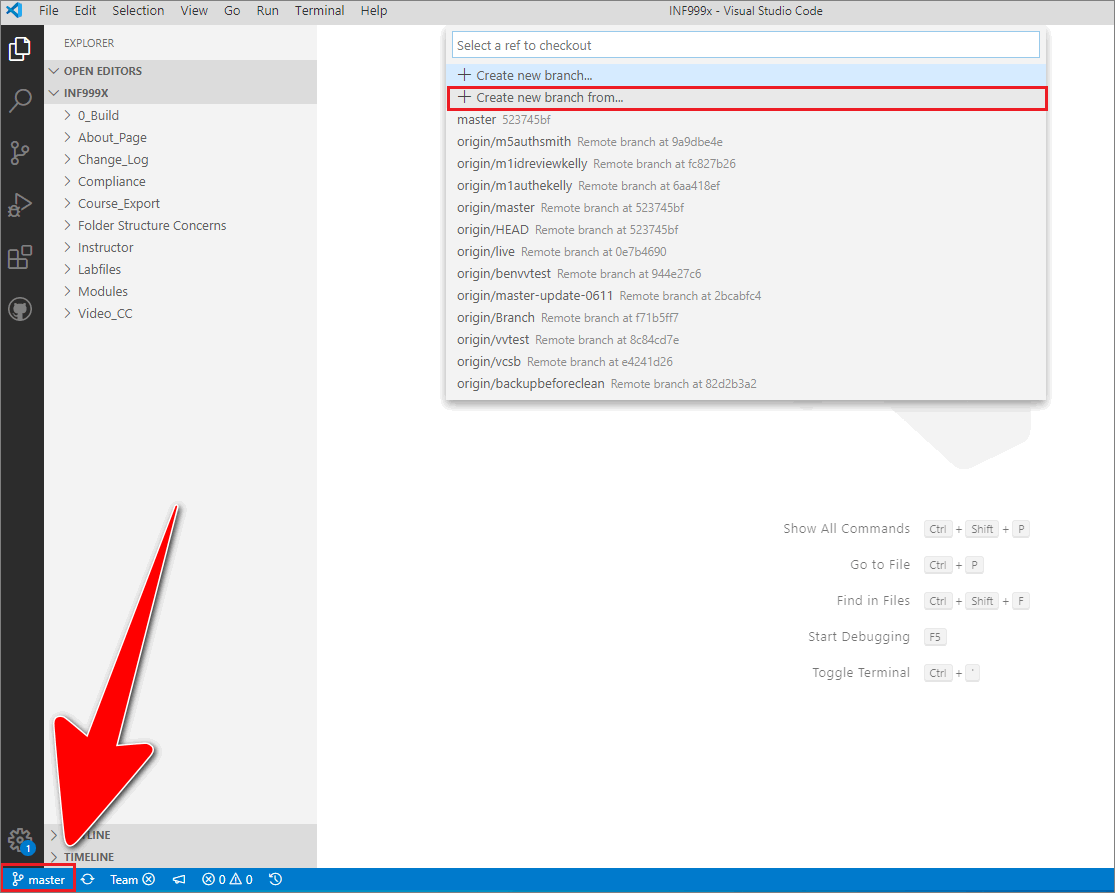
-
Enter a name for your ID reviewer’s branch.
Note: Apply the branch naming convention
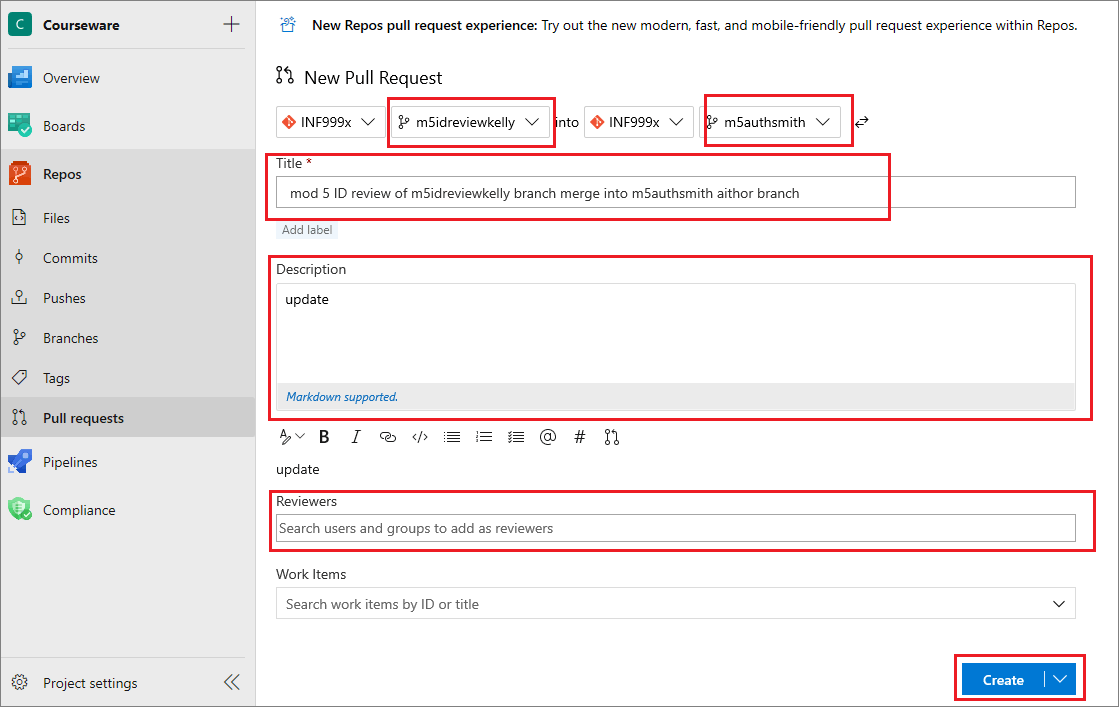
m <module number> idreview <id reviewer's surname>to your new branch, as described in ID review branch naming convention. For example, in the following image, the ID reviewer’s branch is named m5idreviewkelly.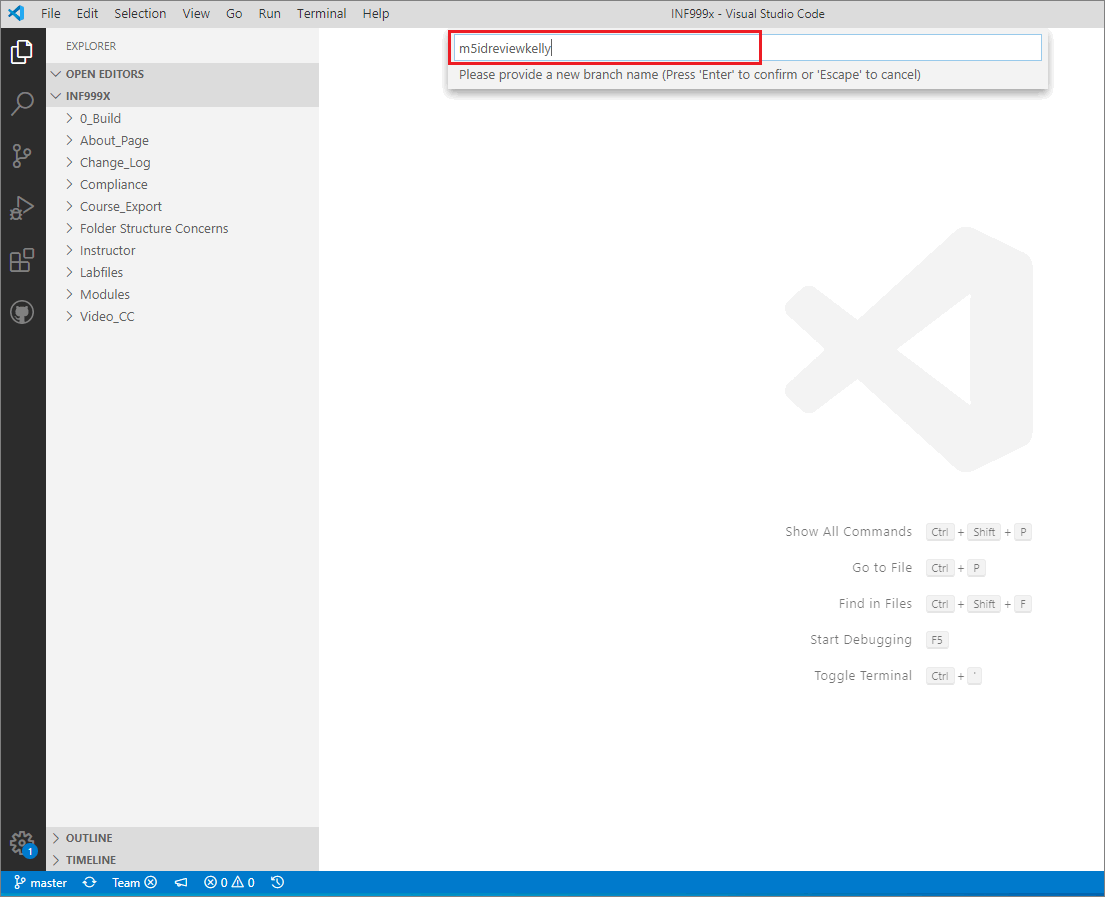
-
In the prompt to Select a ref to create the
<ID reviewer's>branch from, choose the branch that your ID reviewer’s branch will be based on.For example, in the following image, the ID reviewer’s branch named m5idreviewkelly is based on the authoring branch named m5authsmith.

-
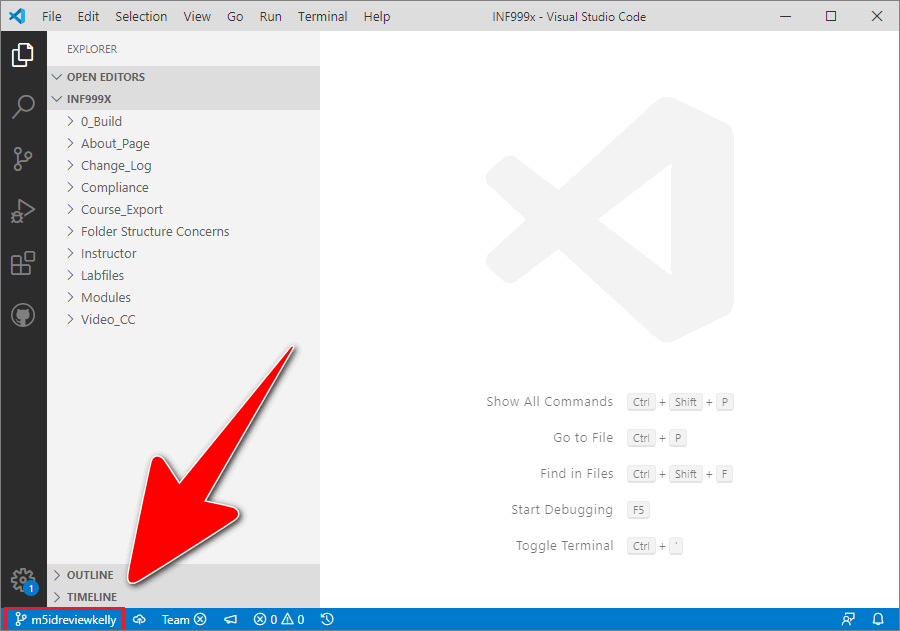
Verify that the VSC status bar indicates that VSC has switched focus to your new ID reviewer’s branch.
For example, in the following image, the VSC status bar indicates that VSC is switched to the ID reviewer’s branch named m5idreviewkelly.
-
In VSC, on your local ID review branch, open the first markdown file for review, and review the instructional design of the file’s contents according to WayPoint Ventures’ guidelines.
-
In VSC, apply, save, stage, and commit any necessary changes/ corrections you make to the markdown file by using the guide Send (push) files.
-
Push the file containing your changes to AzDevOps by following the guide Send (push) files.
Note: Push to AzDevOps regularly, for example after you’ve reviewed a suitable unit of content, like a lesson or single file. Do not wait until you’ve reviewed all of the files before pushing.
-
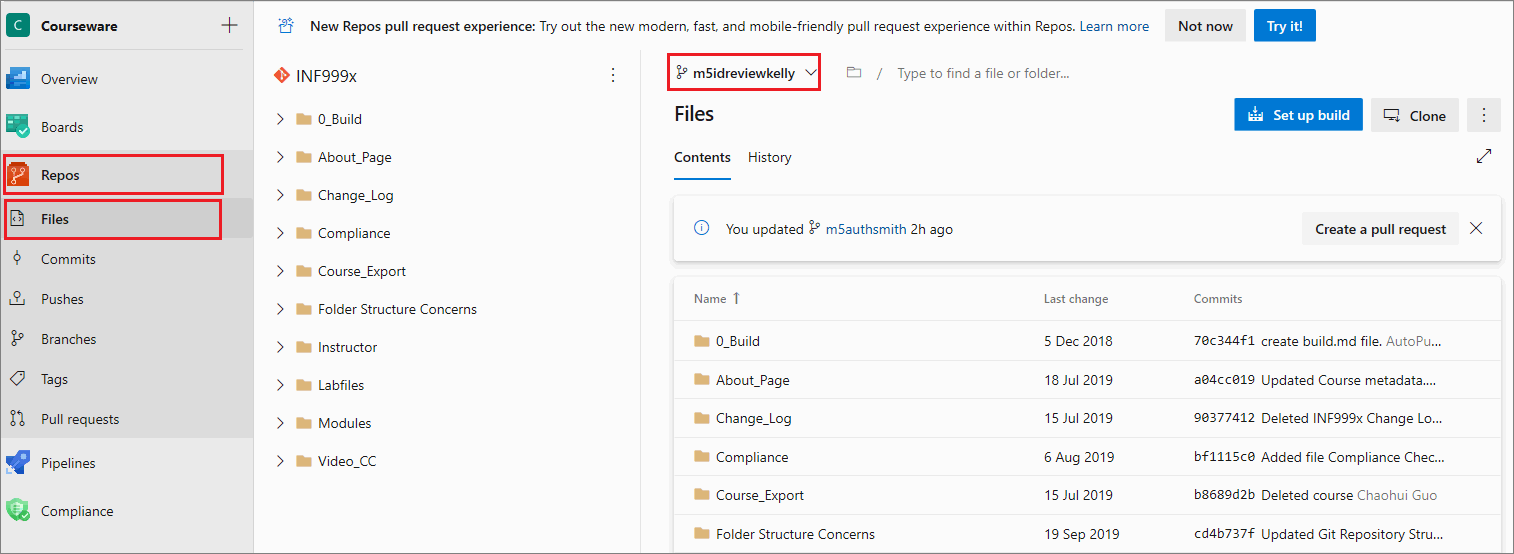
Verify that the edited file you pushed is on AzDevOps.
In a web browser, access the project’s AzDevOps repo by following the guide View course files in web browser.
In AzDevOps, select Repos > Files, use the dropdown to choose your ID reviewer’s branch, go to the file you pushed, and then verify that file contains your changes/ corrections.
-
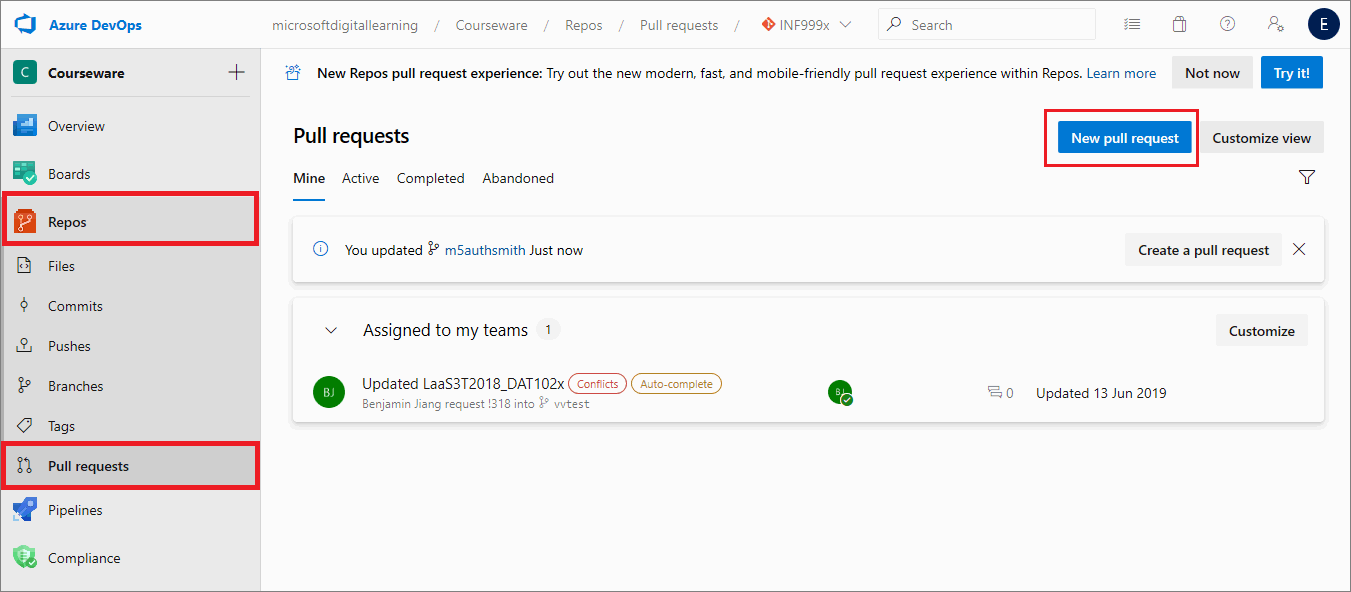
In AzDevOps, open a new pull request (PR).
Select Repos, then choose Pull requests, and select New pull request.
Note: Keep the new PR open (i.e. do not merge the PR yet). Keeping the PR open allows you to apply subsequent changes necessitated by the review process. If you make further changes to the files on your ID review branch, and push them to AzDevOps, the changes will be “rolled into” the open PR.
General information about PRs is available from the guide Pull requests overview.
-
On the New pull request page, add the following information to configure the PR, and when you’ve finished, choose Create.
- Source and Destination branches: Set the dropdowns to merge your ID reviewer’s branch into master branch. Some projects require merging the ID reviewer’s branch into the originating author’s branch. Ask your project manager which branch to merge into. For example, in the following image, the PR is set to merge the ID reviewer’s branch named m5idreviewkelly into the authoring branch named m5authsmith.
- Title: The PR’s title should describe the PRs purpose. For example, mod 5 ID review on m5idreviewkelly branch merge into m5authsmith author branch.. To describe the PRs purpose, add the following information into the PR title text field:
- number of the module that the file you’re reviewing belongs to
- type of review you’re conducting (i.e. id review)
- name of the id reviewer’s branch you’re merging from
- name of branch to merge into
- Description: Enter a brief description of the PR. For example, id review updates
- Reviewers : Select the author’s AzDevOps username, and add the AzDevOps usernames of any other reviewers or relevant stakeholders.
-
Propose or discuss a change/ correction using comments.
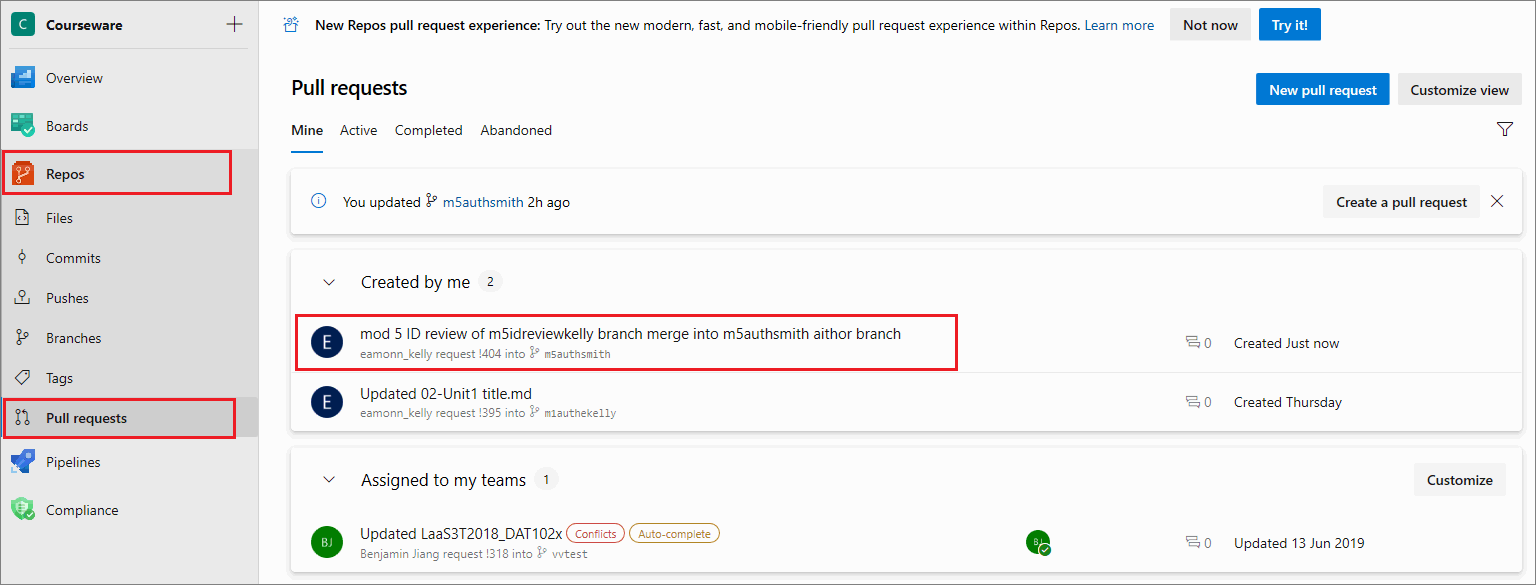
Select Repos, then choose Pull requests, and select the PR you created in steps 11 and 12.
In the Pull request, go to the Overview tab, choose Add a comment…, enter a description of your proposed change, and select Comment.
Note: To view comments added to a PR by another contributor on AzDevOps, open the PR in AzDevOps, go to the Files tab, and select a file that contains comments.
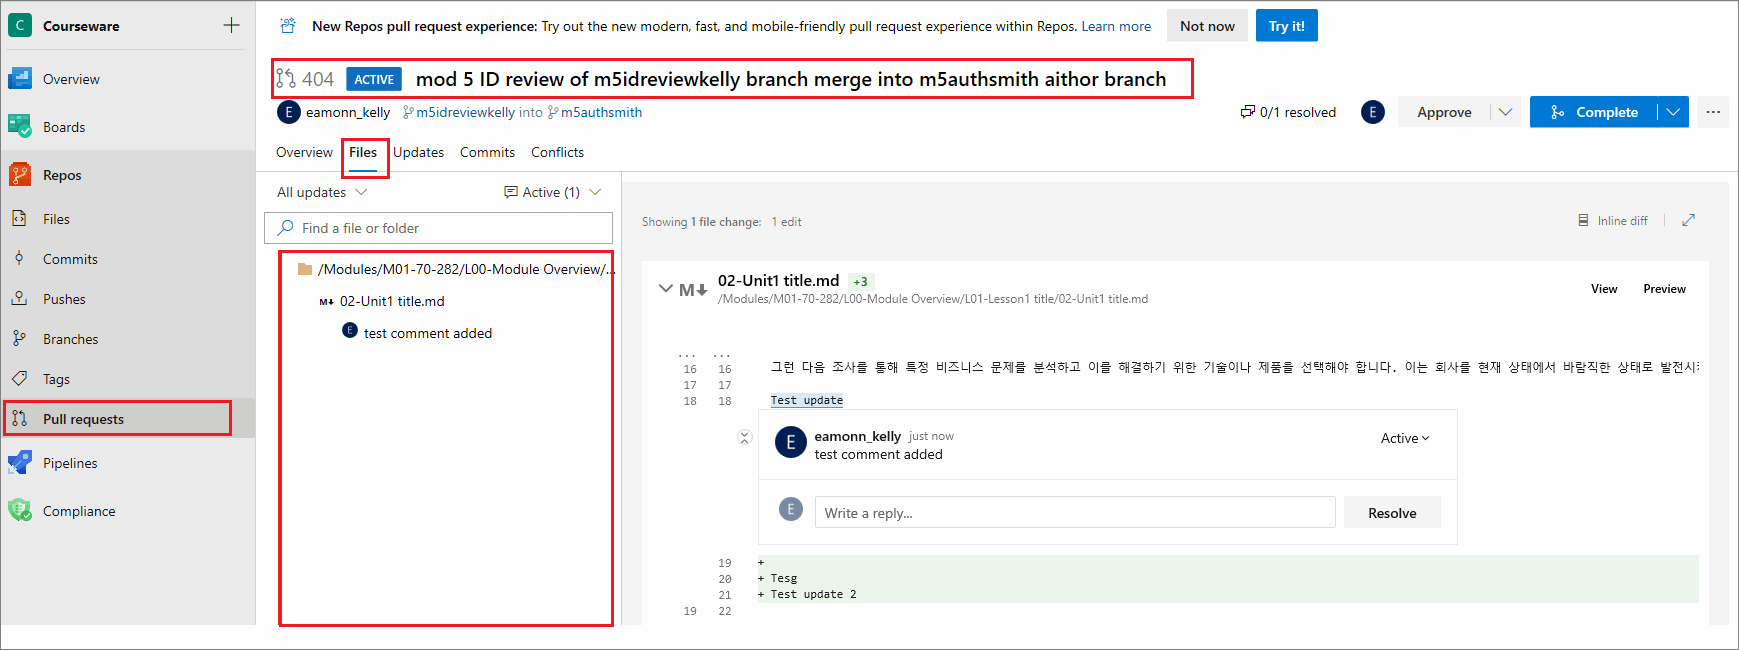
View the comments in the file by selecting the Comments down arrow. From the dropdown menu, choose Active.
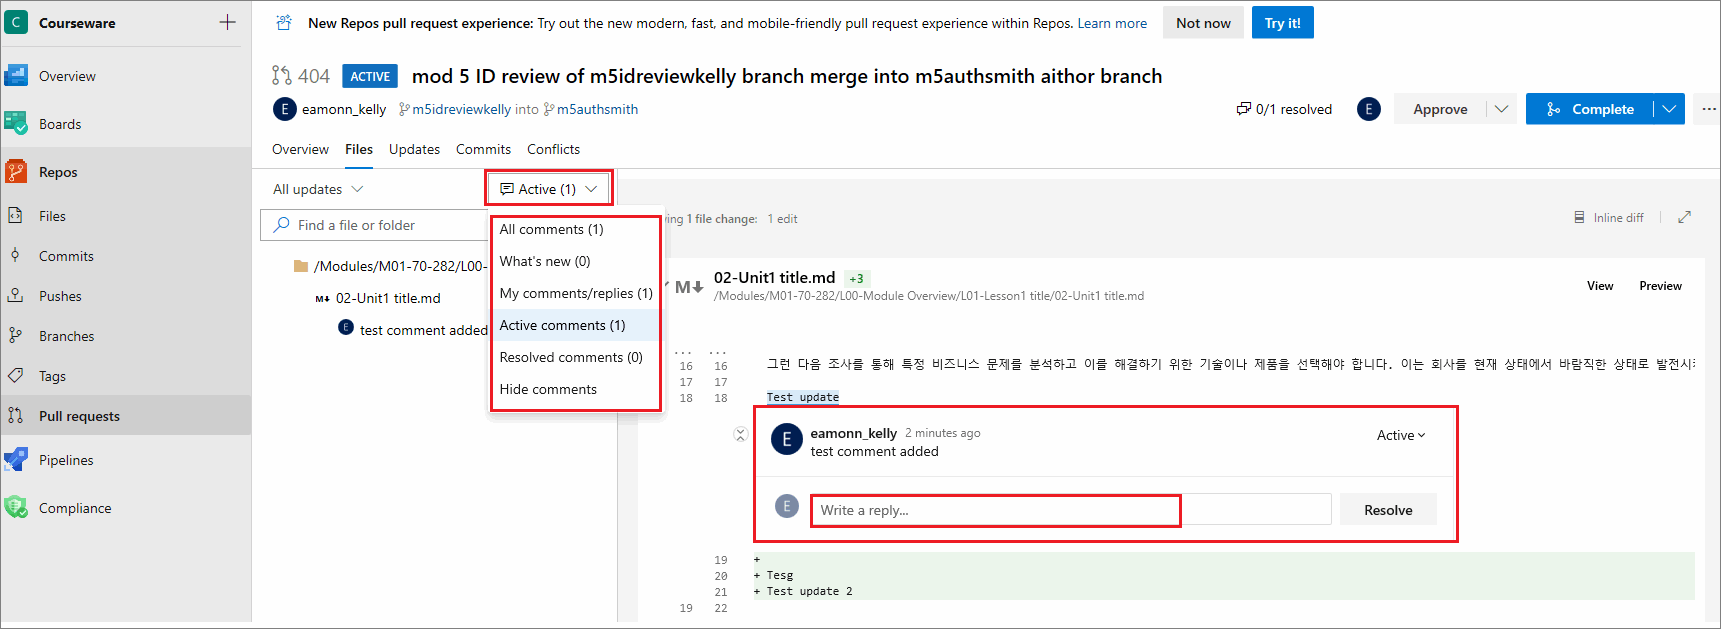
Reply to a comment by entering text into the box Write a reply, and then choose Reply.
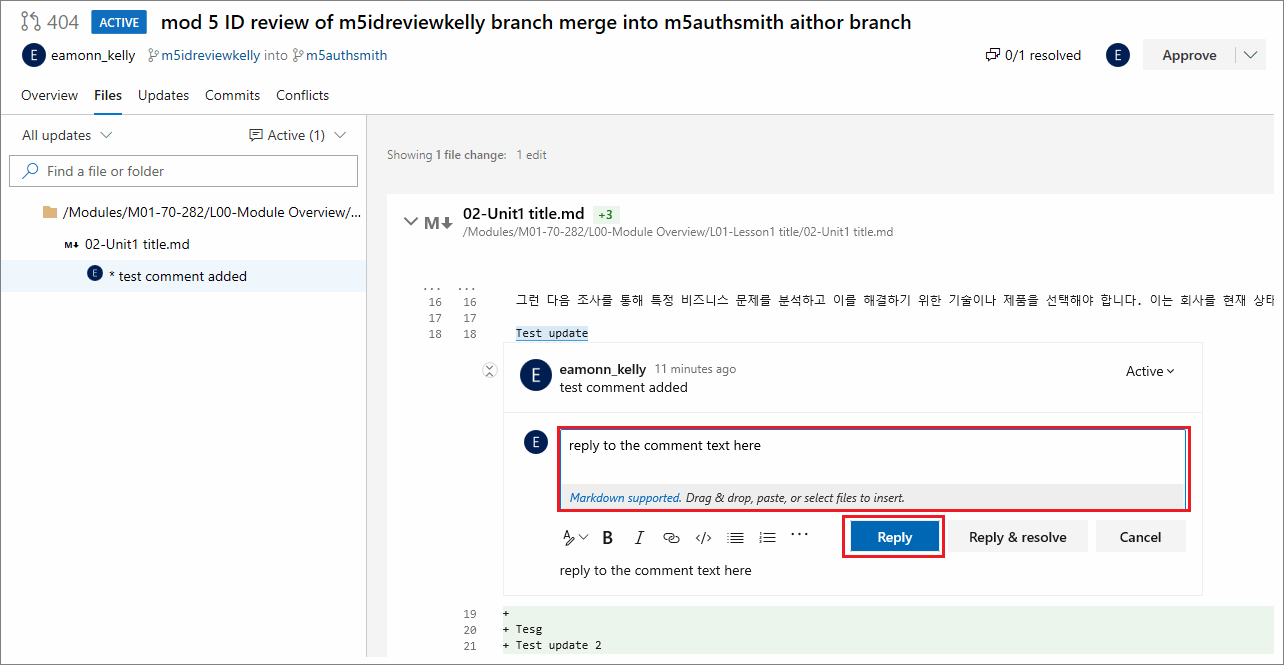
To close a comment, select Reply & Resolve.
-
Notify the author when you’ve applied corrections/ changes to the file’s contents or added a comment to the PR.
If necessary, consult the content author about the changes you made to the file on your ID review branch.
Note: Reviewers and authors can communicate in the following ways (among others) to discuss changes to content necessitated by a review:
- face-to-face meeting, video or voice call
- comments added to the Overview tab on the AzDevOps pull requests page
- markdown comments inside a markdown file, formatted using the correct markdown syntax for comments described in the Markdown syntax guide
- email exchanges
-
On your ID review branch in VSC, open the next file for review and conduct an ID review of the file’s contents.
-
In VSC, apply any required changes/ corrections to the file on your local ID review branch, and add/ reply to comments to the PR on AzDevOps. If necessary, apply any further changes/ corrections to the previous file in accordance with feedback from the content author.
-
On your ID review branch in VSC, save, stage, commit and push your changes to AzDevOps by using the guide Send (push) files.
-
Repeat step 13 to 17 until all of the files for review have passed your ID review. Each time you push new changes, the author may evaluate your corrections and provide feedback.
-
When all content for review has passed ID review, in VSC, delete any comments from within the markdown files (do not delete open comments from the pull request page on AzDevOps).
-
On your ID review branch in VSC, save, stage, commit and push the passed files to AzDevOps (i.e. the files that contain your finalized changes).
-
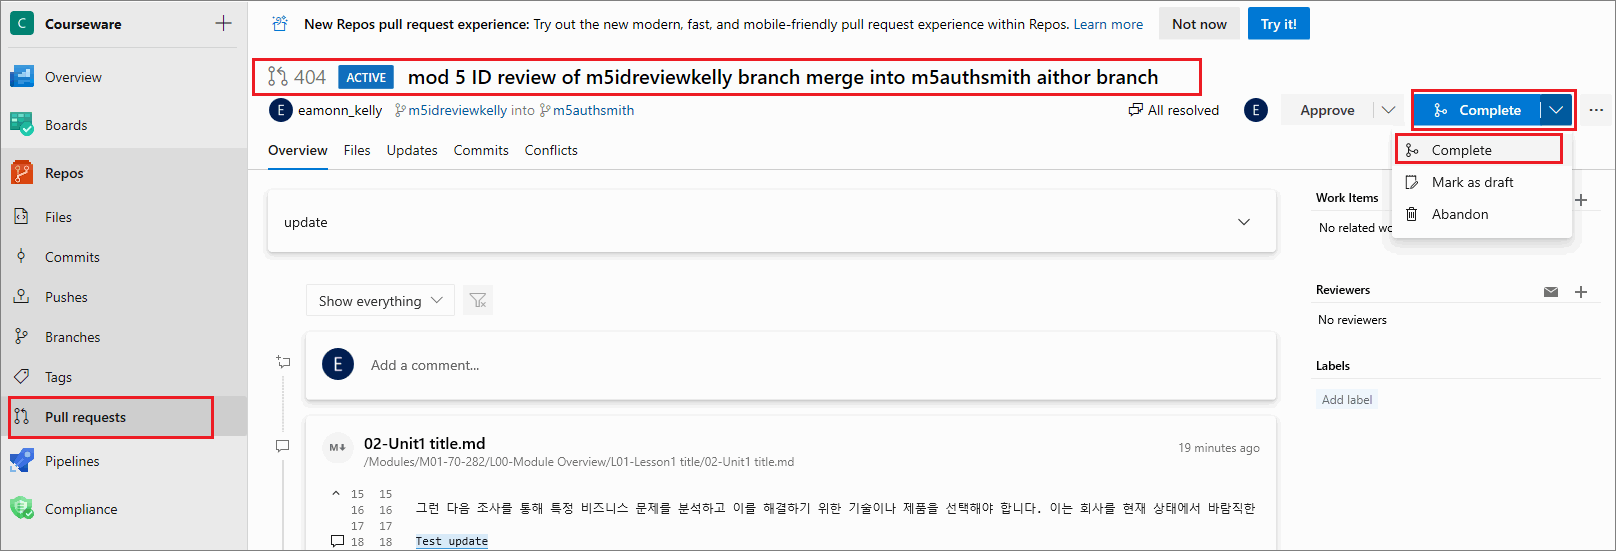
To merge your ID review changes, go to AzDevOps, open the PR, select the dropdown Complete, and then choose the menu option Complete.
-
In the Complete pull request pane, leave the default values. If available, enable the option to Delete
<ID reviewer's>branch after merging, and then choose Complete merge.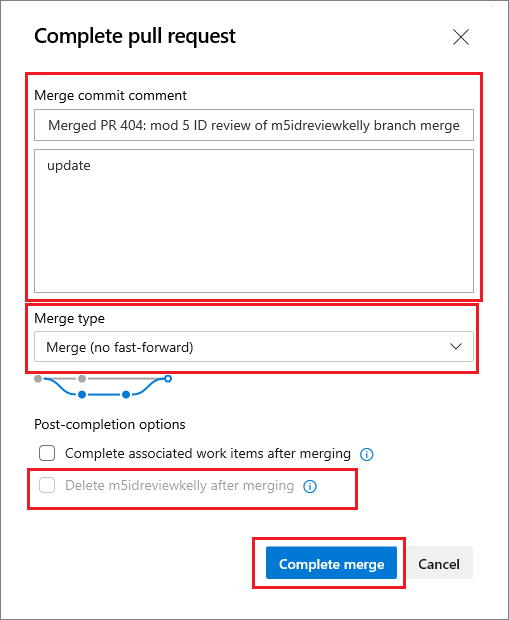
-
Notify the copy editor by email (and the content author) that you’ve completed your ID review successfully.
You have conducted a general ID review as part of a typical project successfully.
ID review branch naming convention
Each reviewer must work in their own reviewer’s branch. A separate reviewer branch for each module/ unit of content is also required. This approach keeps the content separated per reviewer, at each stage in the process, and on a module by module basis.
Generally, a reviewer creates a reviewer’s branch from the master branch of the project’s AzDevOps repo using the guide Create new branch. However, depending on the project’s requirements, the files for review might be on another branch, like an authoring branch. If you’re unsure ask your project manager.
When you create a new reviewer’s branch, your branch name should describe your branch’s content and make the branch’s purpose and owner clear to other contributors.
ID reviewers’ branches use the following naming convention (all lower case):
m <module number> idreview <reviewer's surname>:
- The prefix
mis for “module”. <module number>refers to the module number that the file to be reviewed belongs to.idreviewis a short code for “instructional design review” i.e. the stage in the process the file is at.- The reviewer’s
<surname>is added as a suffix to distinguish the reviewer’s work from other contributors.
Example ID reviewer’s branch name
The following explains how the example reviewer branch name m6-idreview-lee is constructed.
mis an abbreviation for “module”.6is the number of the module that the file(s) for review belong(s) to.idreviewis a short code for “instructional design review”.leeis a reference to the reviewer’s surname.
Putting the previous items together results in the reviewer branch name m6-idreview-lee.
Key points about the ID review process
The following diagram provides an overview of key points in the general ID review process for a typical project.
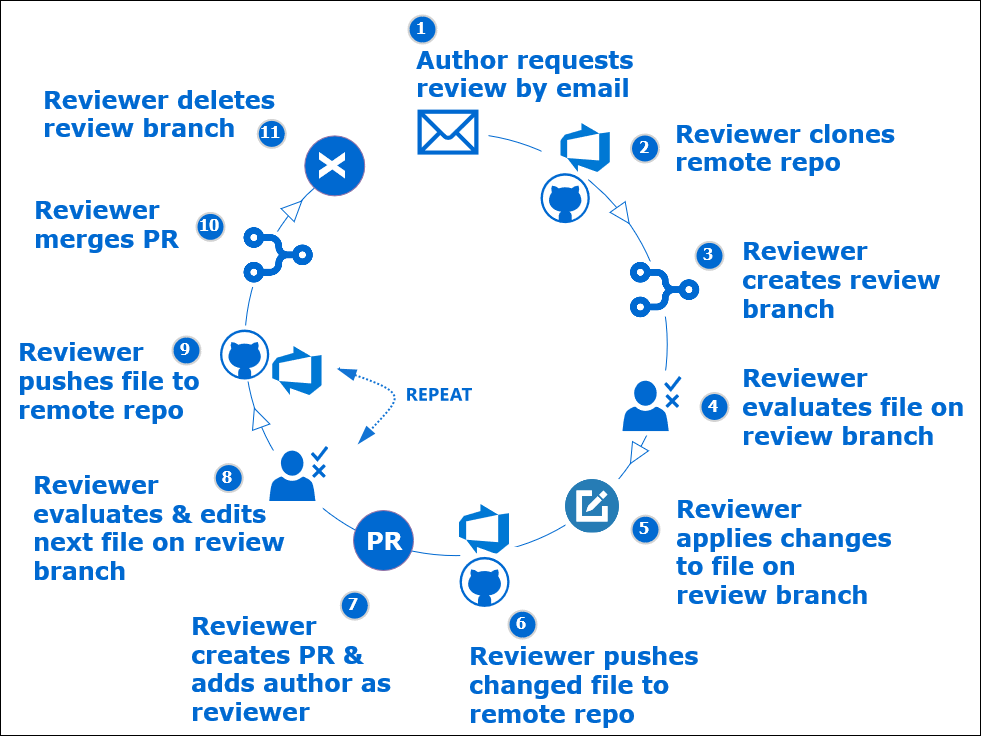
The following are key points about the ID review process.
-
Author requests ID review by email (when content for a module/ unit is ready)
-
ID reviewer:
- clone’s project’s AzDevOps repo
- creates local review branch from master (or authoring branch) in VSC
- reviews content in VSC on ID review branch
- applies, saves and commits necessary changes/ corrections in VSC (on ID review branch)
- pushes changes/ corrections to AzDevOps
- creates pull request (PR) to merge ID review branch into master (or authoring branch)
- adds author to PR as a reviewer on AzDevOps
-
Author evaluates pull request, and liaises with ID to provide feedback on ID reviewer’s changes
-
ID reviewer
- liaises with author to implement author’s feedback on ID reviewer’s changes
- completes ID review
- deletes comments from markdown files
- saves, stages, commits and pushes finalized ID review files to open PR
- merges ID review branch into master (on ID review branch)
- deletes the ID review branch
- notifies the copy editor when ID review is completed
Appendices
Check the following supplementary Appendices for more details and context.