This quick start provides a collection of guides, on a single page, that are essential to contributing content on AzDevOps. Use this quick start to learn what’s required to “get up and running” quickly. Alternatively, choose a single guide from the left sidebar menu.
Video
The following video covers the contents of this guide. Watch the video (optional), read this guide or both. If you cannot access the video, contact your project manager.
Guides in this quick start
This quick start includes the following guides:
- Install Visual Studio Code
- Install Docs Authoring Pack
- Install Word Count extension
- Install Azure Repos extension
- Install Git client
- Set Git credentials
- Download course files (clone repo)
- Create new branch in VSC
- Send (push) files
- Add/ edit markdown in VSC
- Add/ edit images in VSC
- Create pull request
- Work in a pull request
- Merge a pull request
1: Install Visual Studio Code
This guide describes how to download and install Microsoft’s Visual Studio Code (VSC) source code editor. VSC is a software application that is used for creating and editing markdown content.
Note: This guide is for users of Windows operating systems, but links and references to Linux and MacOS are included (where possible). Help, documentation, videos, “tips and tricks” guides, and additional resources are available from the VSC website https://code.visualstudio.com/docs/getstarted/introvideos. Browse through the Introduction Videos and Tips and Tricks sections on the VSC website to get “up and running”, or refer back to the VSC website whenever you need to.
Topics in this guide
Download and install VSC
Complete the following steps to download and install VSC.
-
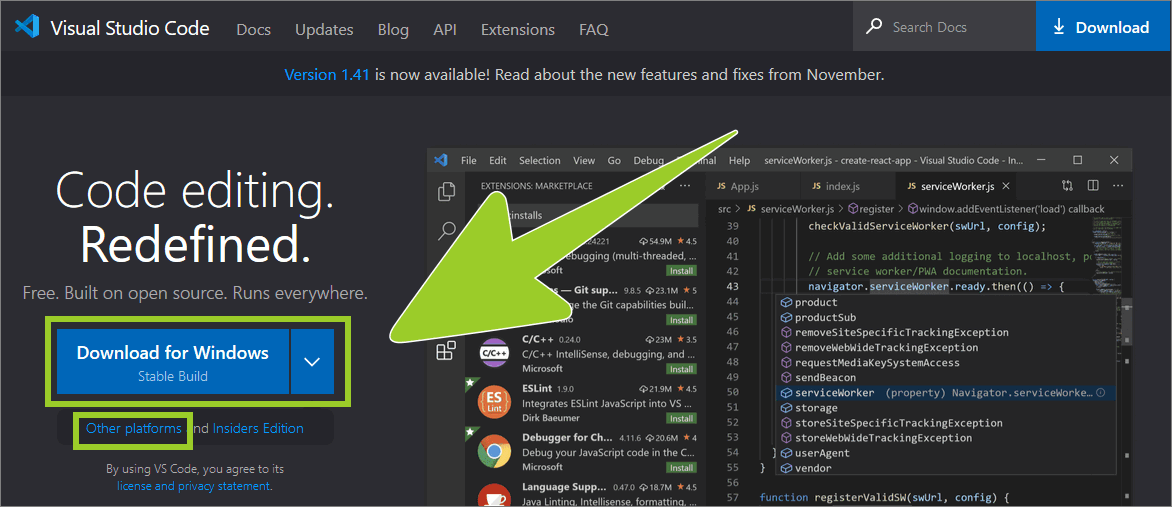
Open a web browser and go to https://code.visualstudio.com.
-
If you are a Windows user, choose Download for Windows. When prompted, save the Visual Studio Code installer file to a suitable location on your computer.
Note: If you do not use Windows, choose the link Other platforms and select an installer that is suitable for your operating system platform (e.g. Linux or macOS). Additional information and guides that are specific to different types of operating system are available on the page Setting up Visual Studio Code.
-
When the VSC installer file has downloaded successfully, go to the location on your computer where you saved the file and run the installer.
-
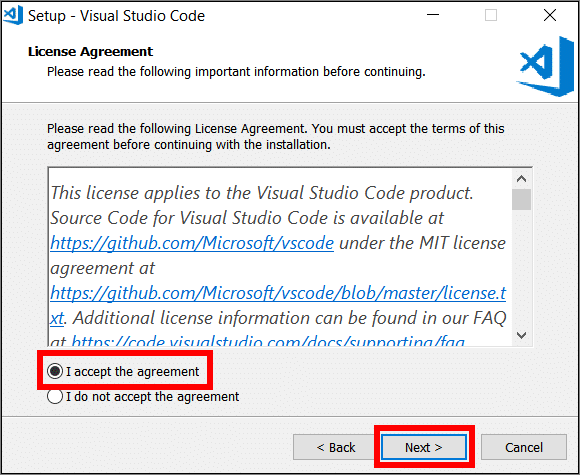
Select I accept the agreement using the checkbox to accept the terms of the VSC license agreement, then choose Next.
-
Continue selecting Next to accept each of the default installation options. Alternatively, specify your preferences and then select Next to continue.
-
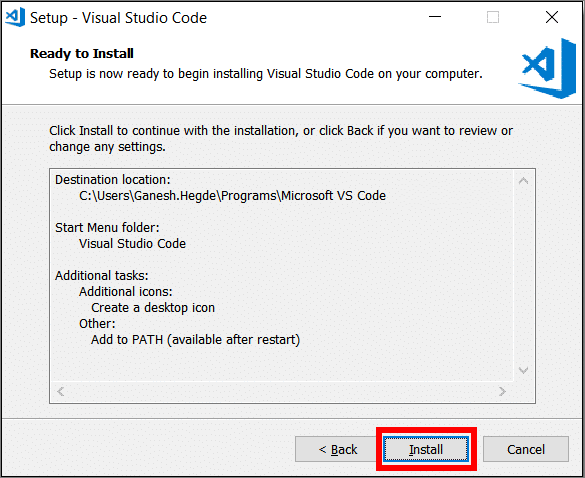
Choose Install to begin installing VSC on your computer.
-
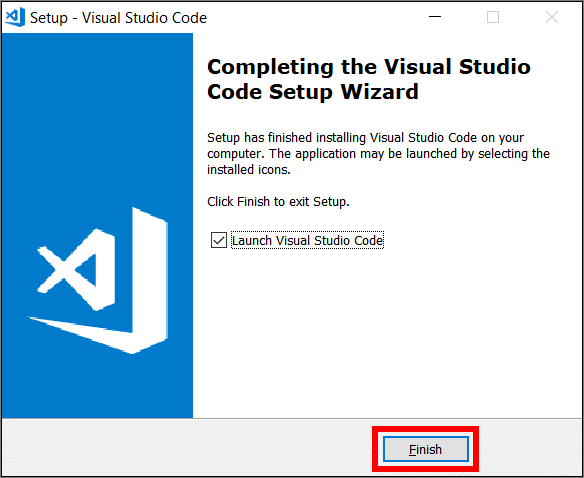
When the VSC installation has completed, select Finish to launch VSC.
You have downloaded and installed VSC successfully.
2: Install Docs Authoring Pack
This guide describes how to download and install Microsoft’s Docs Authoring Pack for the Visual Studio Code (VSC) editor. The Docs Authoring Pack provides the following extensions to VSC for authoring content:
- Markdown Lint checks markdown files for syntax errors
- Code Spell Checker performs spelling checks within a markdown file
- Docs Preview allows you to see how a markdown file will render as a document
- Docs Markdown assists you with using the markdown syntax to author content
- Docs Article Templates provides editable file templates for common markdown document types
- Docs YAML compares your document configuration files with validated configuration schemas
- Docs Metadata generates metadata for markdown files quickly
- LinkCheckMD verifies the integrity of the hyperlinks used within a markdown file
- Docs Images compresses and resizes image files
Topics in this guide
Download and install Microsoft’s Docs Authoring Pack
Complete the following steps to download and install Microsoft’s Docs Authoring Pack for VSC.
-
Launch the VSC editor.
-
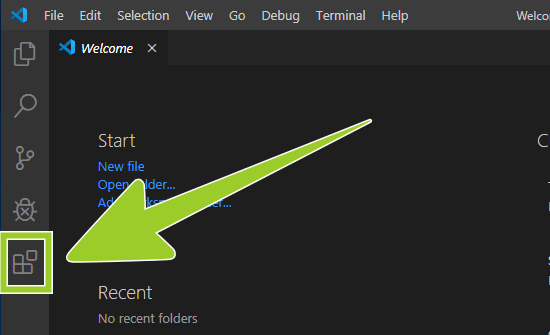
Choose the Extensions icon from the sidebar menu on the left.

-
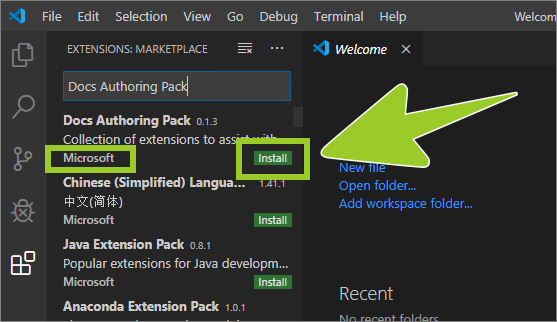
Type Docs Authoring Pack into the extensions search text entry field.
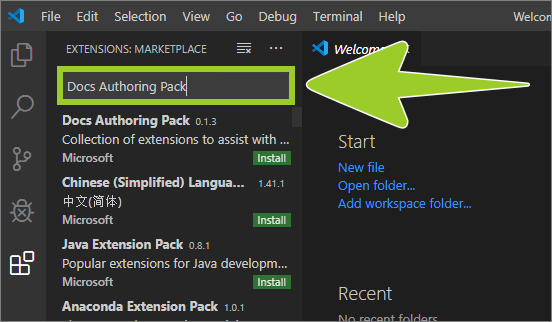
-
The Docs Authoring Pack should appear on top of the list of search results.
Verify that the publisher name is Microsoft, and select the green install button inside the Docs Authoring Pack extension information panel (lower right side).
-
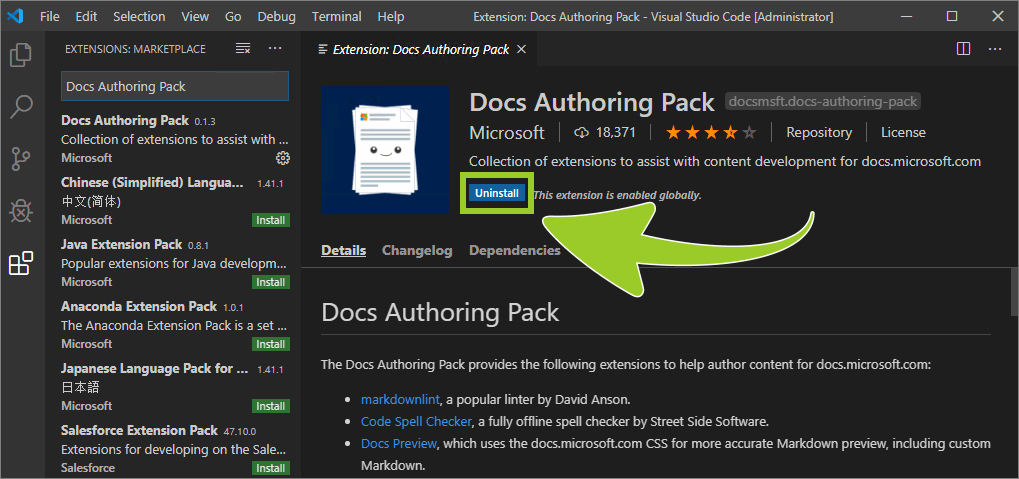
When the Docs Authoring Pack extension has installed successfully, the installation status icon text, inside the extension details pane (on the right), will change from Install (with a green coloured icon) to Uninstall (a blue coloured icon).
You have downloaded and installed the Microsoft Docs Authoring Pack extension for VSC successfully.
Note: For more information about using the Microsoft Docs Authoring Pack see the pages Announcing the Docs Markdown Extension for Visual Studio Code and the Visual Studio Marketplace webpage Docs Authoring Pack.
3: Install Word Count extension
This guide describes how to download and install Microsoft’s Word Count extension for the Visual Studio Code (VSC) editor. The Word Count extension displays the total the number of words present in a file opened in VSC (i.e. “word count”).
Note: More information about the Word Count extension is available from the Visual Studio Marketplace webpage WordCount.
Topics in this guide
Download and install Microsoft’s Word Count extension
Complete the following steps to download and install Microsoft’s Word Count extension for VSC.
-
Launch VSC.
-
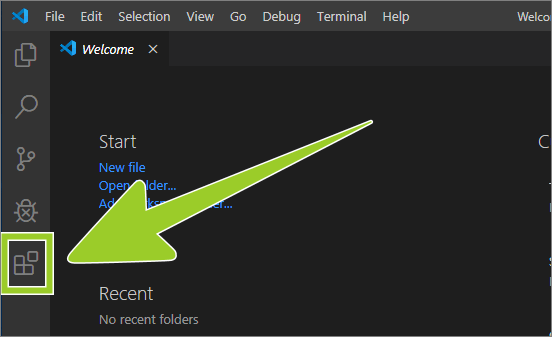
Choose the Extensions icon from the left sidebar menu.
-
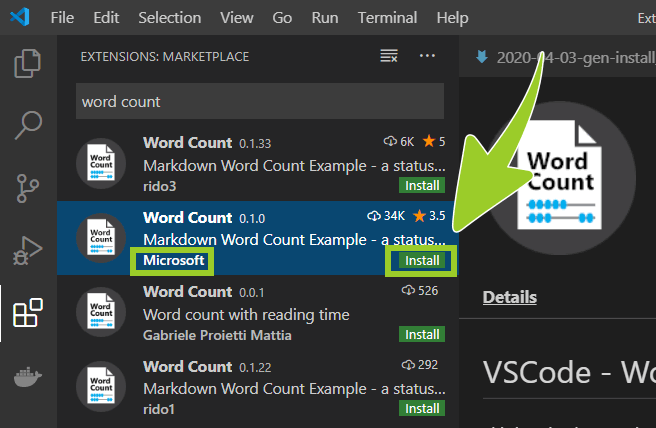
Type Word Count into the extensions search text entry field.
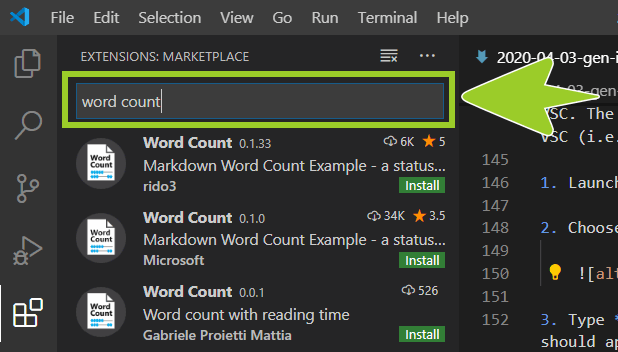
-
The Word Count extension should appear near the top of the list of search results.
Verify that the publisher name is Microsoft, and select the green install button inside the Microsoft Word Count extension information panel (lower right side).
-
When the Microsoft Word Count extension has installed successfully the installation status icon text, inside the extension details pane, will change from Install (with a green coloured icon) to Uninstall (a blue coloured icon).

-
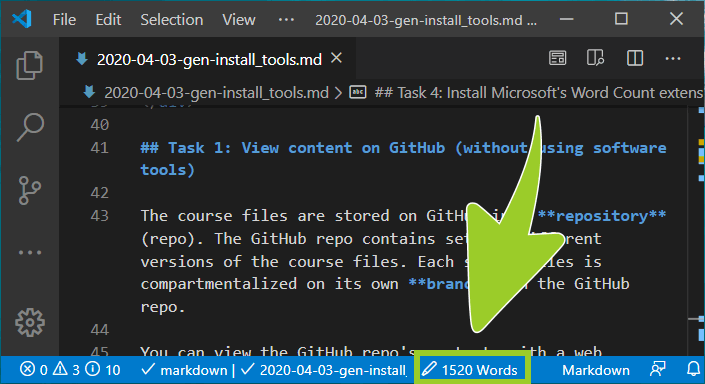
When you have a file opened in VSC, the Word Count extension counts the number words in the file. The total number of words are shown in the VSC status bar (at the bottom of the VSC editor window).
You have downloaded and installed the Microsoft Word Count extension for VSC successfully.
4: Install Azure Repos extension
This guide describes how to download and install Microsoft’s Azure Repos extension for Visual Studio Code (VSC). The extension connects VSC to Azure DevOps for managing changes made to the course files from within VSC.
Note: Only complete this guide if the course you are working on uses an Azure DevOps repository. The extension described in this guide is not required for courses that use a GitHub repository. If you are unsure, check with your project manager.
More information about the extension is available from the Visual Studio Marketplace webpage Azure Repos.
Important update
Microsoft removed the Azure Repos VSC extension from Visual Studio Marketplace on Nov 6 2020, refer to https://github.com/microsoft/azure-repos-vscode/blob/master/DEPRECATED.md.
Despite this, some Microsoft projects use Team Foundation with Azure DevOps for version control, instead of Git and GitHub. If you work with these projects, you might need to install the Azure Repos VSC extension. Ask your project manager if the project you’re working on requires the Azure Repos extension.
You can no longer install the extension from Visual Studio Marketplace (as described in this guide). Instead, complete the following steps to obtain and install the extension.
-
In a web browser, go to https://marketplace.visualstudio.com/items?itemName=ms-vsts.team.
-
Choose the Version History tab.
-
Select Download, beside version 1.161.1, and save the file
ms-vsts.team-1.161.1.vsixto your computer. -
Open VSC, and then select Terminal > New Terminal or use CRTL + SHIFT + ‘.
-
In the terminal, navigate to where you saved
ms-vsts.team-1.161.1.vsix. -
Enter the following command to install the extension:
code --install-extension ms-vsts.team-1.161.1.vsix
Note: You can ignore warnings in VSC about using a depreciated (“sunsetted”) extension.
For help, refer to the Visual Studio Code documentation article Install from a VSIX.
Topics in this guide
Download and install Microsoft’s Azure Repos extension
Complete the following steps to download and install Microsoft’s Azure Repos extension for VSC.
-
Launch VSC.
-
Choose the Extensions icon from the left sidebar menu.
-
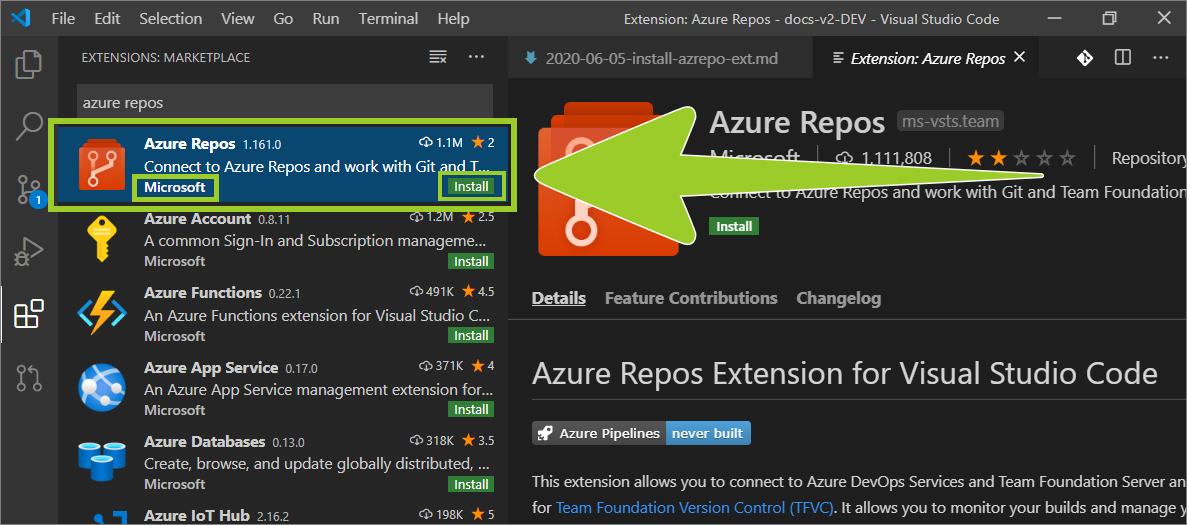
Type azure repos into the extensions search text entry field.
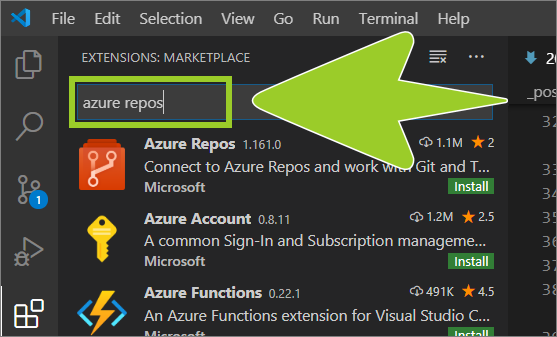
-
The Azure Repos extension should appear near the top of the list of search results.
Verify that the publisher name is Microsoft, and select the green install button inside the Microsoft Azure Repos extension information panel (lower right side).
-
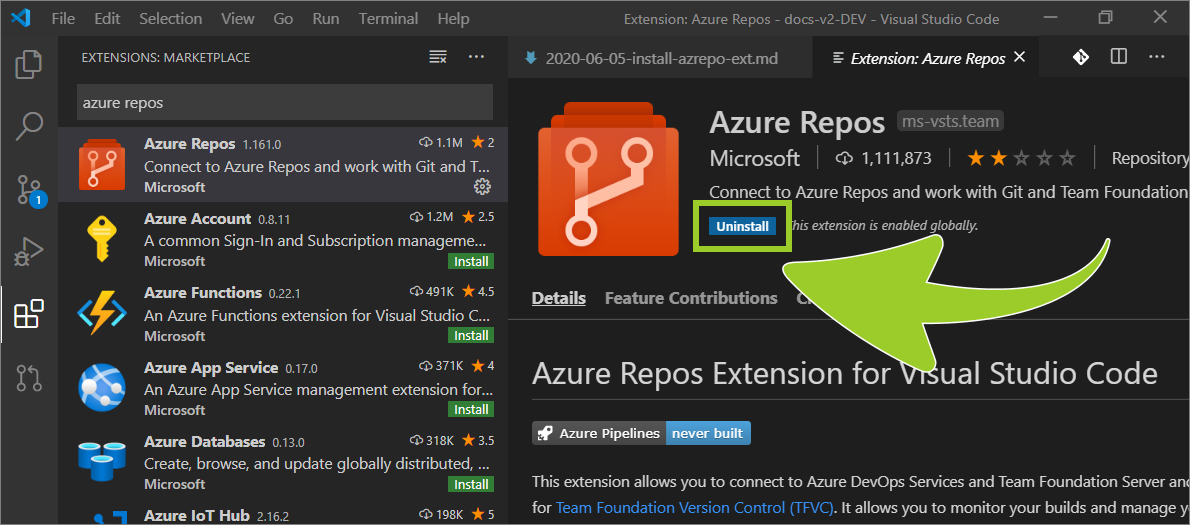
When the Microsoft Azure Repos extension has installed successfully the installation status icon text, inside the extension details pane, will change from Install (with a green coloured icon) to Uninstall (a blue coloured icon).
-
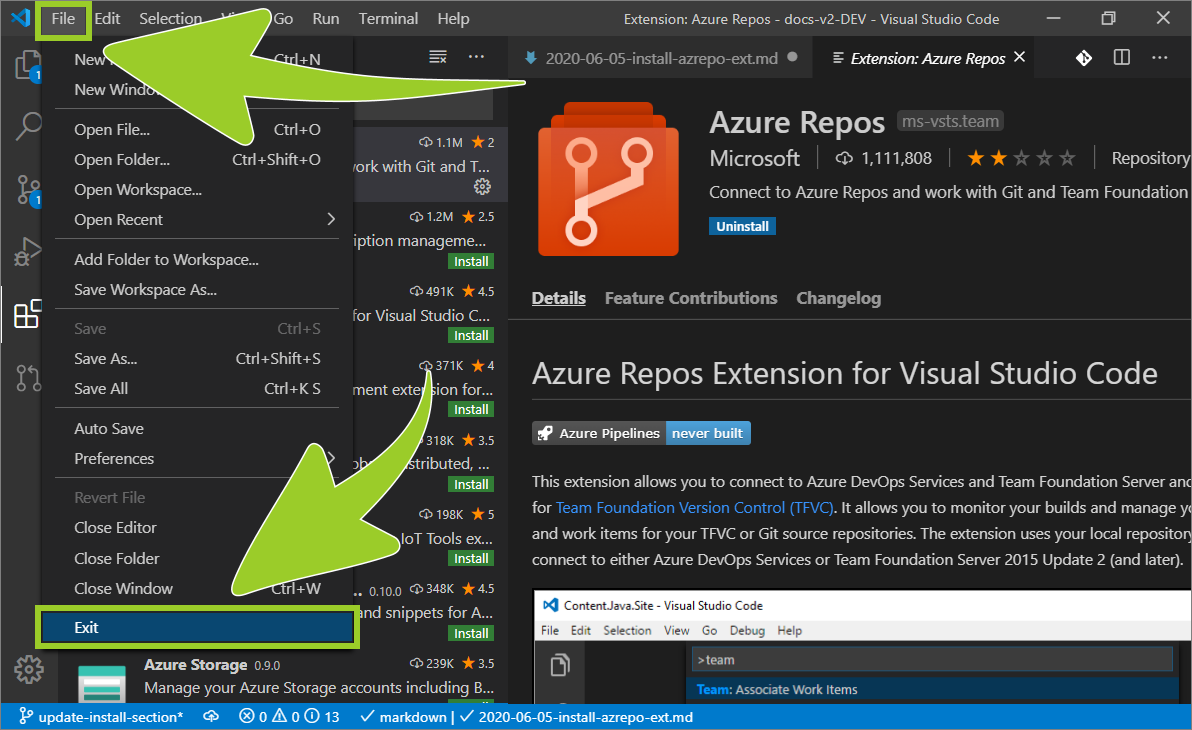
To complete the installation, restart VSC by choosing File > Exit (from the top VSC menu), then re-opening VSC.
You have downloaded and installed the Microsoft Azure Repos extension for VSC successfully.
5: Install Git client
This guide describes how to download and install the Software Freedom Conservancy (SCM) Git client. The Git client is required for running Git commands in the Visual Studio Code (VSC) editor.
Note: This guide is for users of Windows operating systems; support for Linux and MacOS is included (where possible).
Topics in this guide
Download and install the SCM Git client
Complete the following steps to download and install the SCM Git client.
-
Close the VSC editor, if you have it open.
-
Open a web browser and go to https://git-scm.com/download/.
-
Choose a version of the SCM Git client that is appropriate to your computer’s operating system platform.
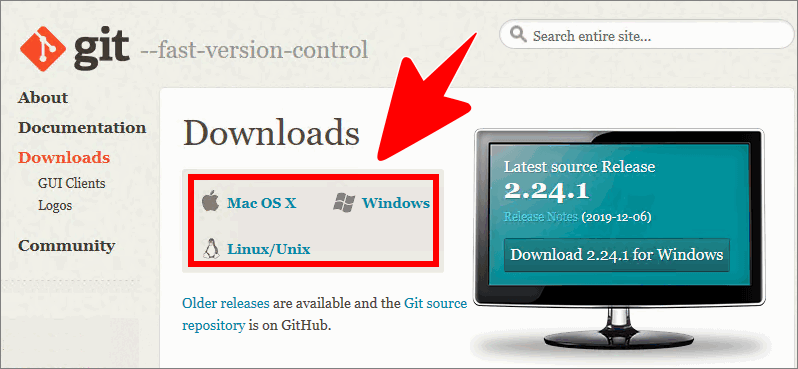
-
Download the Git client installation file and save it to a suitable location on your computer.
-
Go to the location on your computer where you saved the Git client installation file, and run the installer as administrator to start the installation.
Note: For step-by-step detailed installation instructions, follow the guide Use Git with Visual Studio Code. Refer back to the Git with Visual Studio Code guide when you need to.
-
Choose Next to accept the terms of the software license agreement.
-
Continue selecting Next to accept each of the default options for the Destination Location, Components and Start Menu folder. Alternatively, specify your preferences and select Next to continue.
-
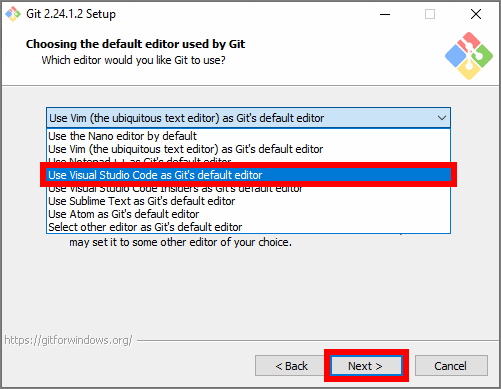
On the Choosing the default editor used by Git page, use the dropdown menu to select Use Visual Studio Code as Git’s default editor, then choose Next.
-
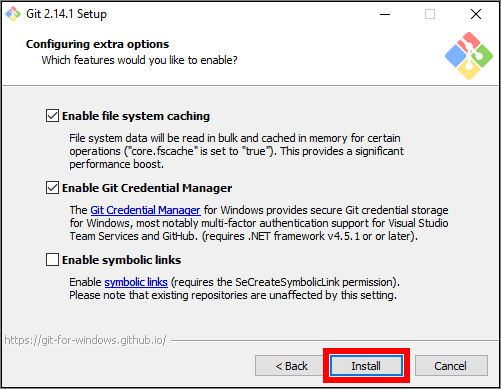
Continue to select Next to accept the default settings for the remaining installation options. As you go, verify that the following options are selected:
- Git from the command line and also from 3rd-party software
- Use the OpenSSL library for HTTPS backend transport connections
- Checkout Windows-style, commit Unix-style line endings
- Use MinTTY (the default terminal of MSY32)
- Enable file system caching
- Enable Git Credential Manager
- Un-check (to disable) the option to Enable symbolic links
- Un-check (to disable) the option to Enable experimental, built-in add -i/ p
Note: Alternatively, you can specify your preferences for each option and select Next to continue. You can also modify the settings after the installation has completed, if you need to. Some installation and configuration options may vary according to your operating system and the Git client version you are installing. In all cases, accept the default settings and values as indicated previously.
-
Select Install, at the end of the Git client Installation Wizard, to begin installing the Git client.
Note: The Install button in the Git client Installation Wizard window may be different to what is shown in the following image. Continue regardless by choosing Install.
-
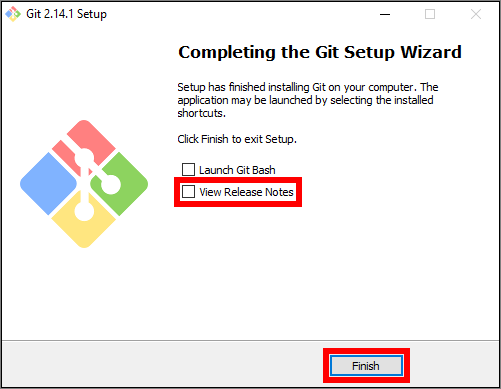
When the Git client installation has completed, un-check (to disable) the option to View Release Notes and choose Finish.
You have downloaded and installed the SCM Git client successfully.
6: Set Git credentials
This guide describes how to set your global Git user credentials using the Visual Studio Code (VSC) editor.
These steps are required to enable persistent interactions between Git, GitHub, Azure DevOps and VSC. Setting your global Git user credentials will distinguish your contributions to the course content from the contributions of others.
Topics in this guide
Set your Git global credentials
Complete the following steps to set your global Git user credentials using VSC.
-
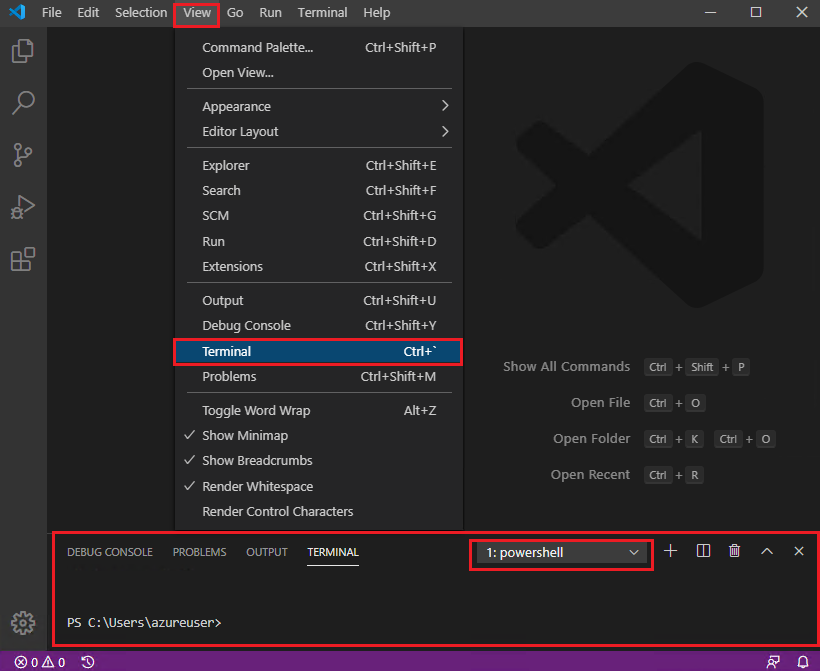
Open VSC, and go to View > Terminal (from the top menu). In the VSC TERMINAL pane, select 1:powershell from the dropdown menu.
Note: You may need to press Enter to display the contents of the VSC Terminal window. Your Git username will be shown in the VSC Terminal instead of the username shown in following images.
-
Type the following command into the VSC Terminal, then press Enter.
git config --list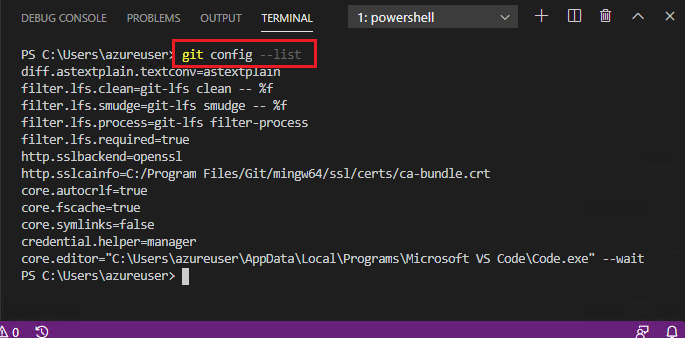
Note how there are no references to
user.nameoremail.addresspresent in the VSC Terminal. This will change when you add your Git user credentials using the following steps. -
To configure your global Git user email address, type the following command into the VSC Terminal then press Enter. Replace the text “you @example.com” with the email address you use with your GitHub user account.
git config --global user.email "you@example.com"
-
To configure your global Git username, type the following command into the VSC Terminal then press Enter. Replace the text “Your Github account user name” with the Git username you want to be identified by.
git config --global user.name "Your GitHub account user name"
-
Type the following command into the VSC Terminal, and press Enter.
git config --list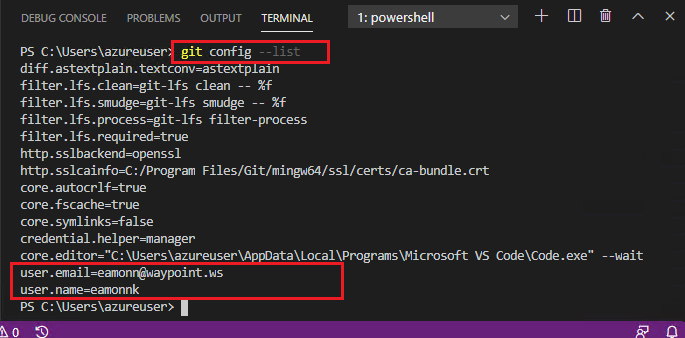
Note how the values for
user.nameandemail.addressare now present in the VSC Terminal.
You have set your global Git user credentials successfully. Close the VSC Terminal pane and the VSC editor.
Note: VSC does not verify the global Git user credentials you provide. Errors that mention permissions when you use Git may be caused by incorrect or misconfigured Git user credentials. Ensure you have the correct global Git user credentials and GitHub user account details in your Git configuration file (Git config). In Windows, the Git config file is stored at
C:\Program Files\Git\etc\gitconfig.More information about configuring Git is available from the SCM webpage 8.1 Customizing Git - Git Configuration.
7: Download course files (clone repo)
In this guide, you will download (or clone) a copy of the course files from AzDevOps onto your computer using the Visual Studio Code editor (VSC).
Topics in this guide
Clone the AzDevOps repo
Complete the following steps to clone the project’s repository (repo) from AzDevOps using VSC.
-
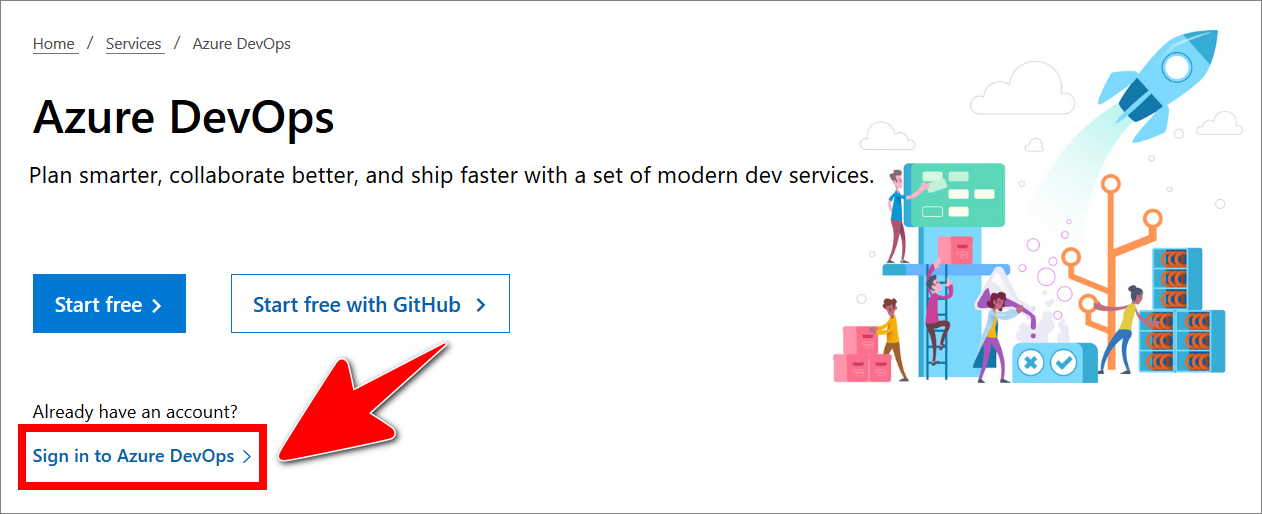
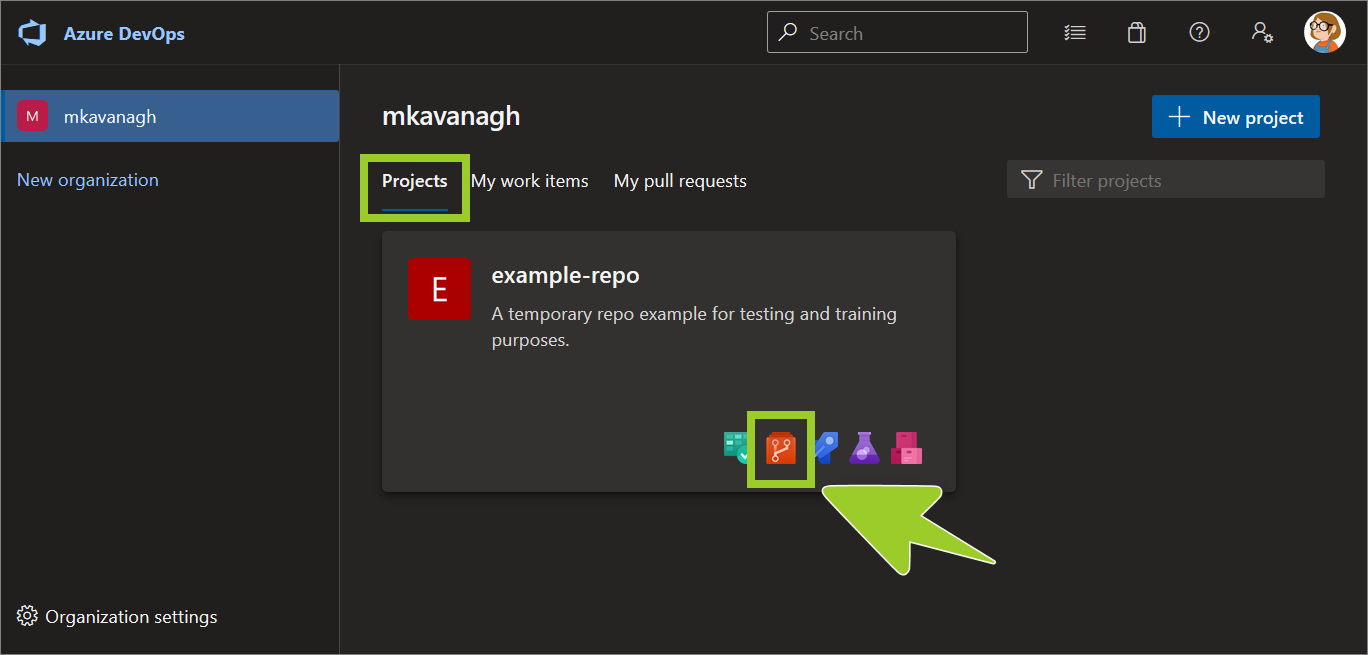
Open a web browser, go to the AzDevOps website at https://dev.azure.com, and sign in.
-
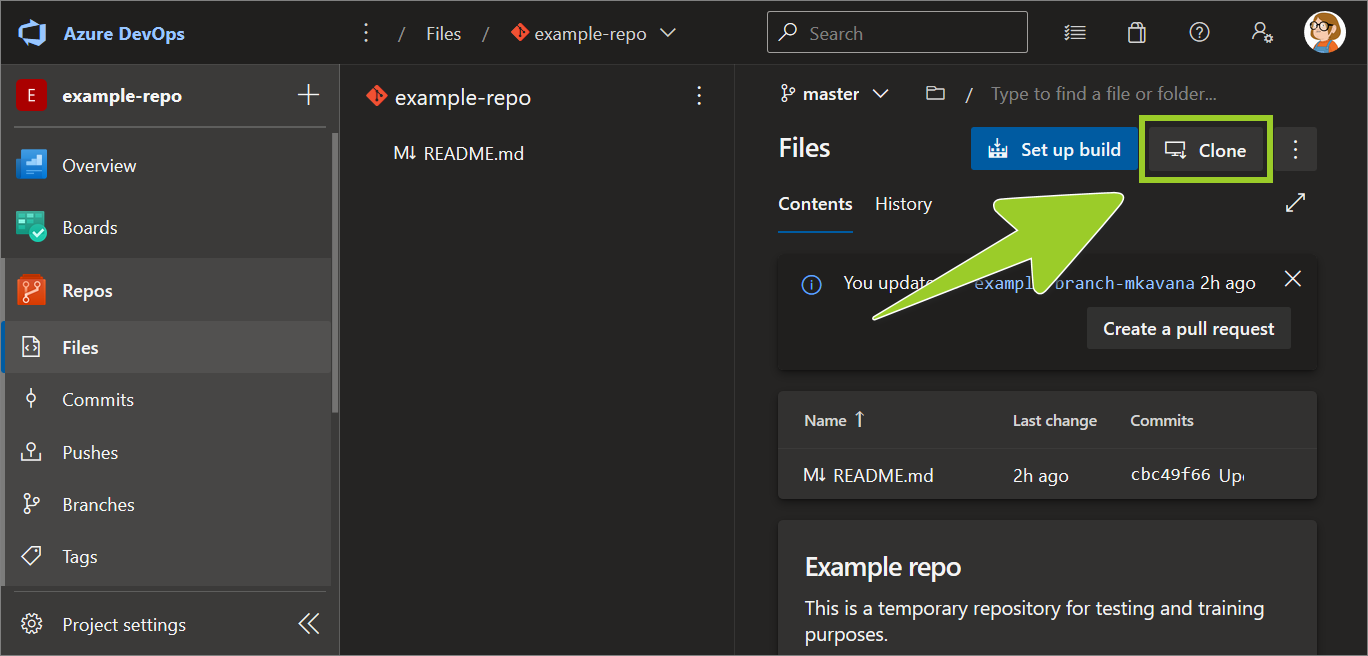
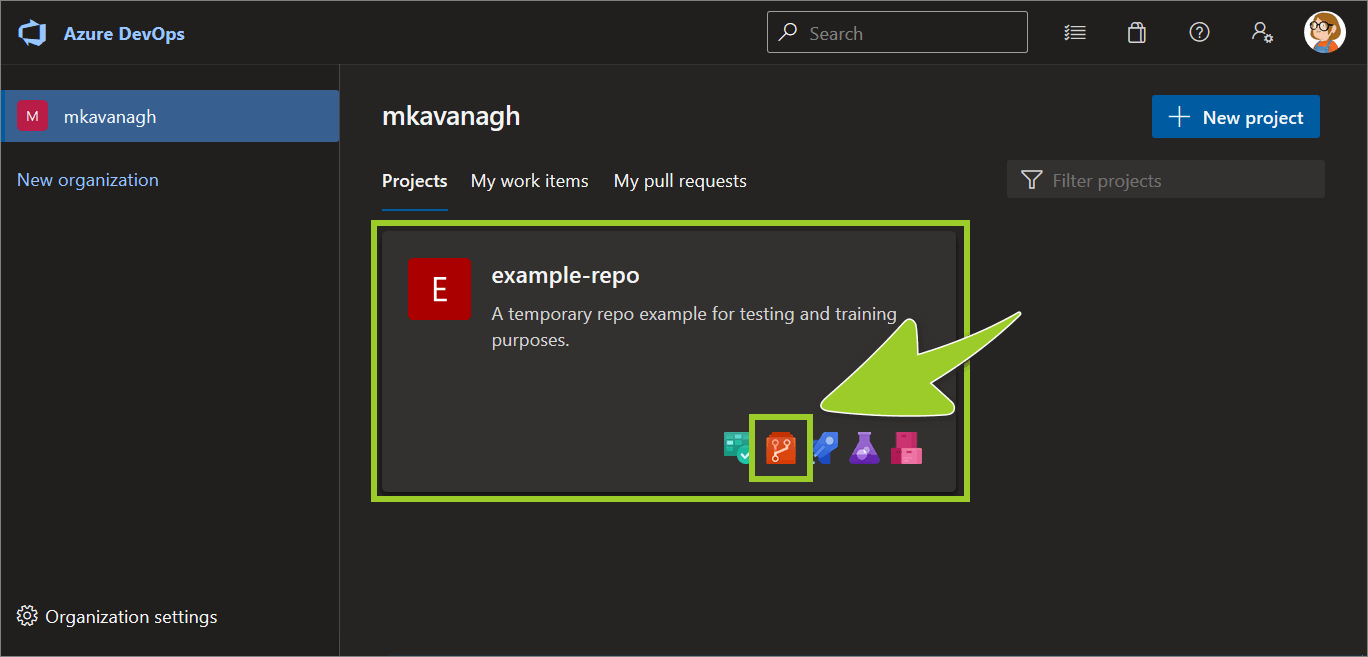
On the Projects tab, locate the project repo you want to clone, and select the Repos icon.
For example, in the following image, the Repos icon for the project example-repo is selected.

-
Choose the Clone icon.
-
In the Clone Repository pane, set the IDE dropdown to Clone in VS Code.
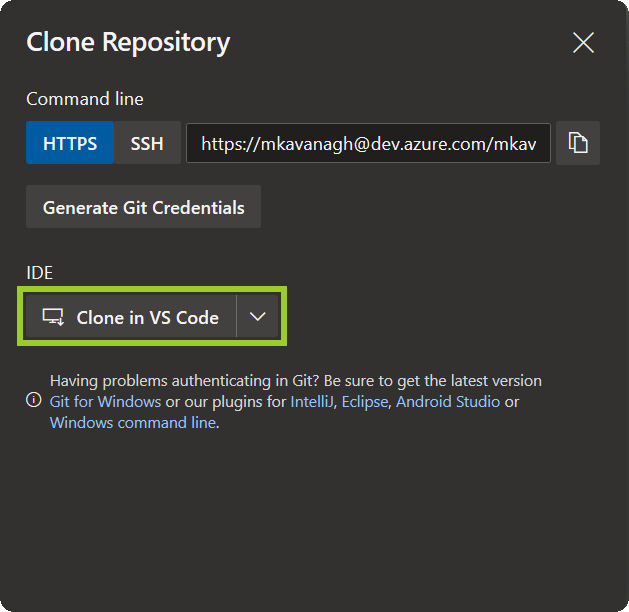
-
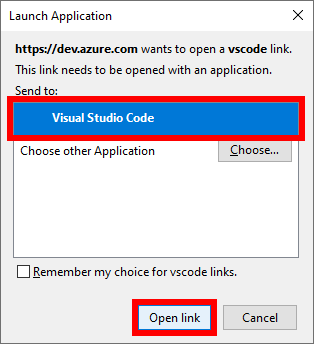
In the Launch Application window, set the Send to option to Visual Studio Code, and then choose Open link.
-
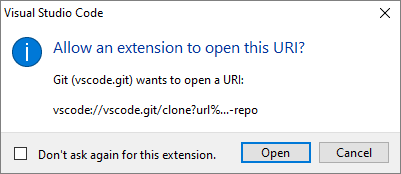
When the Visual Studio Code editor (VSC) opens, choose Open if you’re asked to Allow an Extension to open this URI.
-
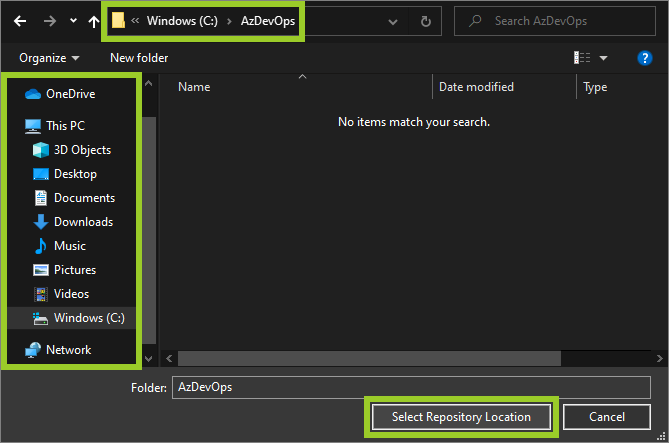
In the VSC file explorer, select a location on your computer for storing the cloned repo, and then choose Select Repository Location.
For example, in the following image, the repo will be cloned into the folder C:\Windows\AzDevOps.
-
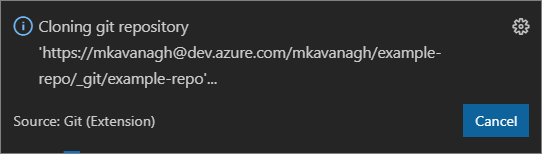
In VSC, wait for the Cloning git repository progress indicator to complete (lower right side).
-
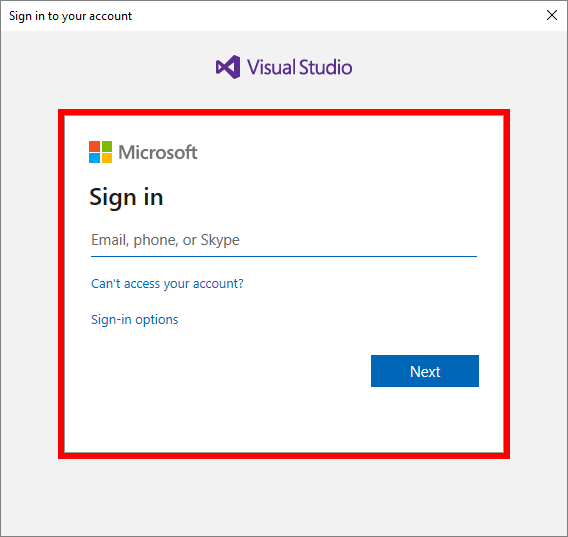
If prompted, sign into AzDevOps/ Visual Studio.
-
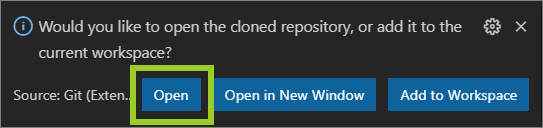
In VSC, choose Open if asked Would you like to open the cloned repository, or add it…
Note: In VSC, you can open a cloned repo from the top menu by using File > Open folder, and selecting the folder with the cloned repo.
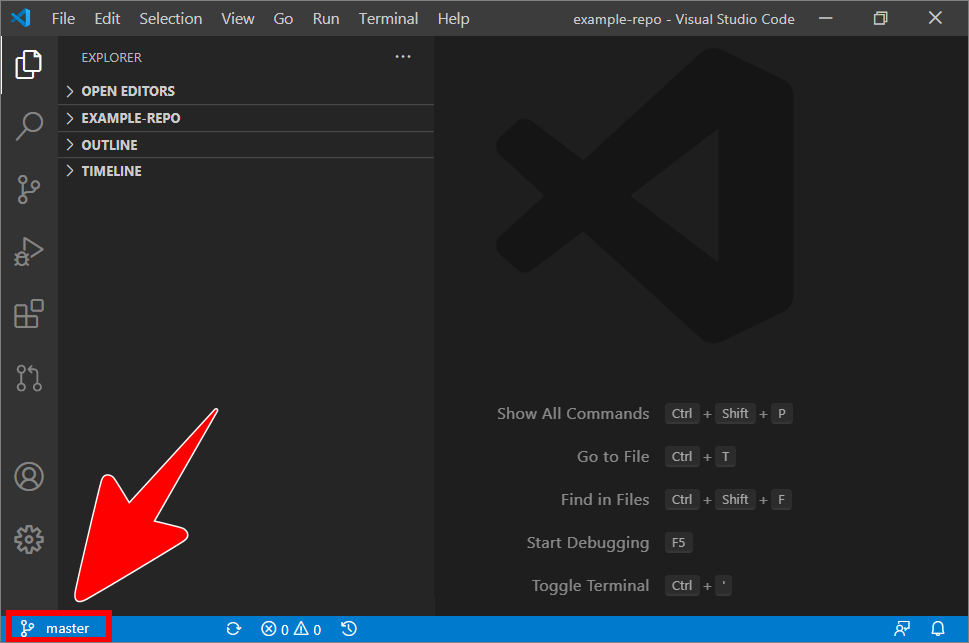
-
The branch icon in the VSC status bar, at the bottom of the editor, indicates the name of branch that VSC is currently switched to.
For example, in the following image, the branch icon in the VSC status bar indicates that VSC is currently switched to the branch named master.
Note: To switch VSC to another branch, refer to the guide Switch branches.
-
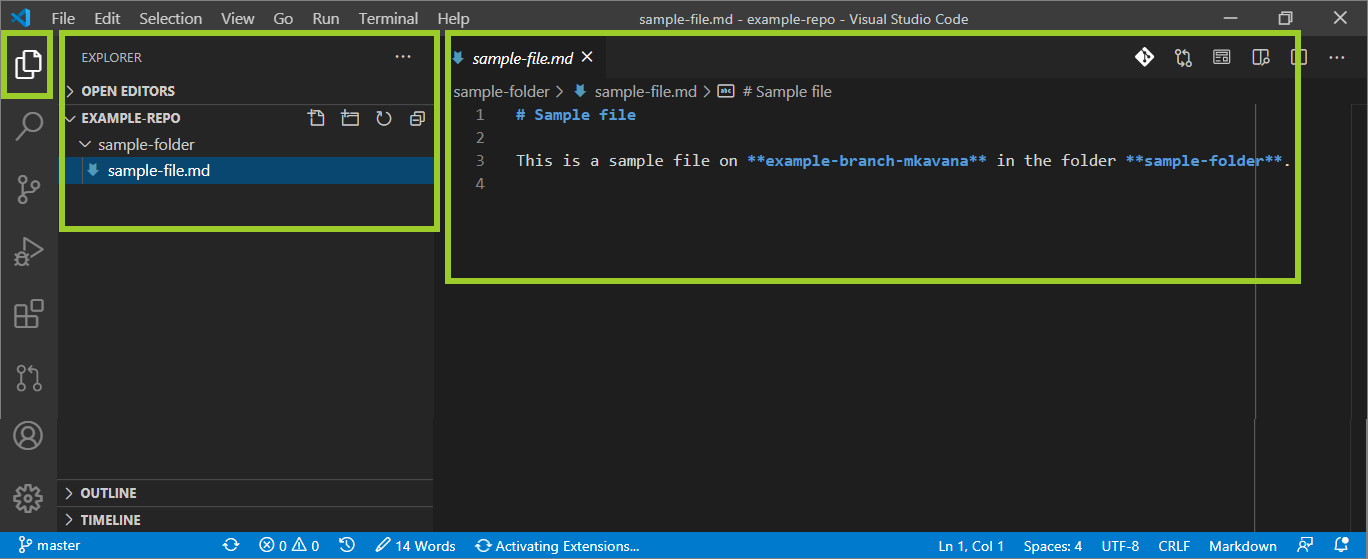
Select the VSC Explorer icon, and use the VSC Explorer to choose a markdown file to open in the VSC Editor tab.
For example, in the following image, the markdown file sample-file .md is open in the VSC Editor tab (right side), and VSC Explorer shows that the file is on the filepath ~/example-repo/sample-folder/ (left side).
You’ve cloned the project’s AzDevOps repo successfully.
8: Create new branch in VSC
This guide describes using the Visual Studio Code (VSC) editor to create a new branch to work on.
Creating a new branch to work on allows you to view, create and edit markdown files and images without affecting the work of other contributors.
Topics in this guide
Create a new Git branch in VSC
Complete the following steps to create a new Git branch using VSC.
-
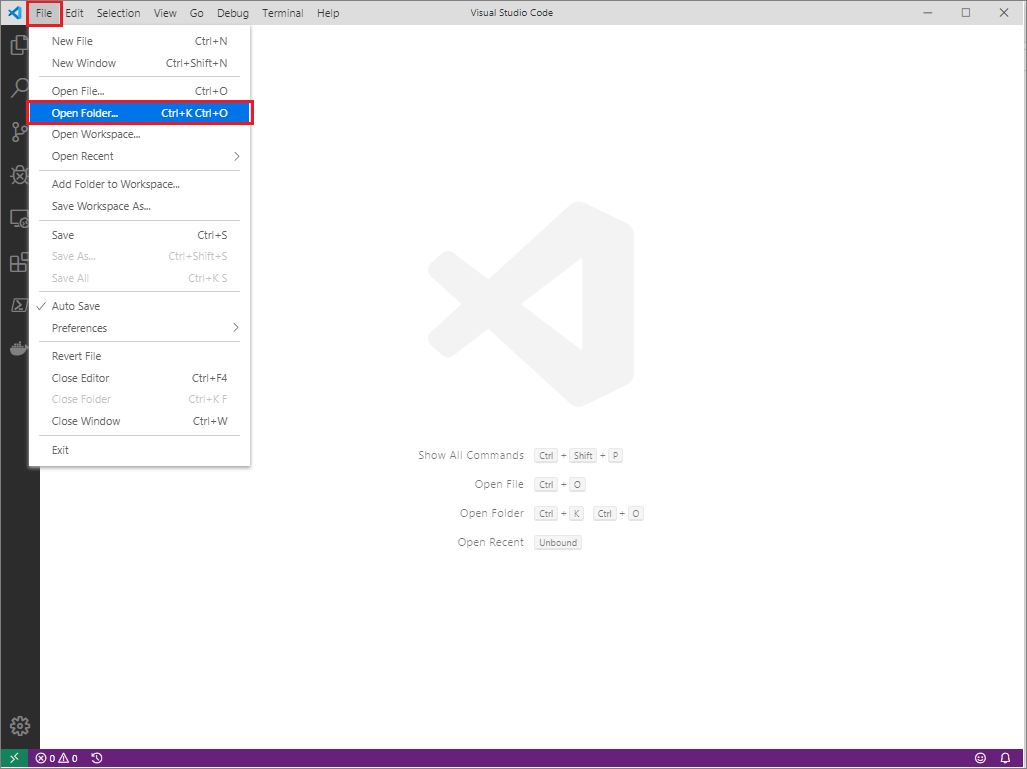
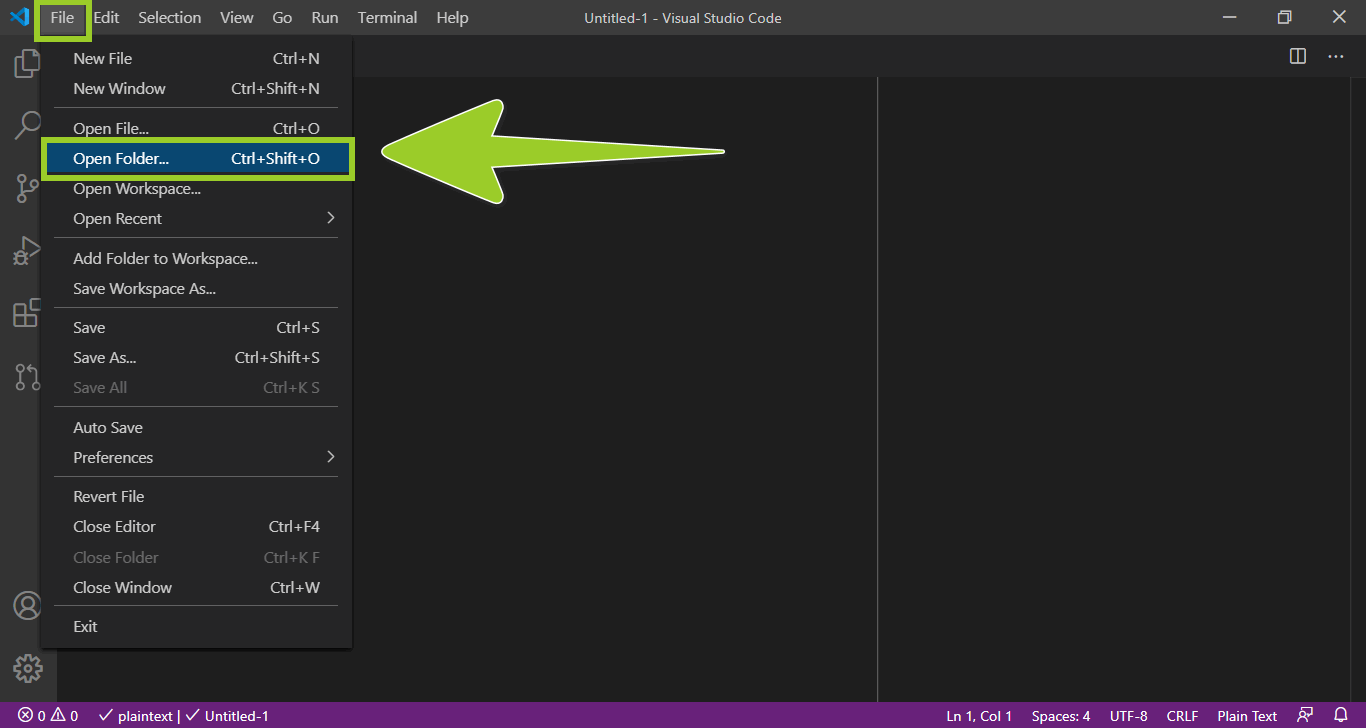
Open VSC and go to File > Open Folder.
-
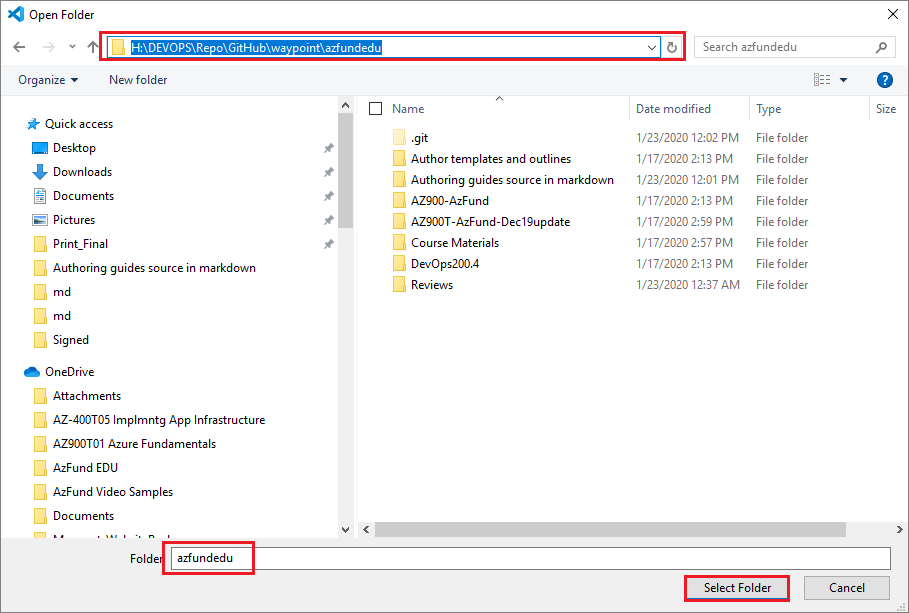
Go to where you cloned the project’s GitHub or AzDevOps repository on your computer (your local repo). Choose Select Folder.
The folder for your local repo should have the same name as the project’s GitHub/ AzDevOps repo you cloned, for example: azfundedu.
-
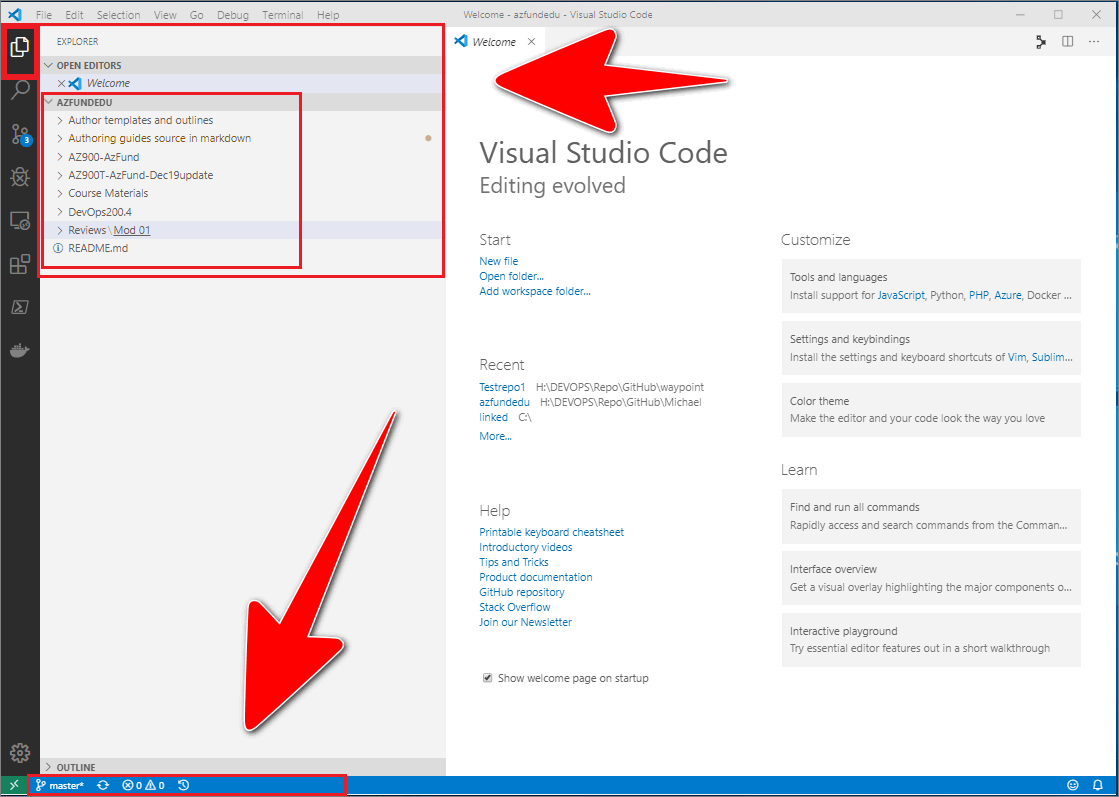
Select the VSC Explorer icon (left sidebar).
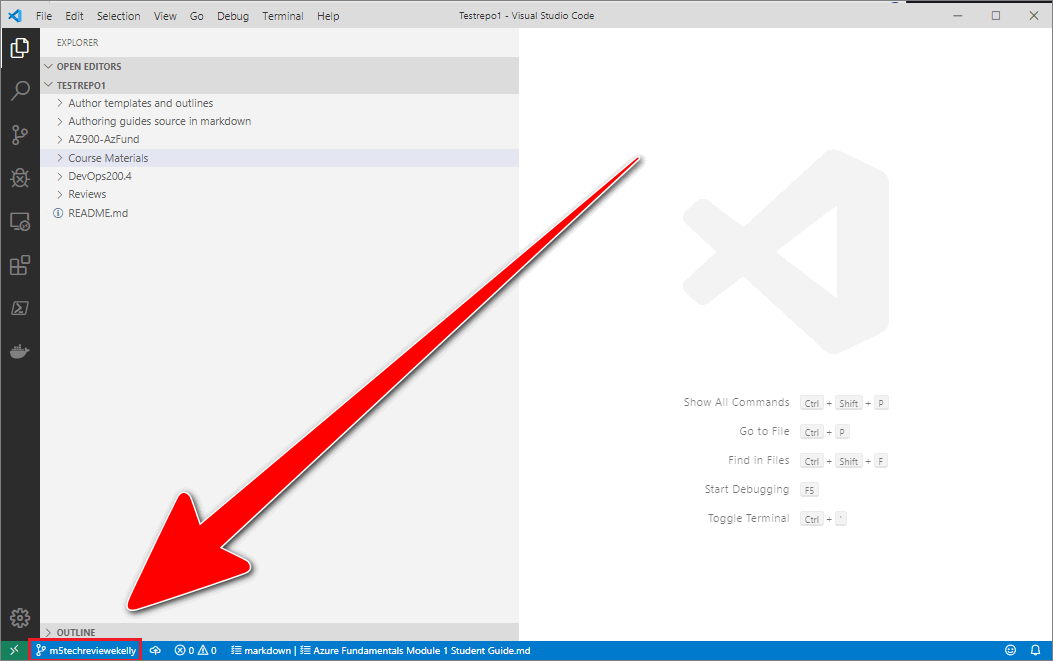
Your local repo’s folder and file structure should be visible in the VSC explorer window. The VSC status bar, at the bottom of the editor, indicates the name of branch that VSC is currently switched to.
For example, in the following image, the master branch is shown in the VSC status bar. Switching VSC to a different branch is described in the guide Switch branch.
Note: VSC opens in the same state it was in when you last closed it. Always check which branch, folders and files VSC is switched to. If you closed VSC previously using the
Xicon, without closing the folder in VSC, VSC may be switched to the wrong branch. You must ensure that VSC is switched to the correct branch to avoid inadvertently overwriting your files. The VSC status bar, at the bottom of the editor, indicates the name of branch that VSC is currently switched to. -
Go to View > Command Palette and type git branch. From the resulting list of commands, choose
Git Create Branch From....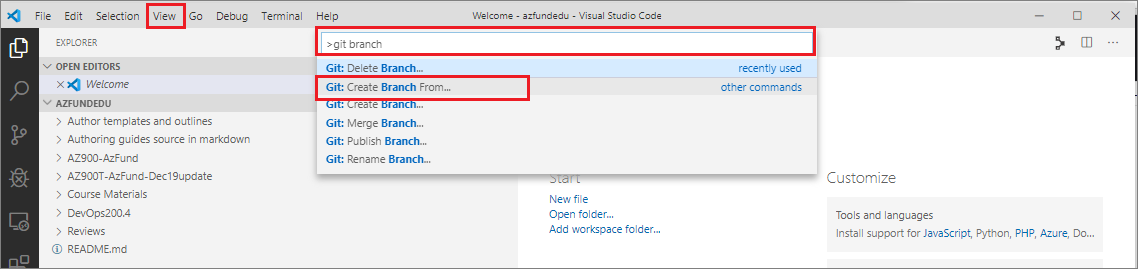
Note: There is another command called
Git Create Branch. Do not use this command, doing so will base your new branch on whatever branch is listed in the VSC status bar. Select the correct commandGit Create Branch From...instead. -
In the subsequent pane, enter a name for the branch you’re creating, and then press Enter.
The name of your new branch must conform to the branch naming convention described in Branch naming conventions.
For example, in the following image, the new branch is named m5techreviewkelly.

-
From the list of branches in the subsequent pane, select the branch that your new branch will be based on (i.e. set the base branch for your new branch).
For example, in the following image, the branch m5authekelly is selected as the base branch.
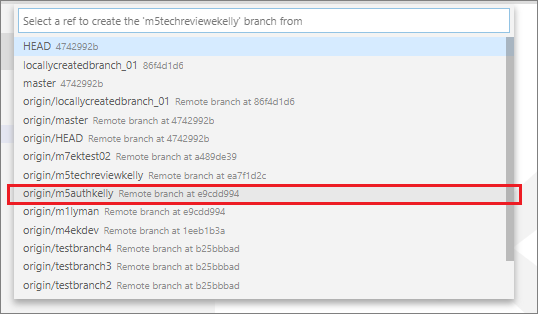
Note: If you are not prompted to choose a base branch, you may have selected the wrong command
Git Create Branch. Return to Step 4 and select the correct commandGit Create Branch From...instead. -
Your new branch should open in VSC. The VSC status bar will indicate that VSC has switched to the new branch you created.
Note: Your new branch is not on GitHub/ AzDevOps yet. Only you can access and see your new (local) branch, until you send your new branch to the project’s remote repo on GitHub/ AzeDevOps. To send (or push) your new branch to the remote repo, refer to Upload (push) your changes. Pushing your branch to the remote repo will ensure that your new branch is present on GitHub/ AzDevOps, backed up, and visible to other contributors.
You’ve created a new branch using VSC successfully.
Branch naming conventions
Generally, each contributor (author, reviewer, etc.) must work in their own branch. A separate branch for each module is also required. This approach keeps the content separated per contributor, at each stage in the process, and on a module by module basis.
A new branch is usually created from the master branch of the project’s remote repo. When you create a new branch, your branch name should describe your branch’s content, and make the branch’s purpose and owner clear to other contributors.
Use the following branch naming convention (all lower case) to name your new branch:
m <module number> <task> <contributor's surname>:
- The prefix
mis for “module”. <module number>refers to the module number that the file you are working on belongs to.<task>is a short code for the stage in the process the file is at. The task short codes are listed in the next section.- Add your
<surname>as a suffix to distinguish your work from the work of other contributors.
Examples of branch names are provided in Example branch names.
Task short codes
Use the following task short codes in your branch name to indicate the stage in the process that the file you are working on is at.
| Role | Process stage | Task short code |
|---|---|---|
| Author | Content authoring | auth |
| Reviewer | Instructional design review | idreview |
| Reviewer | Technical review | techreview |
| Reviewer | Academic review | acadreview |
| Editor | Copy editing | copyedit |
| Prepublication stylist | Prepublication styling and formatting | prepub |
Example branch names
The following are examples of branch names that conform to the branch naming convention, with descriptions of how the branch names are constructed.
Example authoring branch name
The following explains how the example authoring branch name m6authlee is constructed.
mis an abbreviation for “module”.6is the number of the module that the file belongs to.authis a short code for “content authoring”.leeis a reference to the author’s surname.
Putting the previous items together results in the authoring branch name m6authlee.
Example CE reviewer’s branch name
The following explains how the example reviewer branch name m6-cereview-lee is constructed.
mis an abbreviation for “module”.6is the number of the module that the file(s) for review belong(s) to.cereviewis a short code for “content editing review”.leeis a reference to the reviewer’s surname.
Putting the previous items together results in the reviewer branch name m6-cereview-lee.
9: Send (push) files
This guide describes sending (or pushing) the course files you created or modified from your computer to GitHub/ AzDevOps, using the Visual Studio Code (VSC) editor.
Note: This guide uses the Git terminology described in the previous guide Terminology and concepts.
Topics in this guide
Stage, commit, and push your files to GitHub/ AzDevOps
Complete the following steps to stage, commit and push your files to GitHub/ AzDevOps.
-
If you made changes to a file, save the file in VSC using Ctrl+S or File > Save.
Your modified file is now saved locally. You must now stage and commit the modified file to your local repo, then push it to GitHub/ AzDevOps.
-
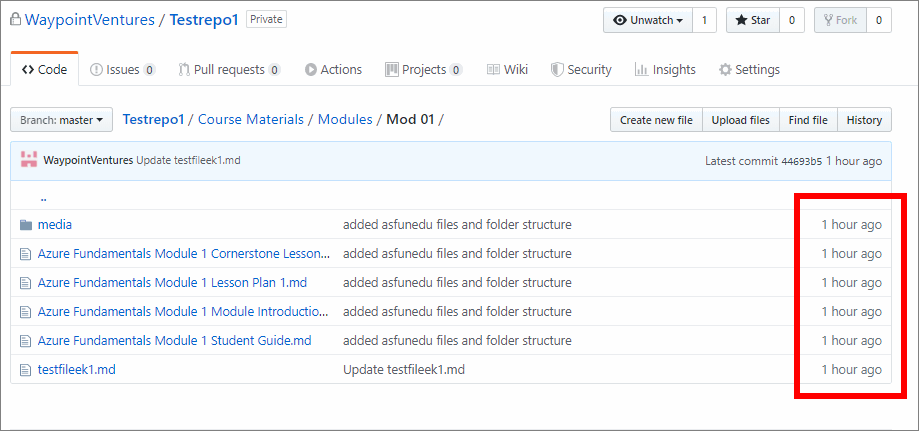
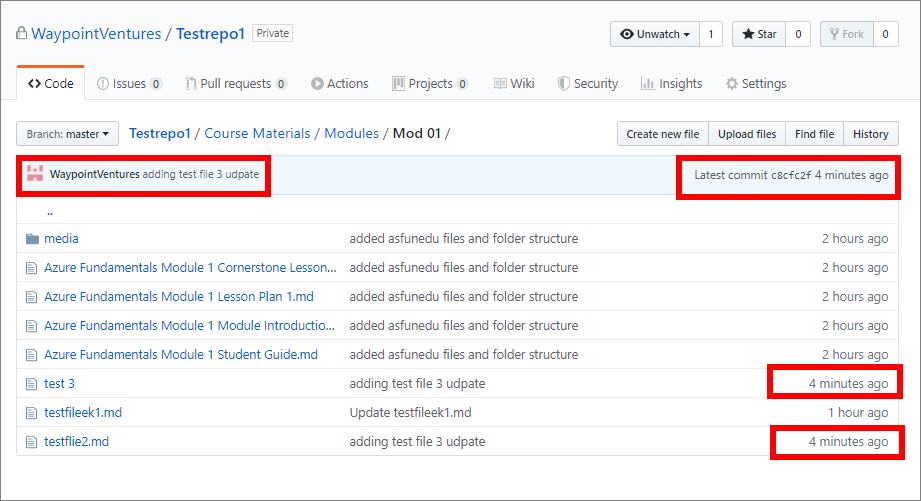
Sign into GitHub/ AzDevOps and verify that your file changes are not present on GitHub/ AzDevOps already by checking when the last commit occurred on GitHub/ AzDevOps.
Note: You don’t need to complete this step every time. Repeat this step until the push process and associated Git commands become familiar to you.
For example, in the following image, the last commit occurred on GitHub 1 hour ago to the files in the folder Mod 01.
-
Start VSC, then open your local repo folder, and go to View > Command Pallette….
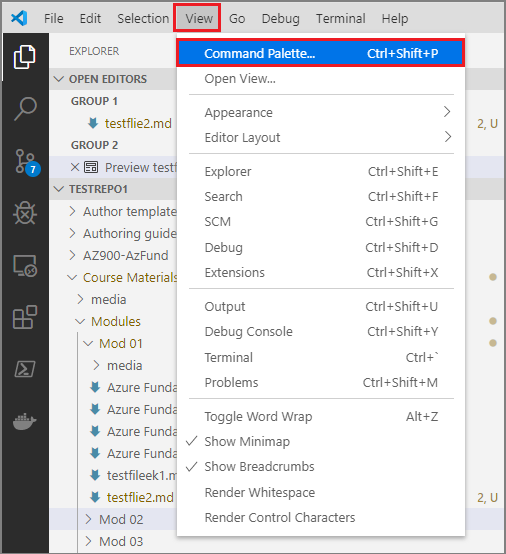
-
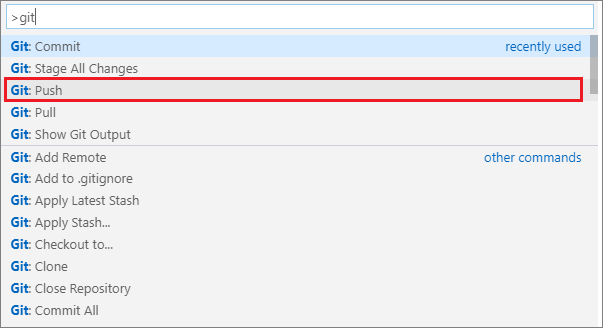
In the VSC Command Palette pane, type git to see a list of available Git commands.
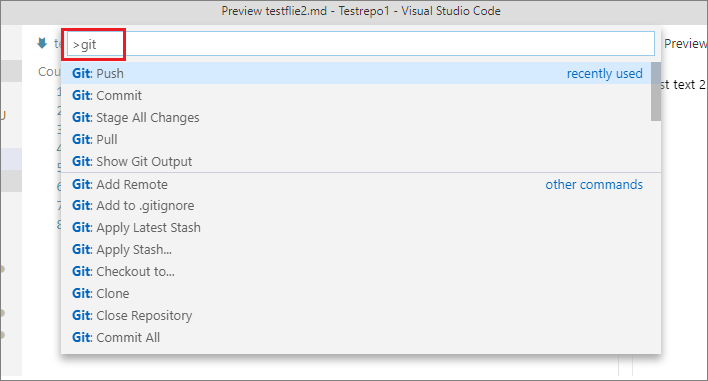
-
Select the command Git: Stage All Changes to stage your files.
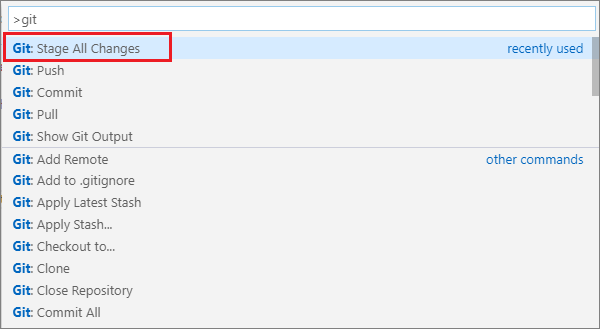
-
If you receive a prompt to Choose a repository, select your local repo.

-
In VSC, under Open Editors, hover your cursor over the name of the file that you staged. The hover-over text should indicate the file’s status as Index added (this property was absent previously, before you staged your changes).

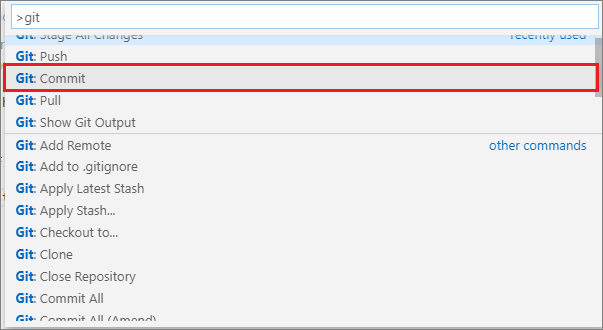
-
In the VSC Command Palette, type git and select the command git: Commit. This command commits the staged file changes to your local repo.
-
If you receive another prompt to Choose a repository, select your local repo.

-
When prompted, enter a message for the commit.
Your commit message must provide a concise description of the file changes you made. Your message should help other contributors understand the changes that you made. Your message will be visible to others, alongside the file, in the GitHub/ AzDevOps repo’s historical timeline.

-
When the Git commit command is finished, the Index added status associated with the file will be gone.
-
In VSC, open the Command Palette, then type git and select the command git: Push. This will send or push the file changes you committed up to GitHub/ AzDevOps.
-
If you receive a prompt to Choose a repository again, select your local repo.

Note: In VSC, the icon associated with a file in the current repo indicates the file’s Git status. A plus sign icon indicates that a file is ready for staging. An arrows icon indicates that a file is committed and ready to be pushed to GitHub/ AzDevOps.
-
When the Git push command is complete, sign in to GitHub/ AzDevOps and verify that your file changes are present on GitHub/ AzDevOps.
For example, in the following image, GitHub indicates that the files in the folder Mod 01 were updated 4 minutes ago.
You’ve pushed new/ modified course files from your computer to GitHub/ AzDevOps using VSC successfully.
Note: To resolve Git push-related errors in VSC, refer to Address Git push-related errors in VSC.
Address Git push-related errors in VSC
The following are common errors that can occur in VSC when you push files to GitHub/ AzDevOps. You must address these errors to run the git push command successfully.
Error: your file changes do not appear on GitHub/ AzDevOps
If your file changes are not present on GitHub/ AzDevOps, check that you staged, committed and pushed your file changes correctly. Repeat the Git commands from the previous Stage, commit, and push your files to GitHub/ AzDevOps, if necessary.
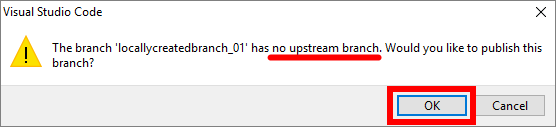
Error: no upstream branch
If you receive a message stating that your branch has no upstream branch, your branch is local only and does not exist on GitHub/ AzDevOps yet. This message is asking you to confirm that you want to publish your local branch to GitHub/ AzDevOps. If you choose OK, your local branch will be made available on GitHub/ AzDevOps.
Error: can’t push refs to remote
If you receive an error message stating that VSC Can’t push refs to remote. Try running pull first…. Run the git pull command from the VSC Terminal, as described in the previous guide Update branch (pull) in VSC. The git pull command gets the latest files from GitHub/ AzDevOps, and merges them with the files in your local repo. When the git pull command is completed successfully, run the git push command again.

Error: permission denied
You might receive an error message stating that VSC is …..unable to x … with file z … permission denied… (or similar). This error is most likely caused by having a file from your local repo open in an editor window in VSC. Close the file in VSC, then stage, commit and push your file changes to GitHub/ AzDevOps again.
10: Add/ edit markdown in VSC
This guide describes how to edit, or add content to, a markdown file using the Visual Studio Code (VSC) editor.
Note: This guide assumes that the markdown file you are editing exists in your local repository (repo). Apply the steps in this guide to any suitable markdown (or PNG) file that you created or cloned from the project’s GitHub or Azure DevOps repo.
If your local repo doesn’t contain a markdown file for you to edit, create a new markdown file by following the guide Create new markdown file in VSC. After you create a new markdown file, add content to the new file by following the steps in this guide.
Some project’s may have author outlines available for you to use. An author outline is a markdown file that contains markdown elements, like tables or multilevel lists. You can copy the markdown elements from an author outline and paste them into your markdown file to create content quickly. The use of author outlines is described in the guide Use author outlines. Ask your project manager if there are author outlines available for the course you are working on, and where to find them.
Topics in this guide
Edit an existing markdown file using VSC
-
Open VSC, and choose File > Open folder from the top menu.
-
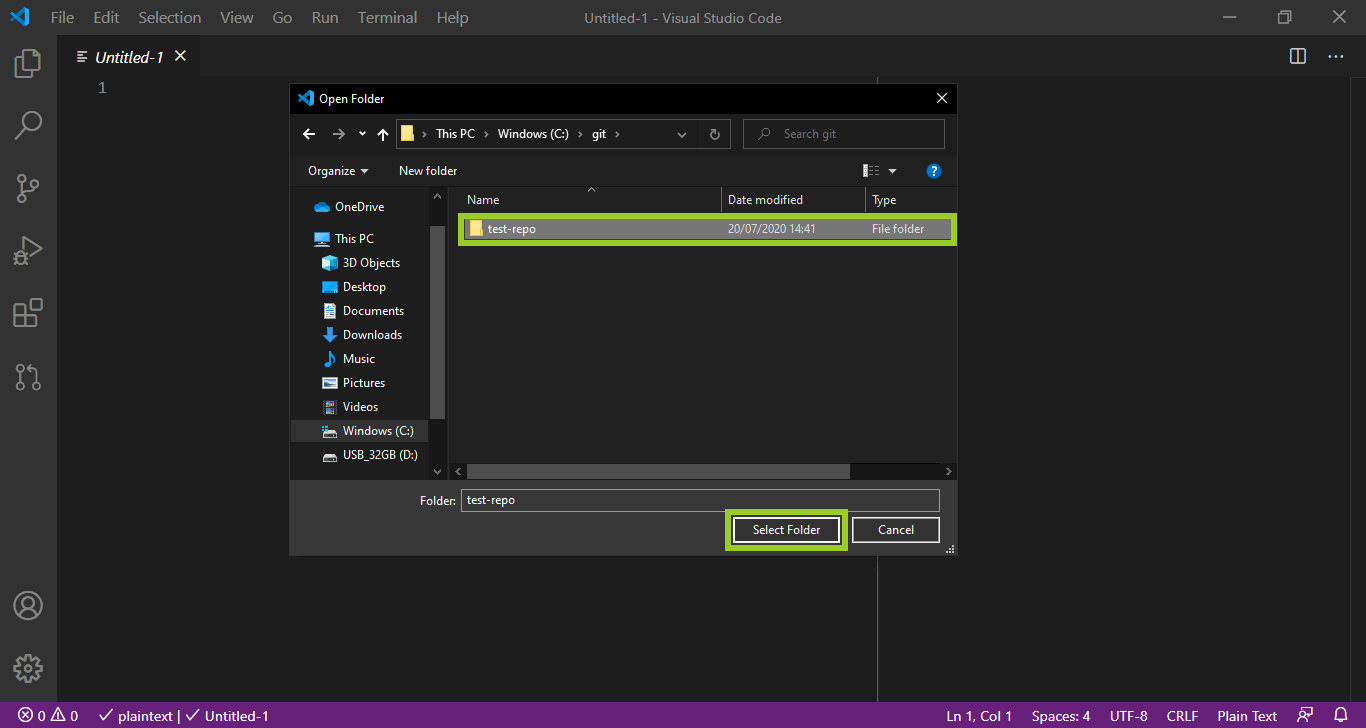
Use the VSC open folder file explorer to select the local repo folder on your computer, then choose Select folder.
For example, in the following image, the local repo folder named test-repo is selected.
-
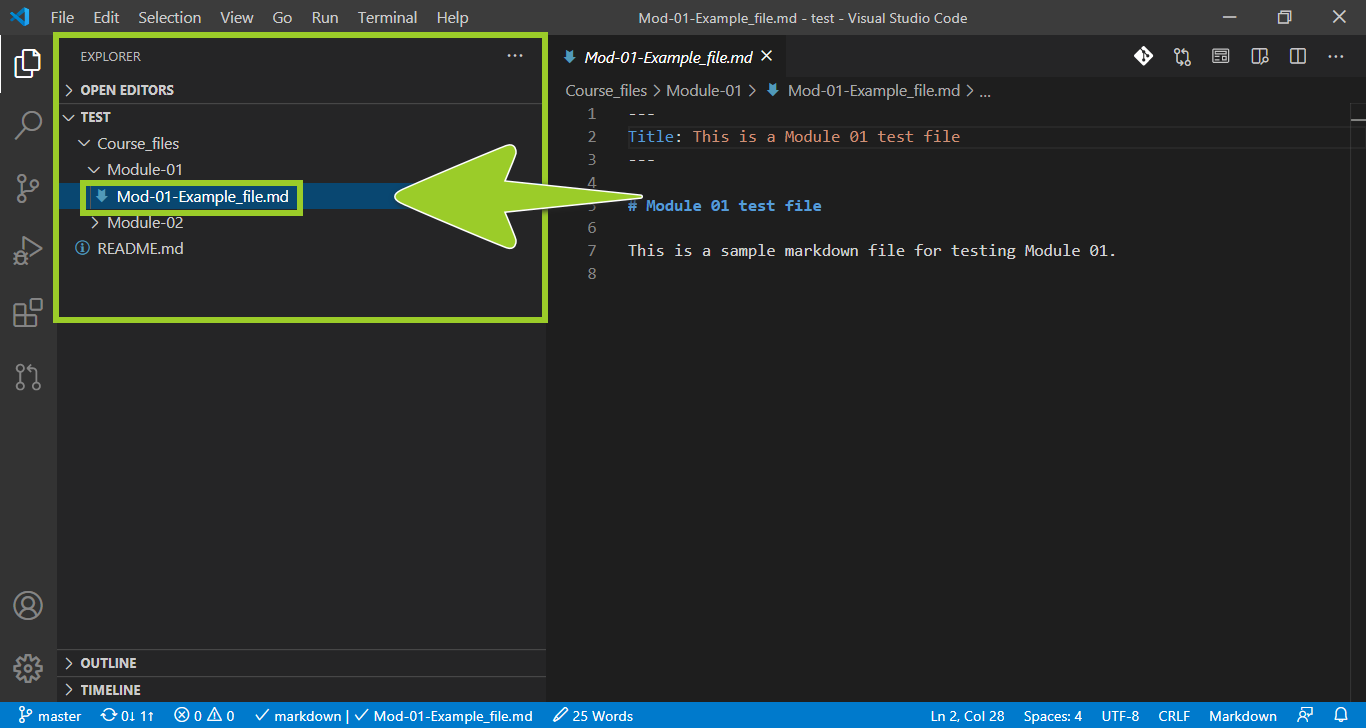
Use the VSC explorer (on the left) to go to the folder that contains the markdown file you want to edit.
For example, in the following image, the folder named Course_files\Module-01 is selected in the VSC explorer.

Note: The VSC status bar, at the bottom of the editor window, indicates the name of the branch that VSC is currently switched to. For example, in the previous image, the VSC status bar indicates that VSC is currently switched to the branch named master. To avoid overwriting your files, switch VSC to the correct branch by following the guide Switch branches.
-
From the VSC explorer, select the required markdown file for editing.
For example, in the following image, the markdown file named Mod-01-Example_file.md is selected in the VSC explorer.
Note: If you don’t have a markdown file to edit, create a new markdown file using the guide Create new markdown file in VSC. Then, proceed to the next step (Step 5) to add content to the new file.
-
Select the VSC explorer icon (on the left side bar) to maximize the VSC editor tab.
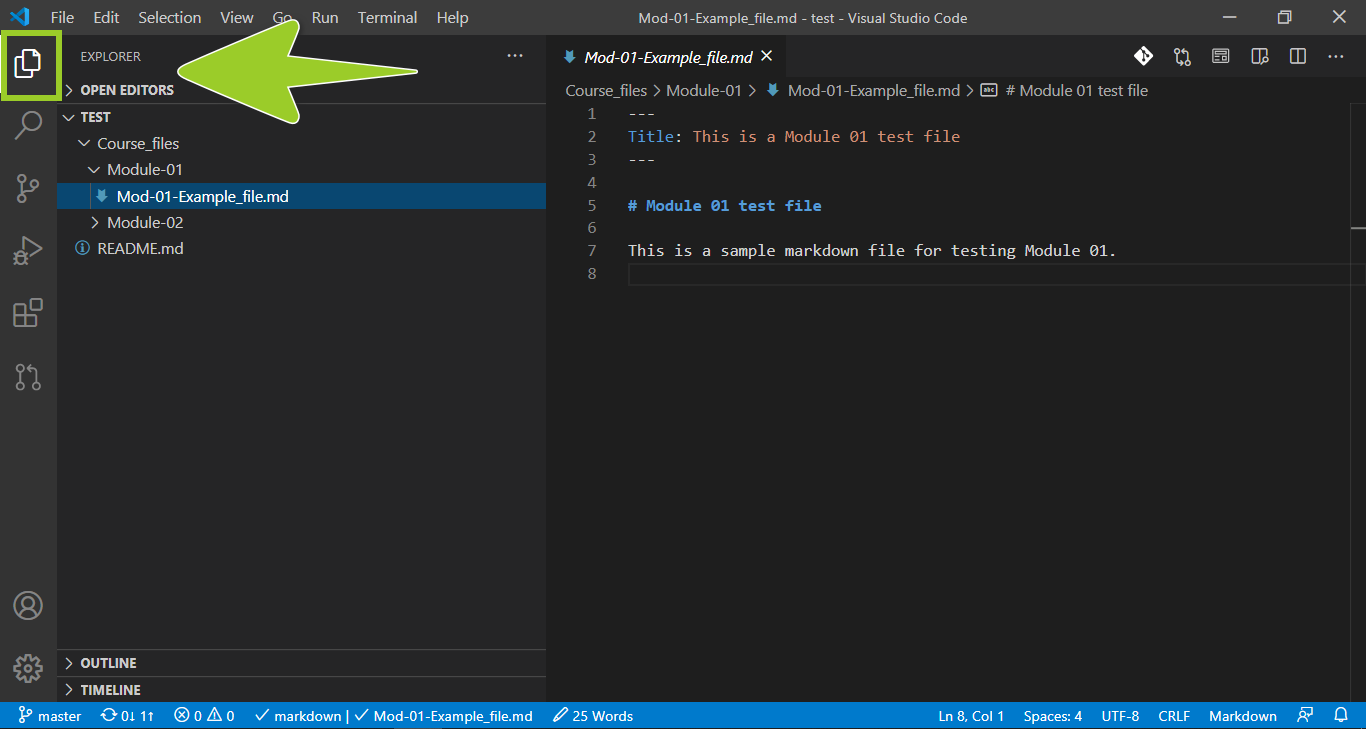
Note: Select the VSC explorer icon to toggle VSC side bar on and off or use the shortcut keys SHIFT + \. You can open more than one file at a time in VSC, and each file can be opened in a separate VSC editor tab.
For more information about VSC shortcut keys, refer to Key Bindings for Visual Studio Code.
-
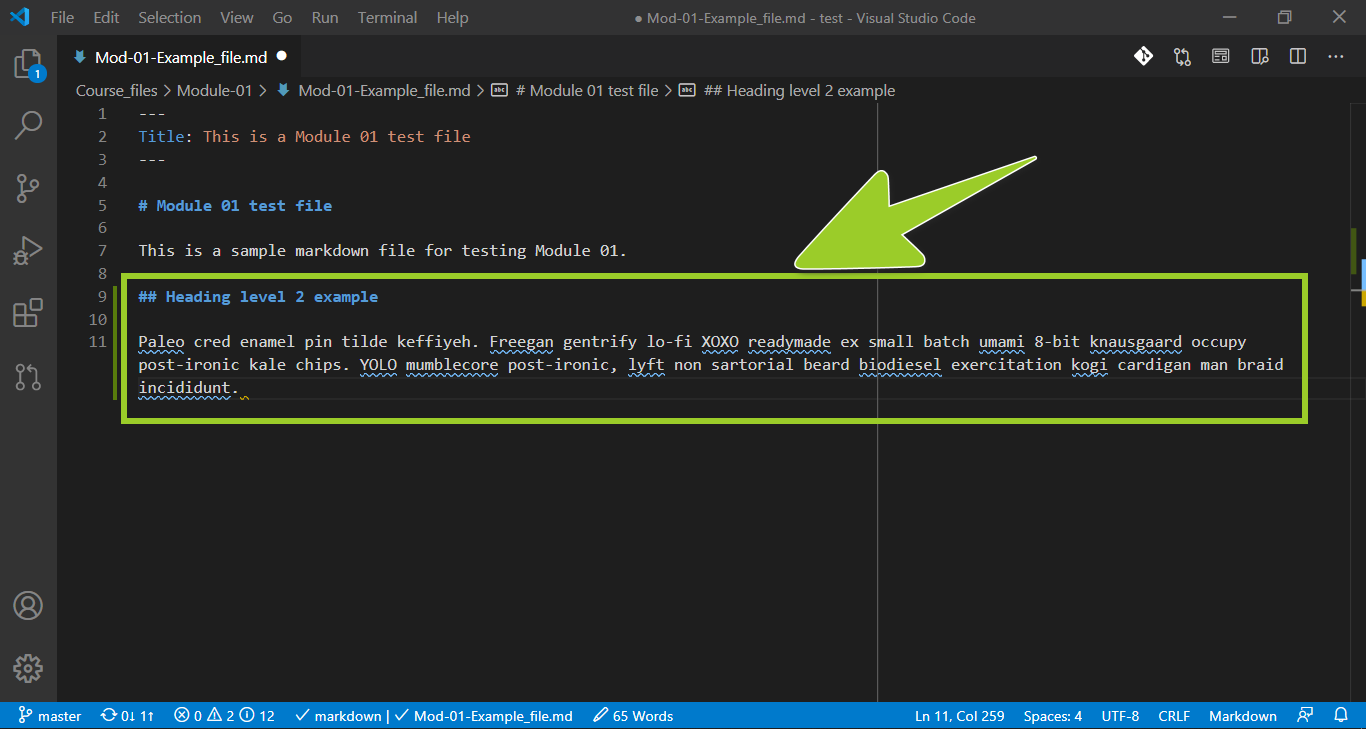
In the VSC editor tab, make your required changes by editing or adding content to the markdown file.
For example, in the following image, the level 2 sub-heading ### Heading level 2 example and accompanying paragraph, with placeholder text, have been added to the markdown file in a maximized VSC editor tab.
Note: Ensure that the file’s content conforms to the markdown syntax described in the guide Markdown syntax guide.
If you are using an author outline, copy the markdown elements provided within the author outline, like tables or multilevel lists, and paste them into your markdown file. Author outlines are described in the guide Use author outlines.
To add graphics and images to your file, follow the guide Add/ edit images in VSC
-
Select the Open Preview to the Side icon (top right) to open a rendered version of your markdown file in a VSC preview tab, alongside the VSC editor tab.
For example, in the following image, the VSC preview tab (on the right) contains the heading and text that were added into the markdown file in the previous Step 6. The VSC editor tab, on the left, contains the “raw” markdown syntax.
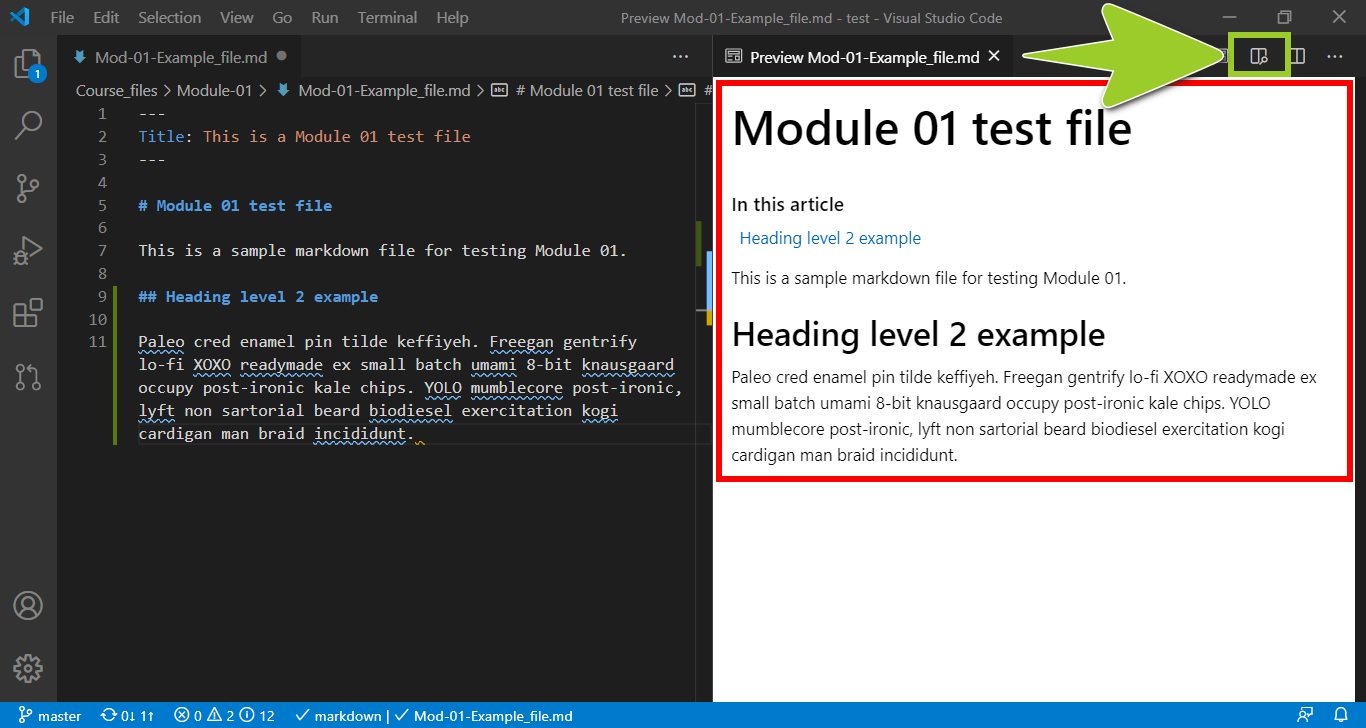
Note: Use the Open Preview to the Side icon, or shortcut keys CTRL + SHIFT + M, to toggle VSC Preview to the Side on and off. To toggle a “full-window” markdown preview on and off, use the shortcut key CTRL + SHIFT + V. Using VSC markdown previews can help you to identify and address content formatting issues. You should also fix any syntax errors that VSC highlights by following the guide Fix linter issues.
-
When you have finished updating the markdown file’s contents, save, stage, commit, and push your file to the project’s remote repo by following the guide Send (push) files.
-
After you have pushed your file to the project’s remote repo, create a new pull request to merge the file by following the guide Create pull request.
You have edited, or added content to, a markdown file using VSC successfully.
11: Add/ edit images in VSC
This guide describes how to add images and graphics to a markdown file using the Visual Studio Code editor (VSC), and how to update images and graphics.
Topics in this guide
Add an image or graphic to a markdown file using VSC
Complete the following steps to add an image or graphic into a markdown file using VSC.
-
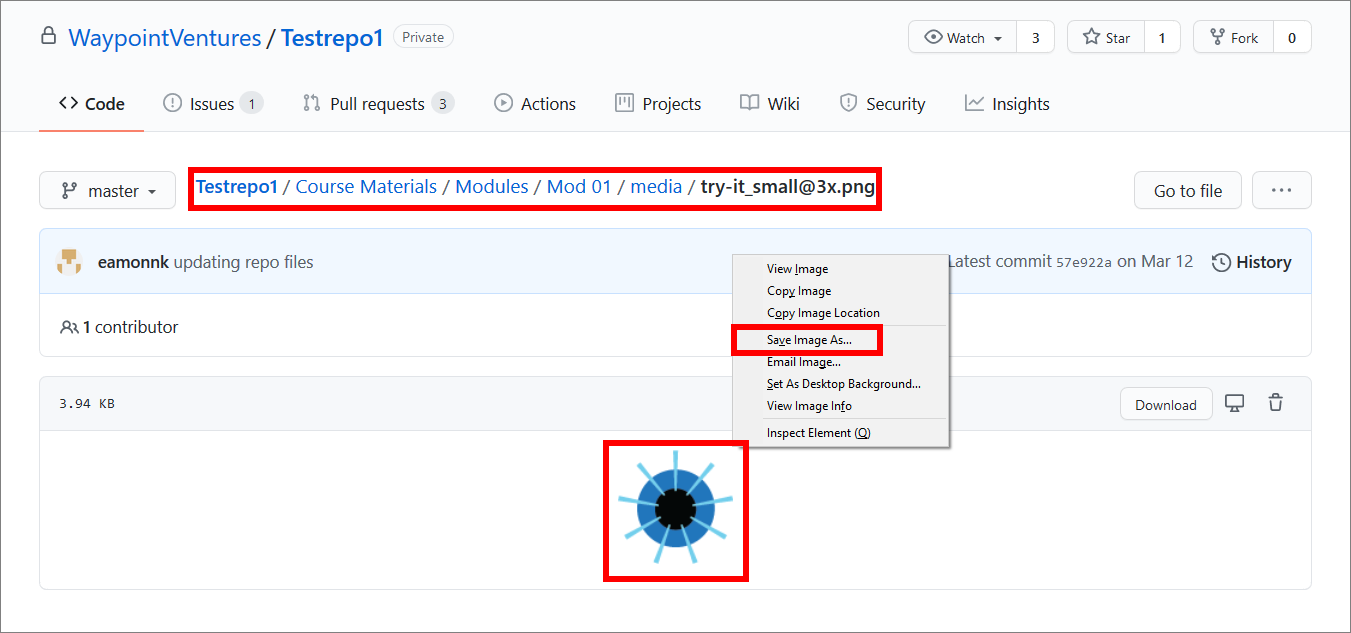
Find a suitable image or graphic file to use, from an approved source, and save it to your computer in Portable Network Graphics format (.PNG).
In the following image, the PNG file try-it_small@3x .png, from the WayPoint Ventures’ test repository (Testrepo1) on GitHub, is an example of a suitable image. Modify the instructions to suit your preferred source of images or graphics, and PNG file.
Note: You must only use images or graphics in PNG format. Using PNG files helps to maintain a standardized file format for images and graphics throughout a project, and keeps file sizes to a minimum.
Ask your project manager if there are approved sources of images and graphics available for you to use within the project you’re working on. You can save time by reusing images and graphics, and their corresponding alt image text.
-
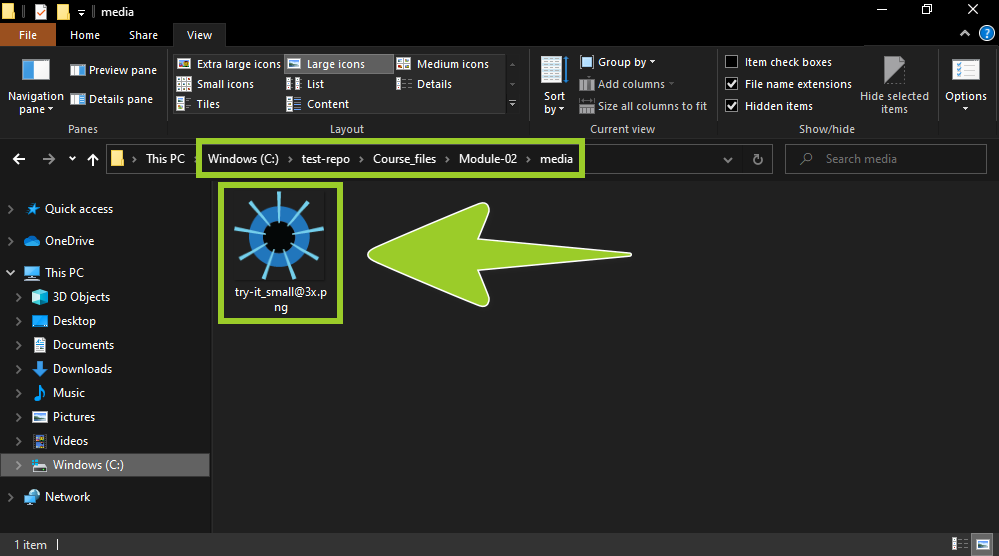
Copy the PNG file you downloaded, and paste it into the appropriate image storage folder inside your local repository (repo).
For example, in the following image, the PNG file try-it_small@3x .png is pasted into an image storage folder named media, inside the local repo test-repo. Windows File explorer shows the media folder on the filepath test-repo\Course_files\Module-02\media.
Note: Any PNG files you paste into your local repo can be sent (pushed) to GitHub or Azure DevOps, like markdown files, by following the guide Send (push) files.
The location of image storage folders can vary between projects. For example, the WayPoint Ventures’ repo Testrepo1 on GitHub contains a separate image storage folder, named media, for each module. All PNG files are be placed into a media folder that corresponds to a particular module. In Testrepo1, the media folders are on the filepath Testrepo1\Course Materials\Modules\Mod
X\media whereXrefers to the number of the module.Ask your project manager about the location of image storage folders for the particular project you are working on.
-
Rename the PNG file you pasted by using the following filename convention:
mod<module_number>-<brief_description>-<three_digit_number>.pngFor example, in the following image, the original PNG filename try-it_small@3x .png has been updated to mod02-try_it-001 .png.
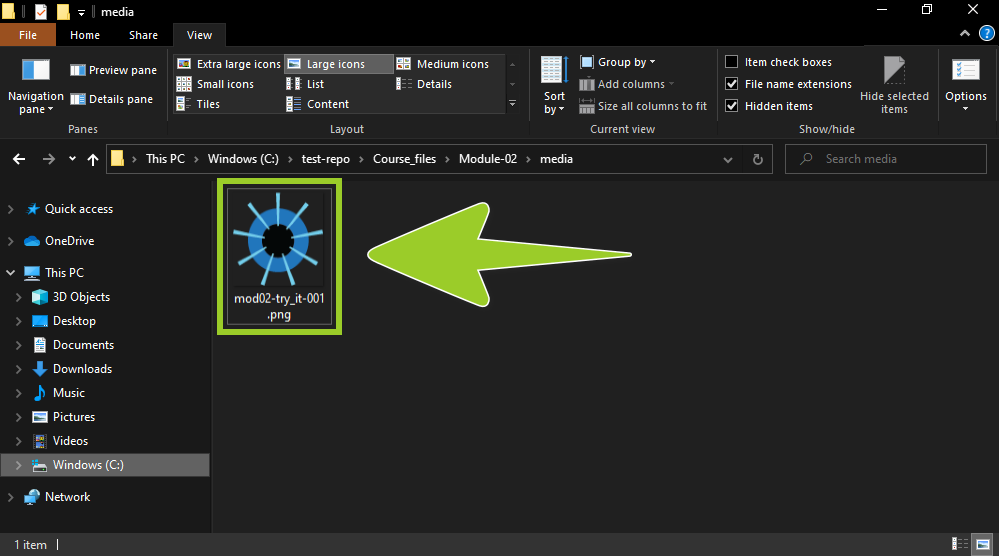
Note: Other contributors may work with your PNG file. To ensure that your PNG file is not removed by mistake, use clear file naming conventions to help other contributors identify the purpose of your PNG file, and the module it belongs to.
-
In VSC, open your local repo folder, and use the VSC explorer to select a markdown file to add the PNG into.
For example, in the following image, the markdown file Mod02-Example_file .md is selected in the VSC explorer. The markdown file Mod02-Example_file .md is in the local repo test-repo, and on the filepath test-repo\Course_files\Module-02.
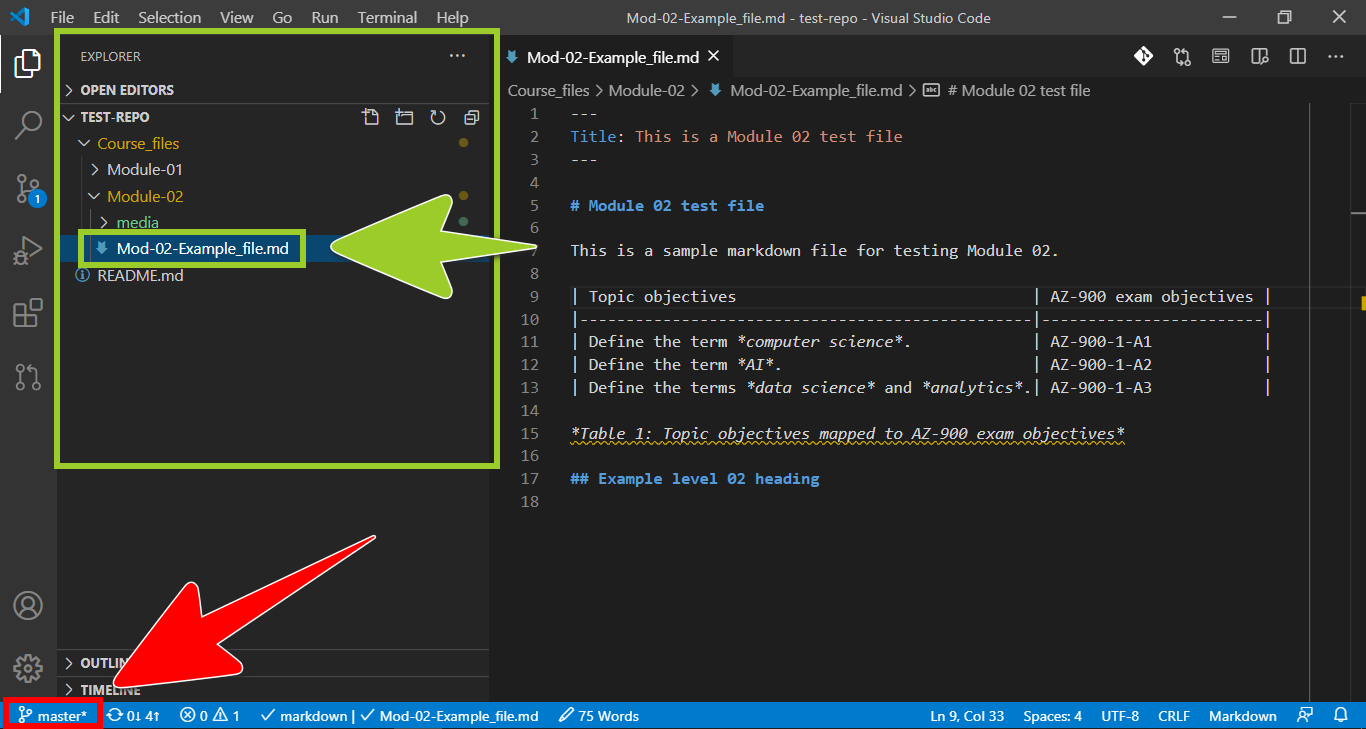
Note: The VSC status bar, at the bottom of the editor window, indicates the name of the branch that VSC is currently switched to. For example, in the previous image, the VSC status bar indicates that VSC is currently switched to the branch named master. To avoid overwriting your files, switch VSC to the correct branch by following the guide Switch branches.
-
If you need to maximize the VSC editor tab, select the VSC explorer icon from the left side bar.
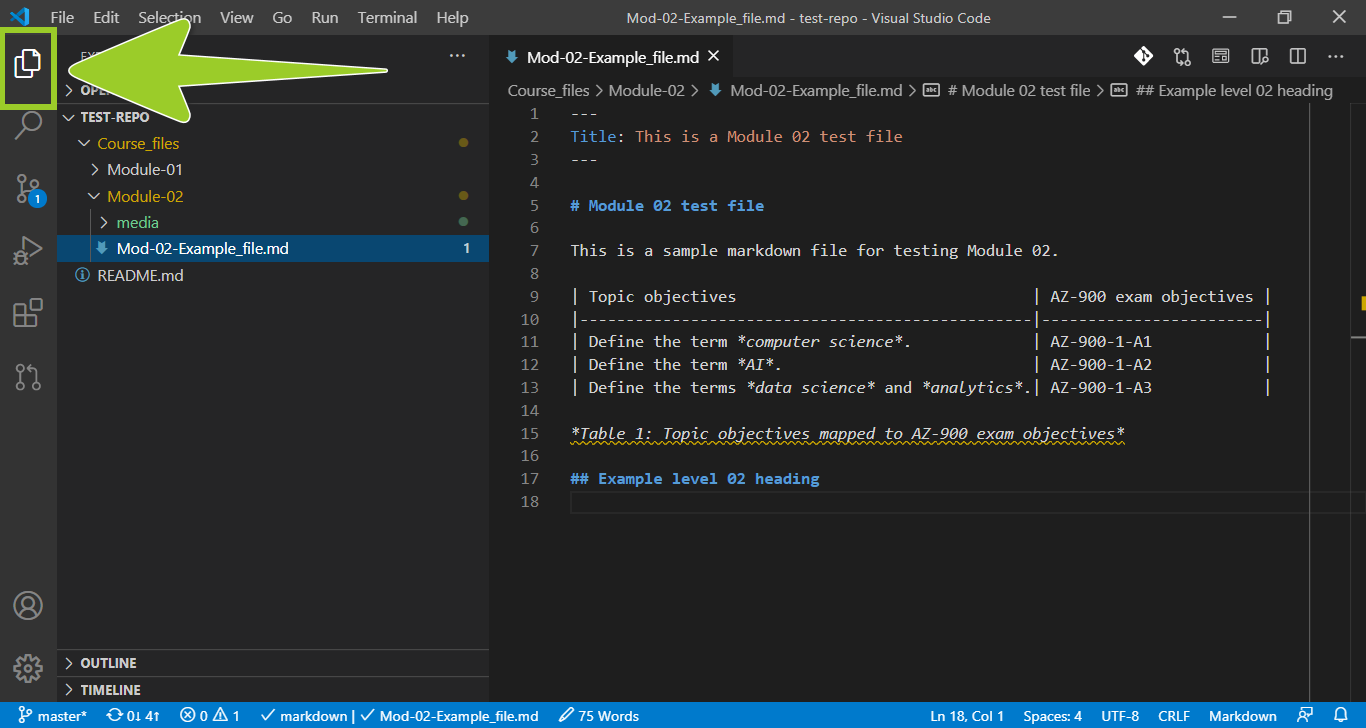
Note: Select the VSC explorer icon to toggle the VSC side bar on and off.
-
In the VSC editor tab, create a link to the PNG file by adding the following markdown syntax to a suitable place inside your markdown file.
You must modify the previous markdown syntax to suit your required image storage folder and image filename .png. For example, in the following image, to create a link to the PNG file mod02-try_it-001 .png, the modified markdown syntax
is added to the markdown file.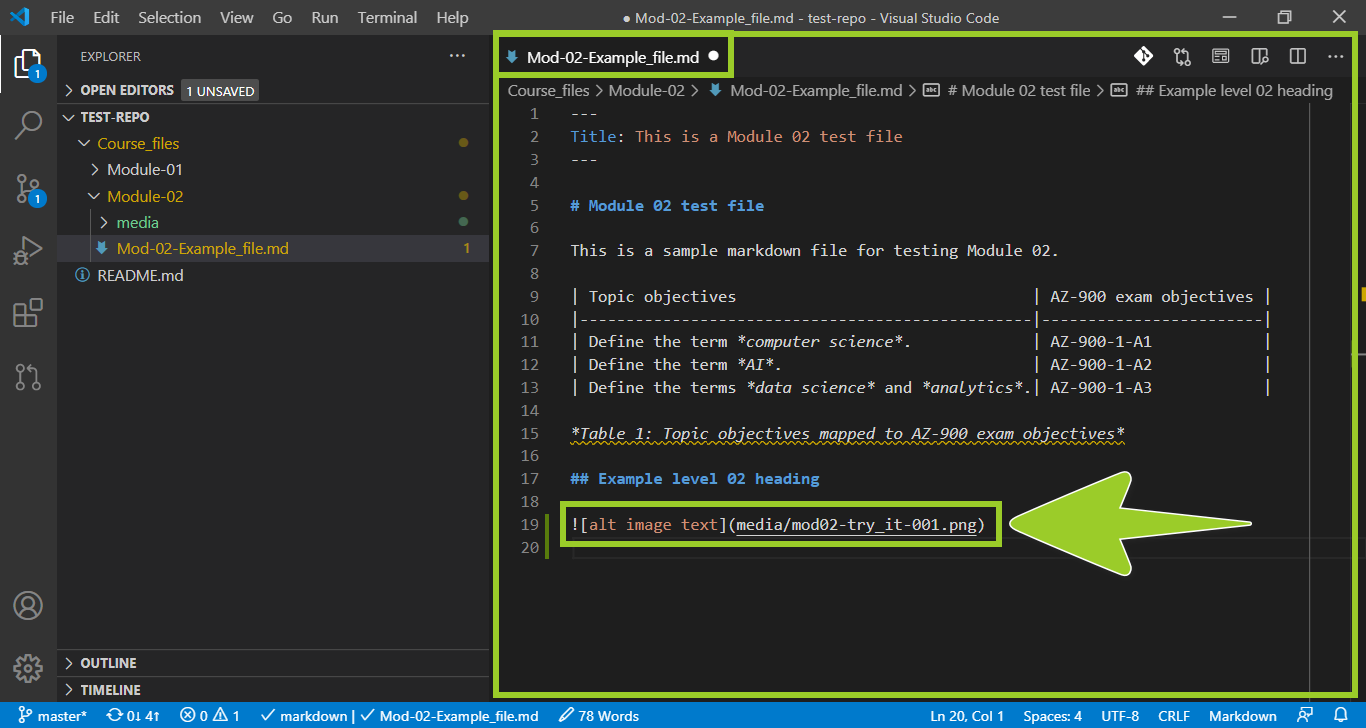
Note: Where appropriate, in the VSC editor tab, you must indent the links to PNG files in your markdown file. Indenting ensures that the images and graphics line up correctly with the other elements in your markdown file, like bulleted lists, and paragraph text.
Typically, in markdown, an empty line is required before a link to a PNG file, and after the link. Each link must also be placed on a new line. You must add caption text for some PNG files.
The correct markdown syntax for indenting, spacing, and captioning PNG file links is described in the guide Markdown syntax guide.
-
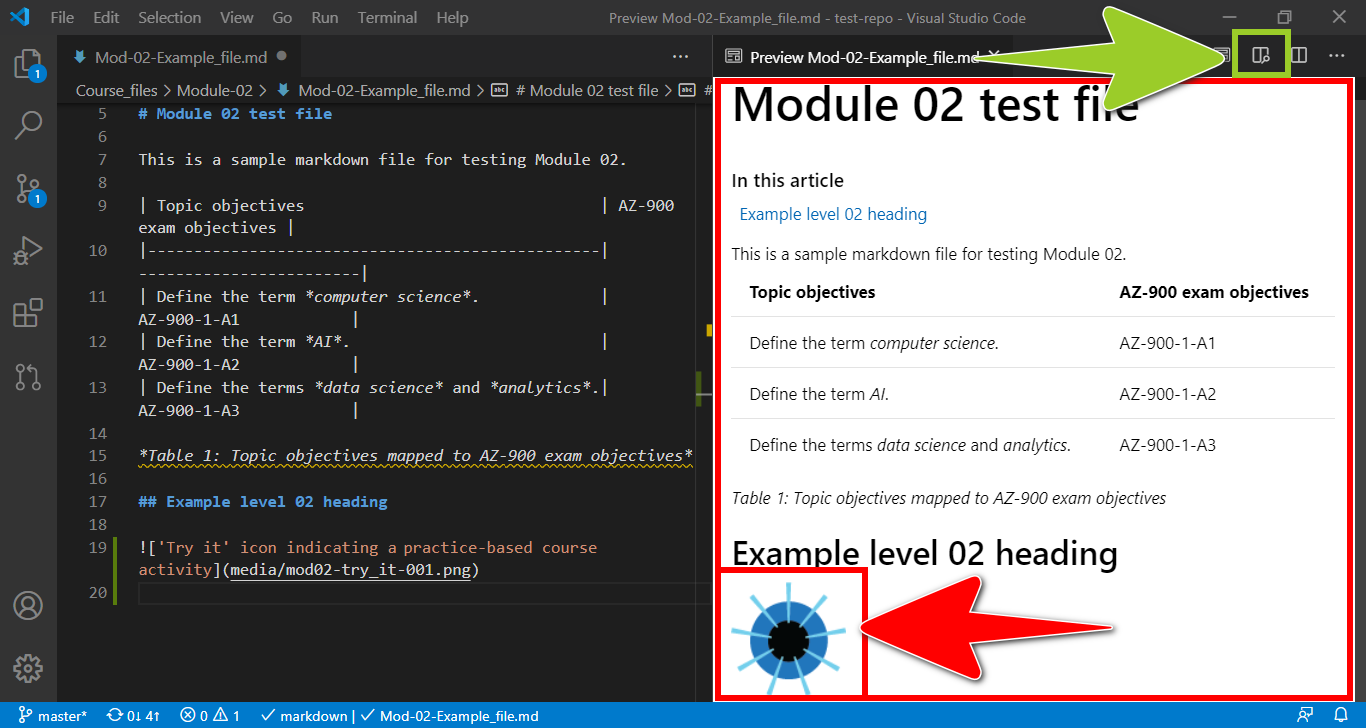
Update the alt image text for the PNG file you added.
For example, in the following image, the alt image text has been updated to ‘Try it’ icon indicating a practice-based course activity.
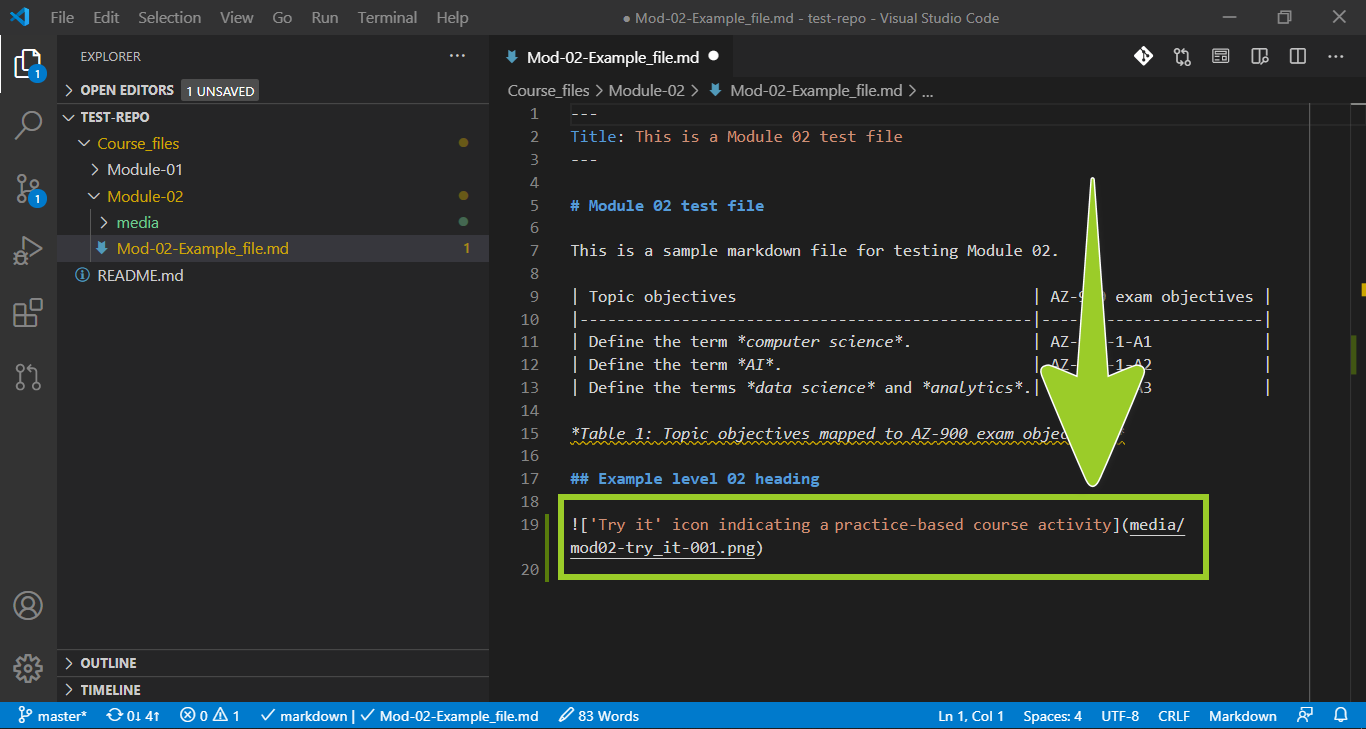
Note: The alt image text is a textual description of an image or graphic for use by people with visual impairments. Alt image text will be published in the final course documents, and adding alt image text is a legal requirement for accessibility purposes. You must add alt image text to all images and graphics in markdown.
-
Verify that your PNG file renders as intended by selecting the Open Preview to the Side icon (top right). Selecting the icon opens a rendered version of your markdown file in a VSC preview tab, alongside the VSC editor tab.
For example, in the following image, the VSC preview tab (on the right) contains a rendered version of the markdown file, with the linked PNG file. The VSC editor tab, on the left, contains the non-rendered “raw” markdown syntax.
Note: Use the Open Preview to the Side icon, or shortcut keys CTRL + SHIFT + M, to toggle VSC Preview to the Side on and off. To toggle a “full-window” markdown preview on and off, use the shortcut keys CTRL + SHIFT + V.
Using VSC markdown previews can help you to identify and address content formatting issues, like inconsistent indenting, that can cause PNG files to display incorrectly. You should also fix any syntax errors that VSC highlights by following the guide Fix linter issues.
For information about VSC shortcut keys, refer to Key Bindings for Visual Studio Code.
-
When you have finished adding images or graphics into the markdown file, save, stage, commit, and push your markdown and PNG files to the project’s remote repo by following the guide Send (push) files.
-
After you have pushed your markdown and PNG files to the project’s remote repo, create a new pull request to merge the files by following the guide Create pull request.
You have added a new image or graphic into a markdown file using VSC successfully.
Update an image or graphic
This topic describes how to update an image or graphic.
Note: When you create a new version of an image or graphic, reuse the original PNG filename to avoid having to modify any links to the PNG file in the markdown files. Overwrite the original PNG file with your new PNG file using copy and paste. Reusing the same filename allows version control software, like Git, to track different versions of a PNG file in your repo.
Complete the following steps to update (overwrite) a PNG file.
- Outside your local repo, rename the new PNG file with the same filename as the PNG file you want to replace.
- Copy the new PNG file to your clipboard.
- Paste the new PNG file into the folder, in your local repo, that contains the PNG file you want to replace. If prompted, confirm that you want to overwrite the existing PNG file with the new PNG file.
- Optional - Where necessary, open any markdown files that contain links to the PNG file, and update the corresponding alt image text accordingly.
- Push the new PNG file to your project’s remote repo by following the guide Send (push) files.
- Optional - If you updated the alt image text inside any markdown files, you must also push the markdown files to your project’s remote repo by following the guide Send (push) files.
- After you have pushed your PNG (and markdown) file(s) to the project’s remote repo, create a new pull request to merge the file(s) by following the guide Create pull request.
You have updated an image or graphic successfully.
12: Create pull request
This guide describes how to create a Pull Request (PR) on AzDevOps.
Note: This guide assumes that any additions/ changes you made to a file in your local repo have been saved, staged, committed, and pushed to AzDevOps using the guide Send (push) files.
General information about PRs is available from the guide Pull requests overview.
Topics in this guide
Create a pull request on AzDevOps
Complete the following steps to create a PR on AzDevOps.
-
Open a web browser, go to the AzDevOps website at https://dev.azure.com, and sign in.
-
On the Projects tab, locate the project repo with the branch you want to restore, and select the Repos icon.
For example, in the following image, the Repos icon for the project example-repo is selected.
-
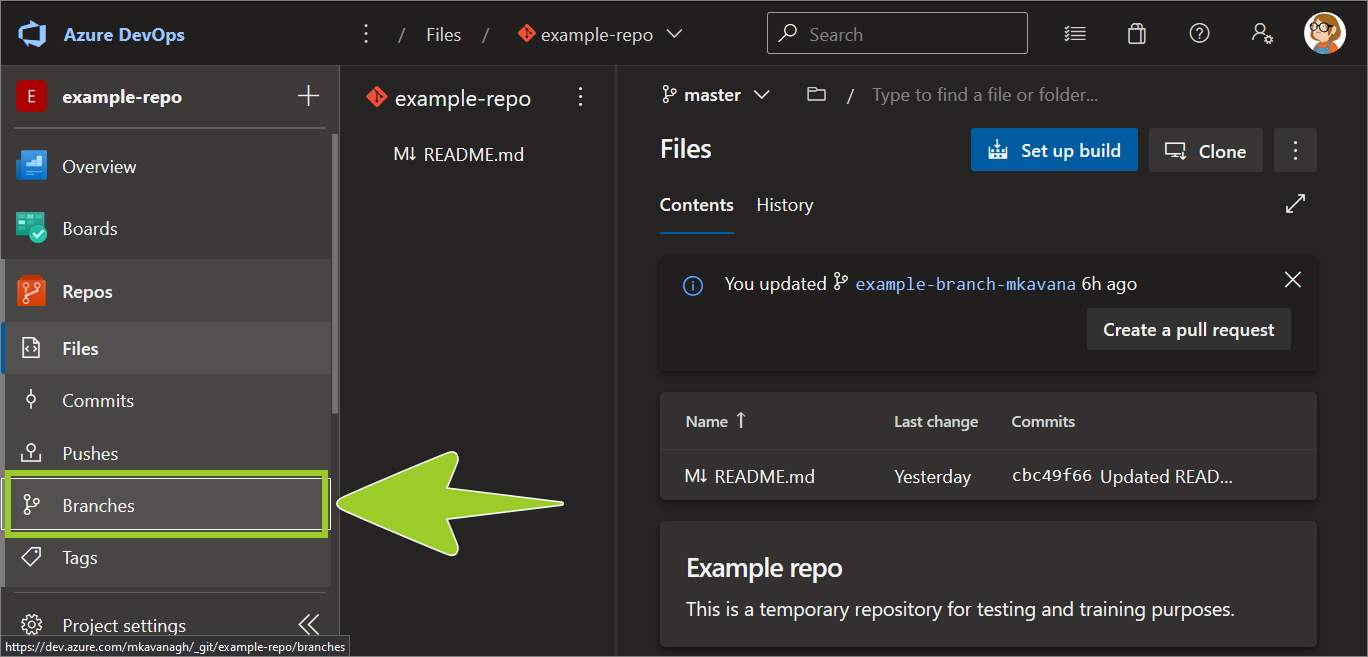
Select Branches from the left side menu.
-
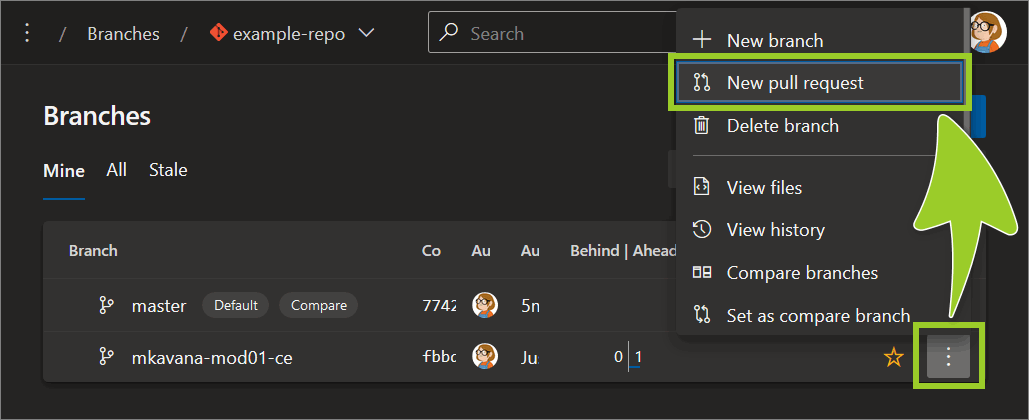
In the Branches pane, select the vertical ellipsis (
⋮) icon beside the branch you want merge from (on the right side), and then choose New pull request.For example, in the following image, the new PR will be merged from the branch named mkavana-mod01-ce.
-
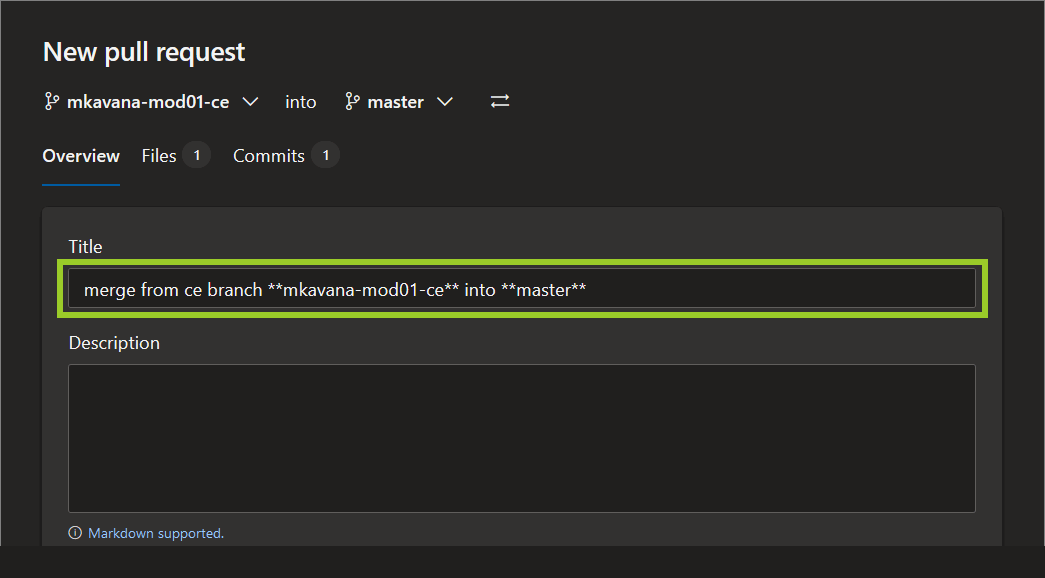
In the New pull request form, add the following into the PR Title text field:
- number of the module that the file you’re merging belongs to
- type of action you performed on the file you’re merging (for example, content edit review, image updates)
- name of the branch you’re merging into (for example, master)
For example, in the following image, a suitable PR title is Merge from ce branch mkavana-mod01-ce into master.
-
Optional In the Description text field, describe the file additions/ changes you’re merging.
For example, in the following image, a suitable description is Merge copy edits from ce branch mkavana-mod01-ce into master with copy edits to the files /sample-folder/sample-file.md.
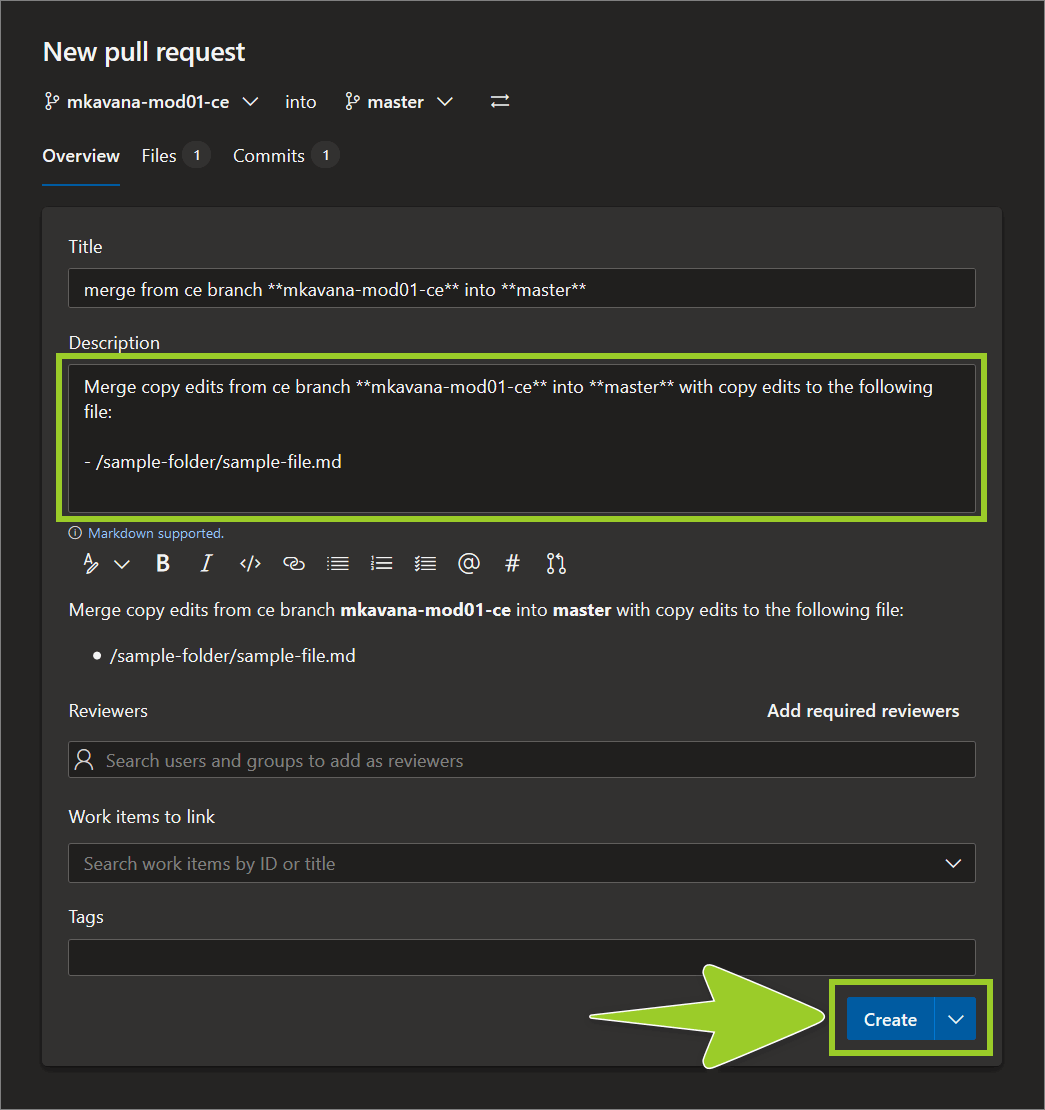
Note: Descriptions provide a way for contributors to explain the changes they applied to files on AzDevOps. Descriptions are optional, but recommended.
The reviewer’s guides in the Workflow and processes section of this website suggest adding a checklist of items the for review into the Description field. A checklist provides a convenient way for reviewers, content authors, and other contributors to track the progress of a review. To add a review checklist, choose a guide that corresponds to your role from the navigation menu on the left of this website.
-
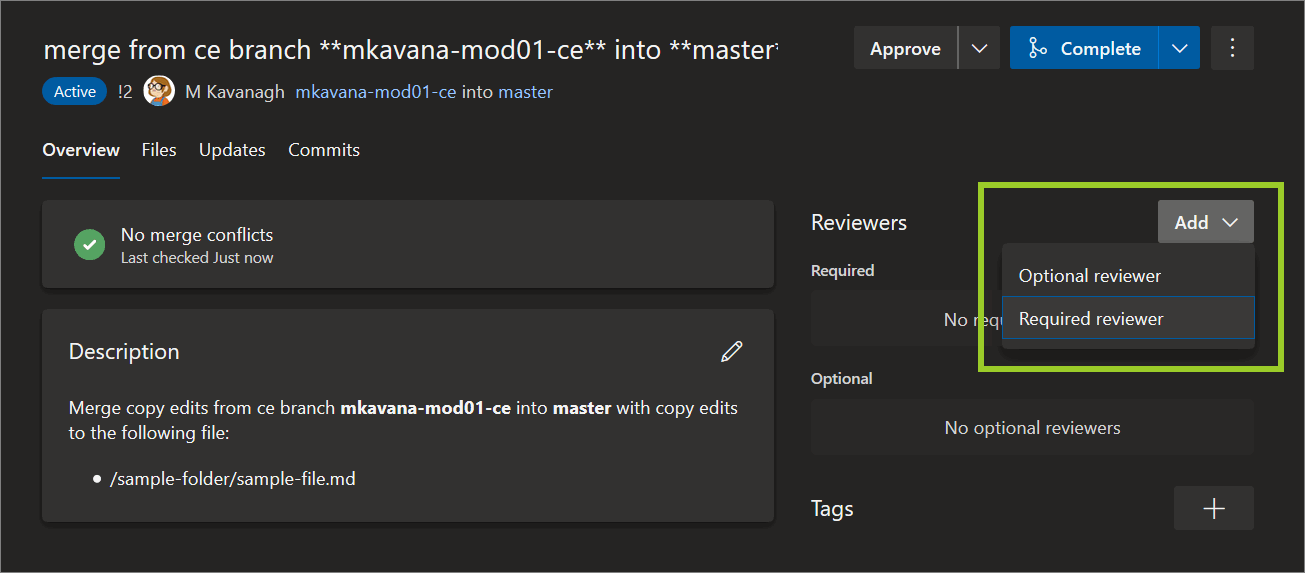
In the Reviewers pane, in PR Overview tab, to add a reviewer to your PR, select Add, choose Required reviewer, and then enter the reviewer’s AzDevOps username.
In the Reviewers pane, add AzDevOps username of the owner of the branch you’re merging into, like the originating author for example. If you modify files in the PR, AzDevOps will send notifications to the reviewers you added.
-
Send an email to the person you’re handing your files off to (as a notification that your PR is ready). Your email should include the following:
- Details about the PR (like the names of the branches the PR involves, PR title, number, and purpose). For example, Mod 01 PR#23 to merge copy edit changes from ce-branch-X into author-branch-Y
- URL/ link to the PR on AzDevOps
- Optional screen capture/ grab of the PR
You’ve created a pull request on AzDevOps successfully.
Note: Keep the new PR open (i.e. do not merge the PR yet). Keeping the PR open allows you to apply and push subsequent changes from your local branch “up” to AzDevOps. Any further changes that you push from your local branch up to AzDevOps will be “rolled into” your open pull request.
At this stage, the reviewer evaluates the file that contains your additions/ changes.
Where necessary, the reviewer will add comments about your changes to the open PR, or by sending you an email. Adding comments to a PR is useful for discussing changes, sharing suggestions, and consulting the reviewer about the changes you made to the file on your branch. To evaluate a reviewer’s feedback in a PR, follow the guide Work in a pull request.
13: Work in a pull request
This guide lists key the considerations for evaluating an AzDevOps Pull Request (PR), and describes how to work in an AzDevOps PR to evaluate proposed file changes/ additions.
Topics in this guide
- Key considerations for evaluating an AzDevOps PR
- Open a file in an AzDevOps PR
- Add and resolve AzDevOps PR review comments
- Open an image file in an AzDevOps PR and add comments
- Mark a file as reviewed in an AzDevOps PR
Key considerations for evaluating an AzDevOps PR
This topic describes key considerations for evaluating an AzDevOps PR.
An AzDevOps PR contains file changes/ additions proposed by another contributor. Typically, when a contributor creates an AzDevOps PR, they also nominate a reviewer on AzDevOps. The AzDevOps reviewer must then evaluate the contributor’s proposed changes, within the PR, to determine their acceptability.
Note: Unlike GitHub, reviewers cannot modify files in an AzDevOps PR from a web browser directly. All file modifications must be applied to the originating branch. It might be quickest to modify a file from a PR in Visual Studio Code (VSC), and then stage, commit, and push the modified file “up” to AzDevOps.
If you’re unsure, check with your project manager.
The following list of key considerations can help AzDevOps reviewers evaluate an AzDevOps PR.
- On AzDevOps, changes made to files on one branch can be compared and contrasted with (unchanged) files on the originating branch using the Differences (or diff) feature.
- The diff feature on AzDevOps shows how the contents of a file were modified, line-by-line. Within a “diffed” file, red colored line items indicate deletions, and green colored line items indicate additions.
- There’s no way to select and merge individual changes from an AzDevOps PR. All or none of the changes must be accepted and merged, or rejected.
- Comments can be added to a PR to facilitate a discussion of the changes proposed within an AzDevOps PR between the person proposing the changes, the AzDevOps reviewer, and any other contributor added to the PR. For example, between an Author, a Content Editor, and an AzDevOps reviewer.
- AzDevOps reviewers can use comments to provide the PR owner with feedback on their proposed file changes. The PR owner can work on their originating branch to apply the reviewer’s suggestions to the files in the open PR. When the reviewer and PR owner are satisfied with the corrections/ edits, the contents of the PR can be merged.
- Alternatively, an AzDevOps reviewer can apply their corrections/ edits to a new branch, and then open a new PR to merge the files that contain the reviewer’s edits.
Note: For general information about when a PR is created, and by whom, choose a guide that corresponds to your role from the navigation menu on the left side of this website. The PR evaluation and review processes can vary between projects. If you’re unsure, ask your project manager about the PR evaluation and review processes that apply to the project you’re working on.
Open a file in an AzDevOps PR
Complete the following steps to open a file in an AzDevOps PR (markdown or image file).
-
Open a web browser, go to the AzDevOps website at https://dev.azure.com, and sign in.
.
-
On the Projects tab, locate the project repo you require, and select the Repos icon.
For example, in the following image, the Repos icon for the project example-repo is selected.
-
Select Pull requests from the left side menu.
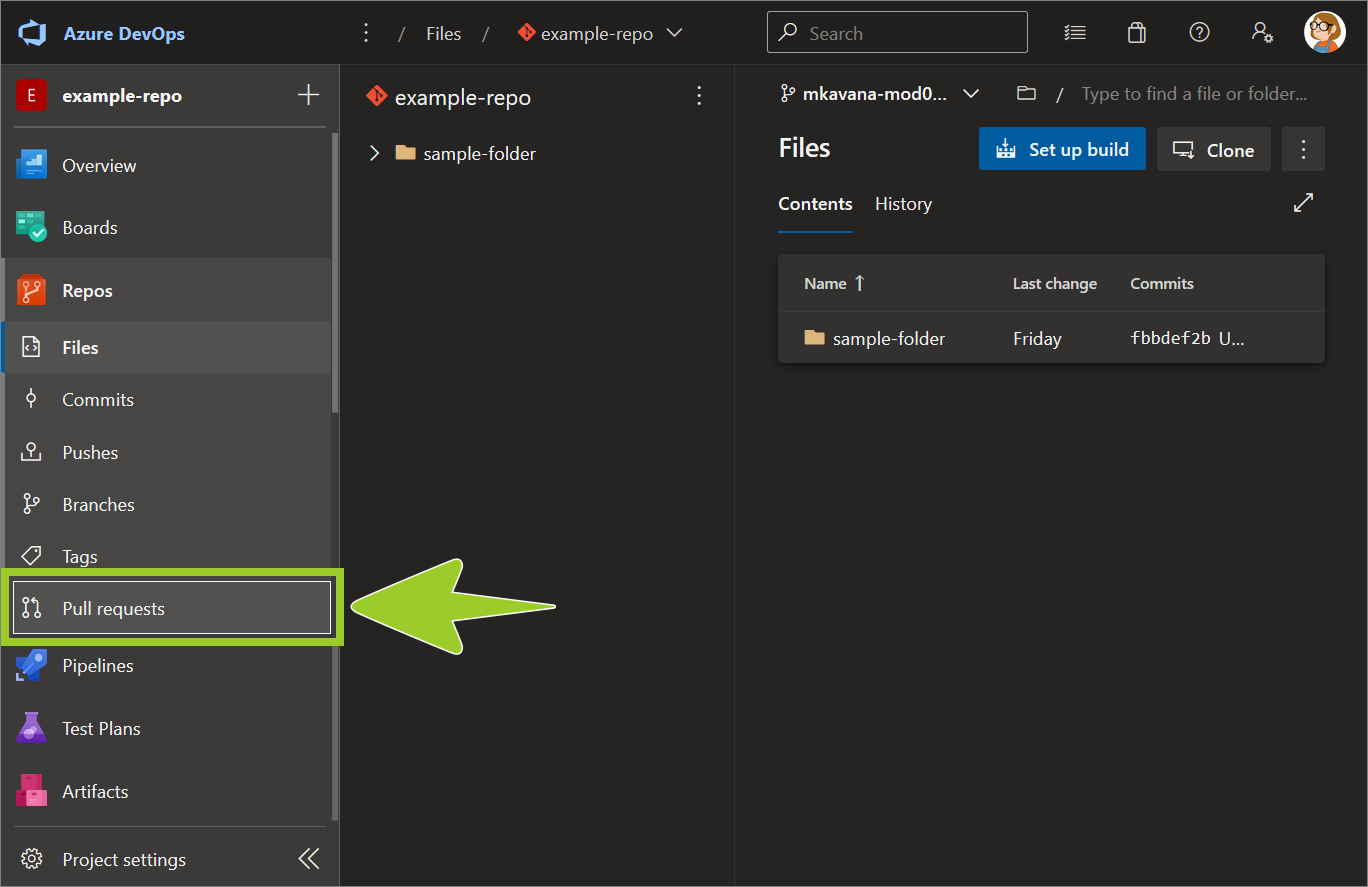
-
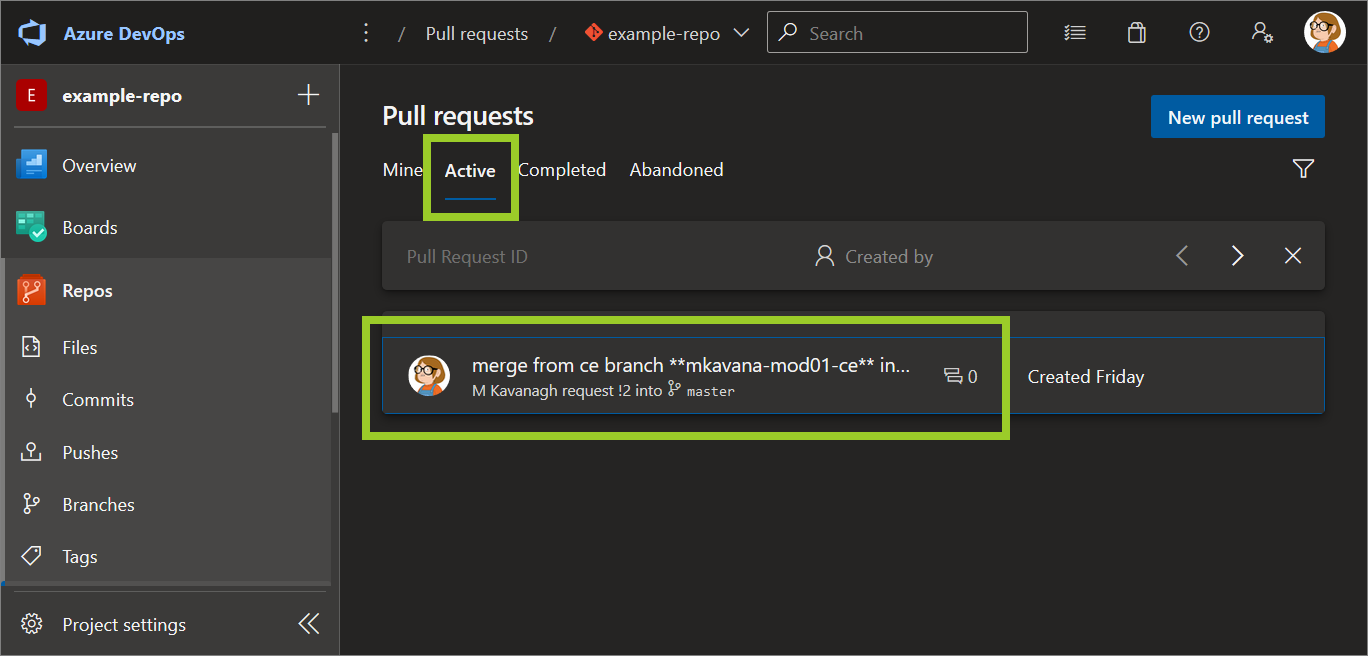
In the Pull requests pane, on the right side, choose the Active tab for a list of open PRs. Then, select the PR with the file you want to open.
For example, in the following image, the PR merge from ce branch **mkavana-mod01-ce** into **master** is selected from the list of open PRs in the Active tab.
-
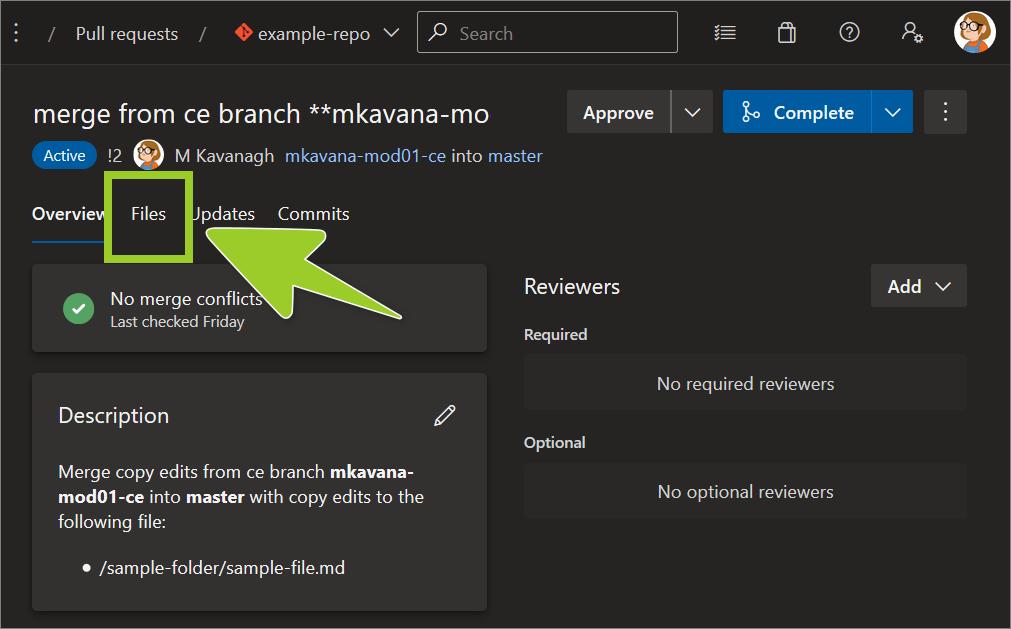
Choose the Files tab to access a list of the files the PR contains.
-
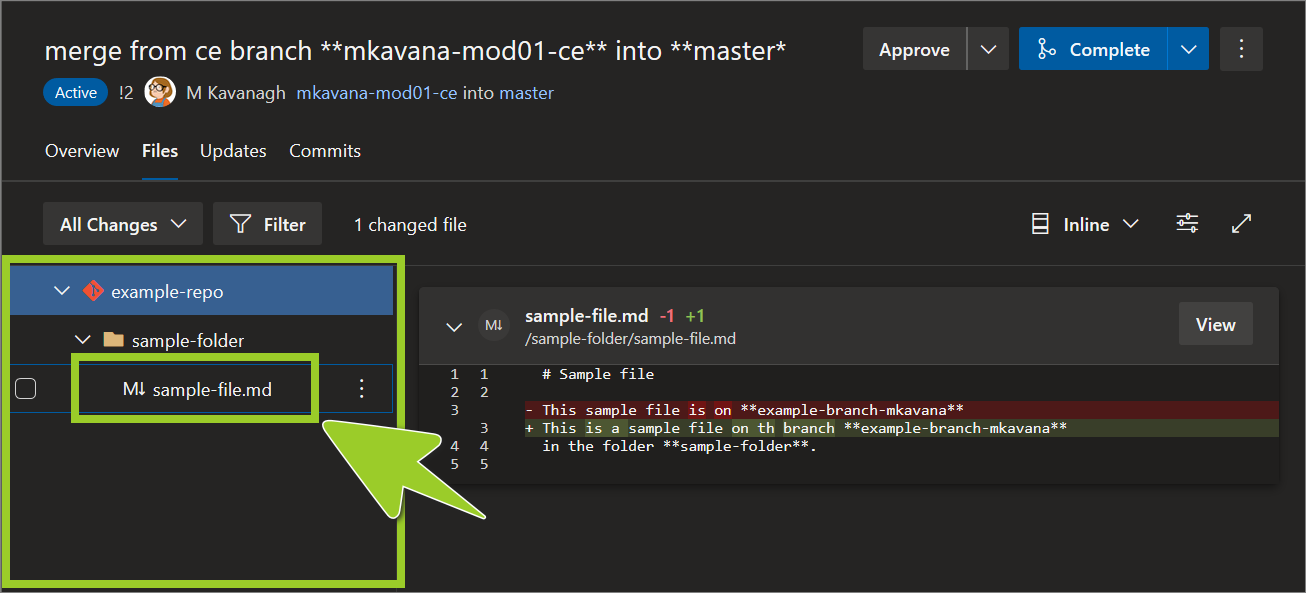
Select a file from the File navigation pane on the left side.
Note: If the PR has many files, the files are listed in the File navigation pane.
For example, in the following image, the file sample-file .md is selected from the File navigation pane.
-
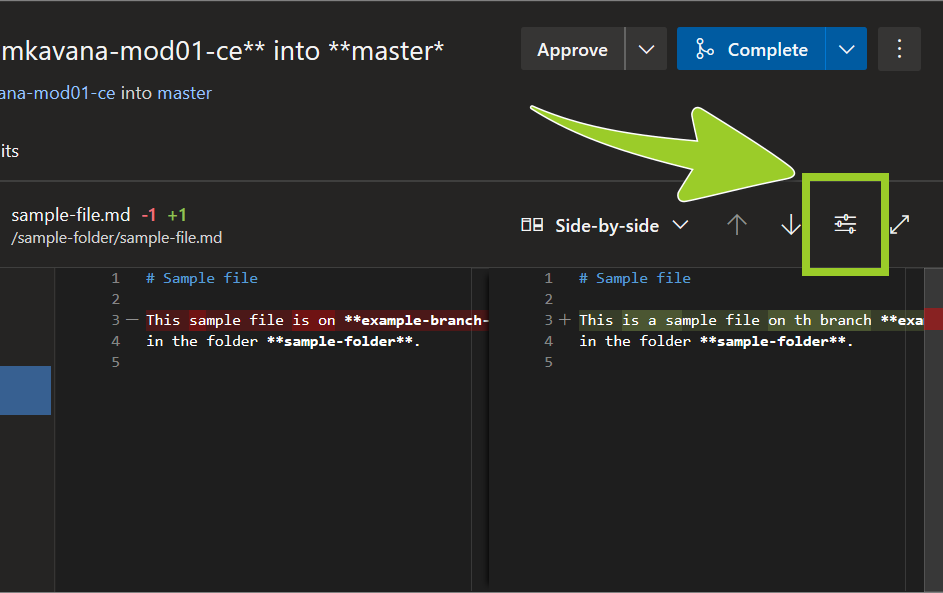
Set the dropdown option for comparing file changes to Inline diff or Side-by-side diff.
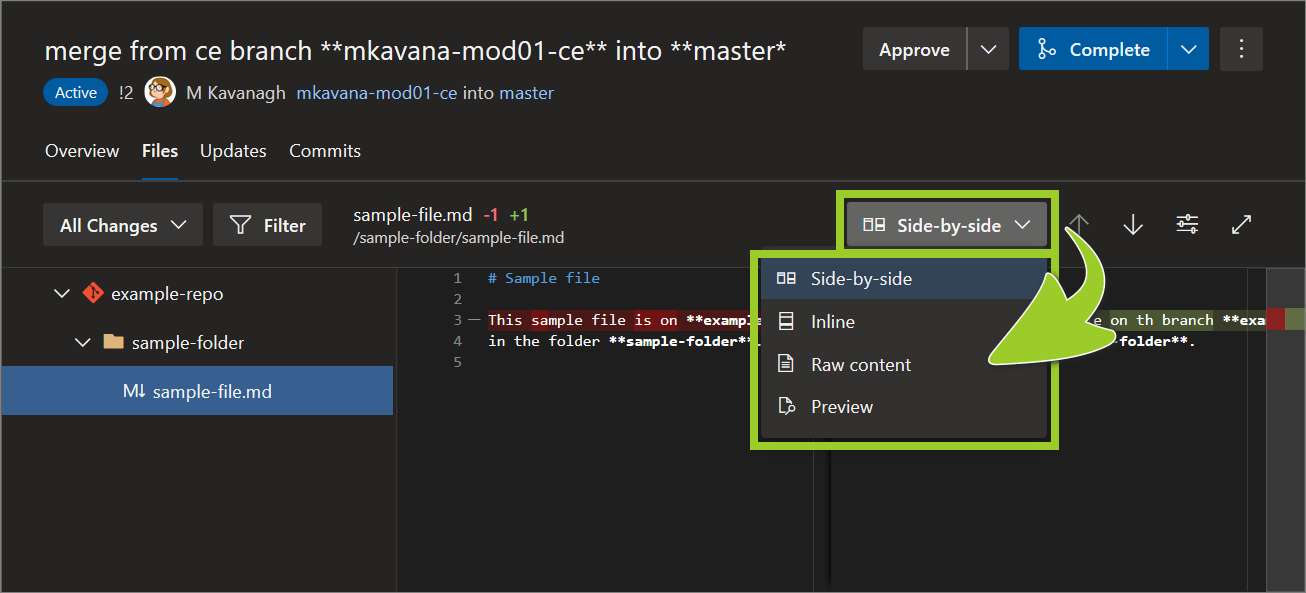
Note: To modify the AzDevOps Editor preferences, choose the Settings icon.
-
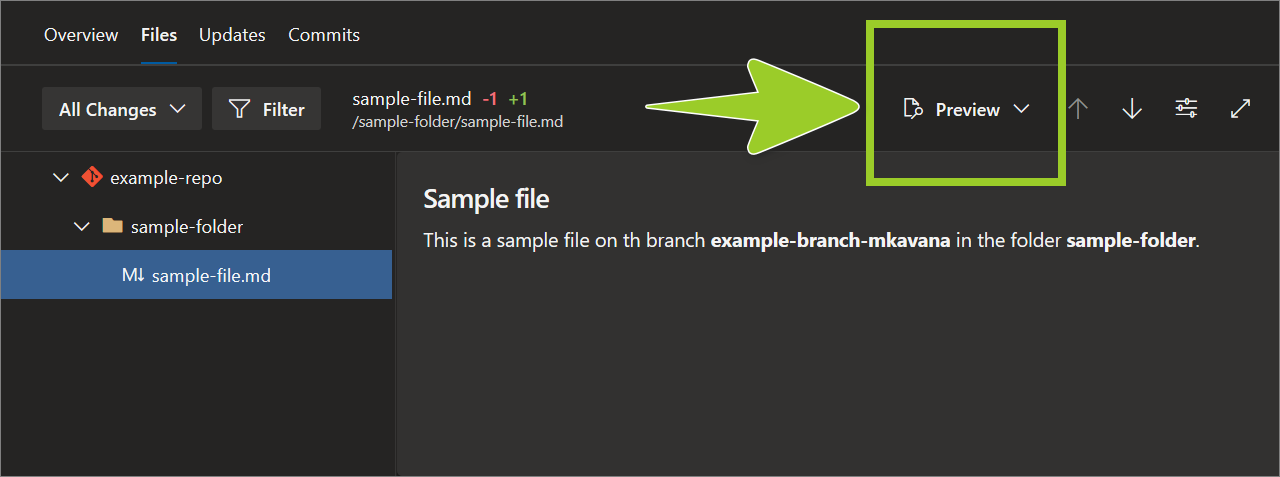
For a rendered preview of the file’s content, set the dropdown option for comparing file changes to Preview.
For example, in the following image, the dropdown option is set the dropdown to Preview the contents of the file sample-file .md.
-
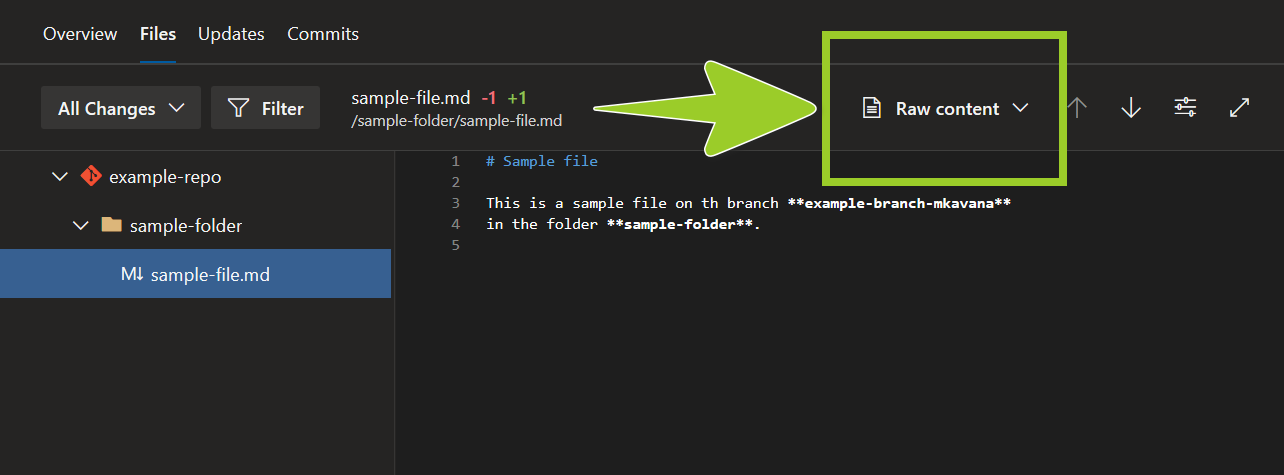
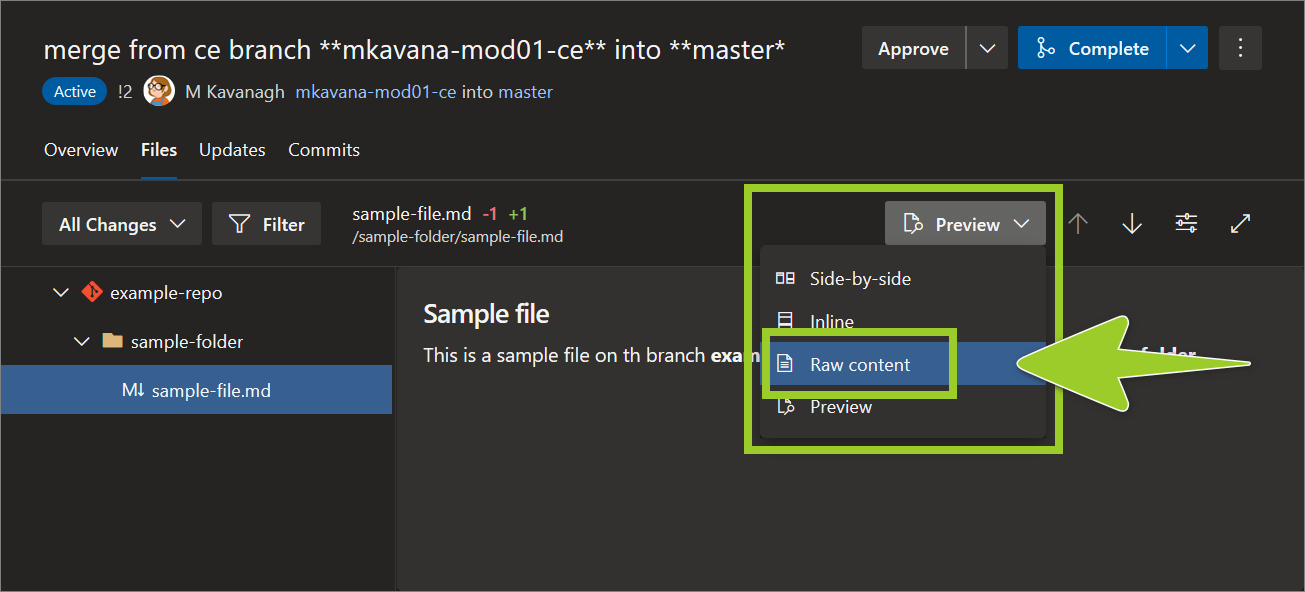
To return to the “raw” markdown content, set the dropdown option Raw content.
For example, in the following image, the dropdown option is set the dropdown to Raw content.
You’ve opened a file in an AzDevOps PR successfully.
Add and resolve AzDevOps PR review comments
You can add review comments to the files in a PR, to initiate a discussion about a proposed file change.
Complete the following steps to add and resolve review comments in a file within an AzDevOps PR.
-
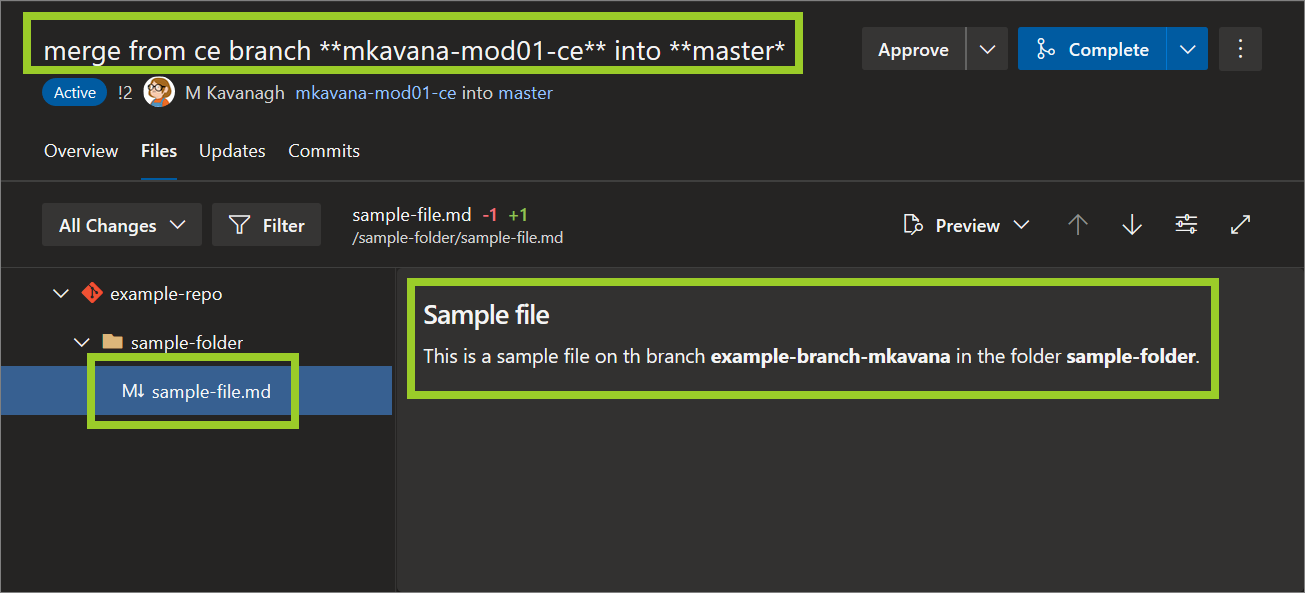
Open a file in an AzDevOps PR by referring to Open a file in an AzDevOps PR.
For example, in the following image, the file sample-file .md is open in the PR merge from ce branch **mkavana-mod01-ce** into **master**.
-
With the file open, set the dropdown option for comparing file changes to Raw content.
For example, in the following image, the dropdown option is set the dropdown to Raw content.
-
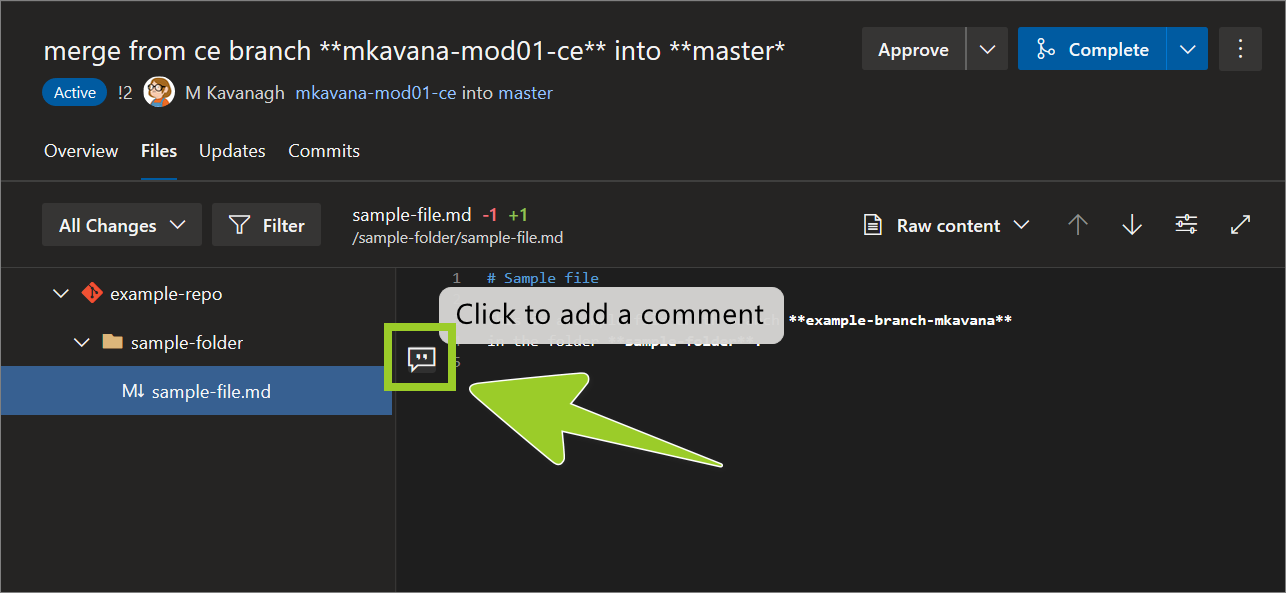
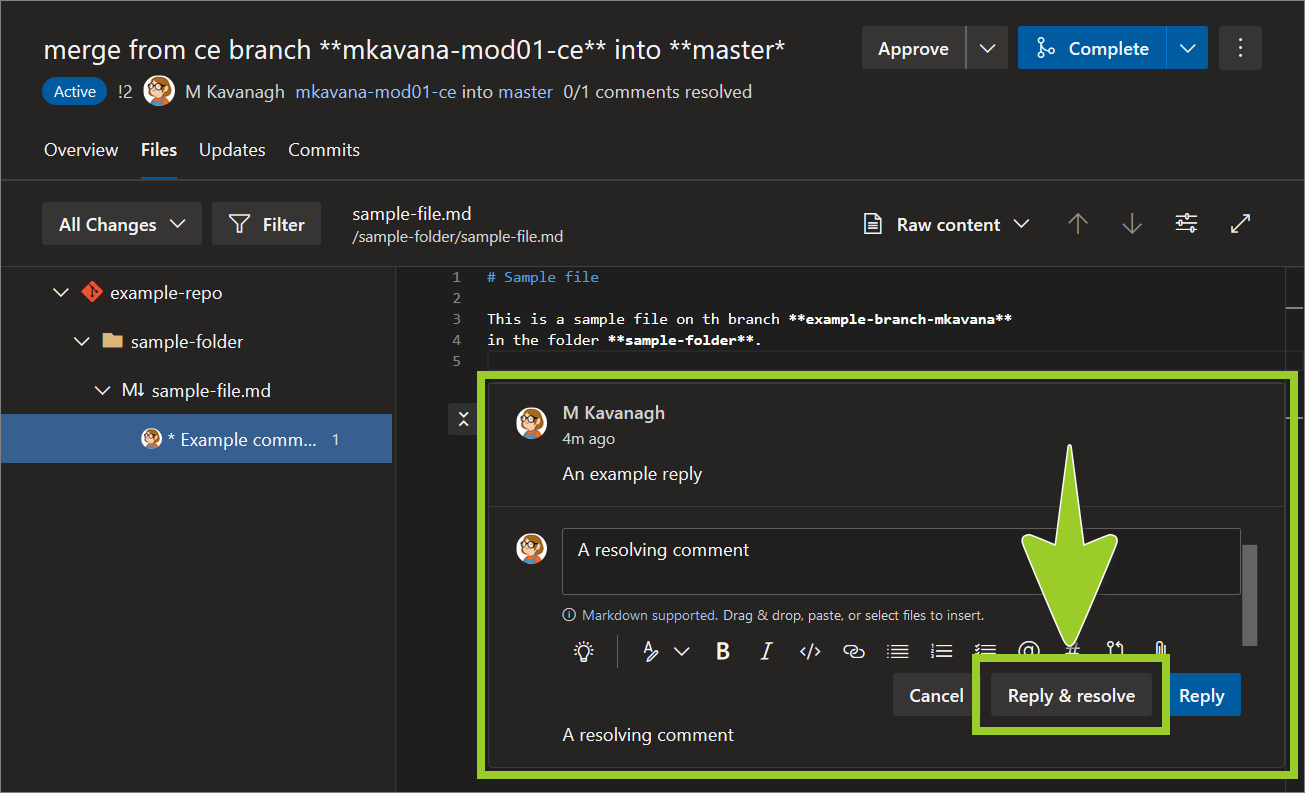
Hover over the number of the line you want to add a comment to, and then select the add comment icon (speech bubble symbol).
For example, in the following image, the add comment icon is selected on line number 5.
-
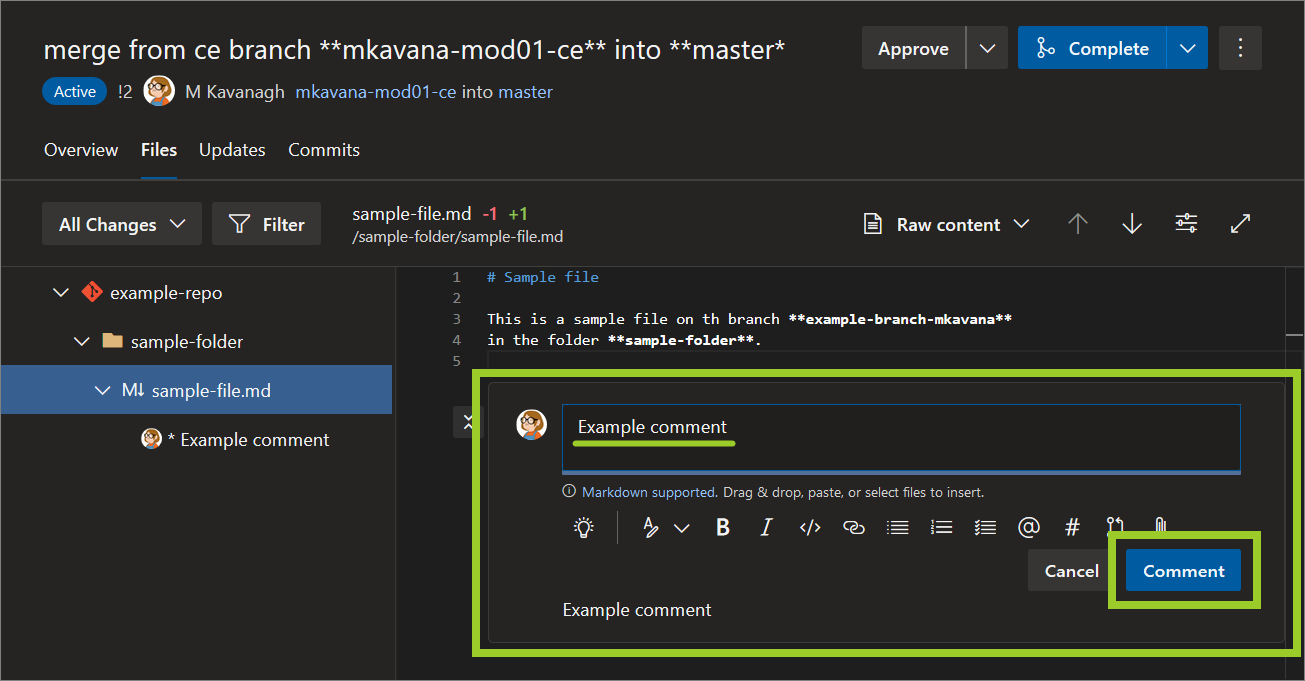
Enter your comment text, and choose Comment.
For example, in the following image, the comment text Example comment is entered.
-
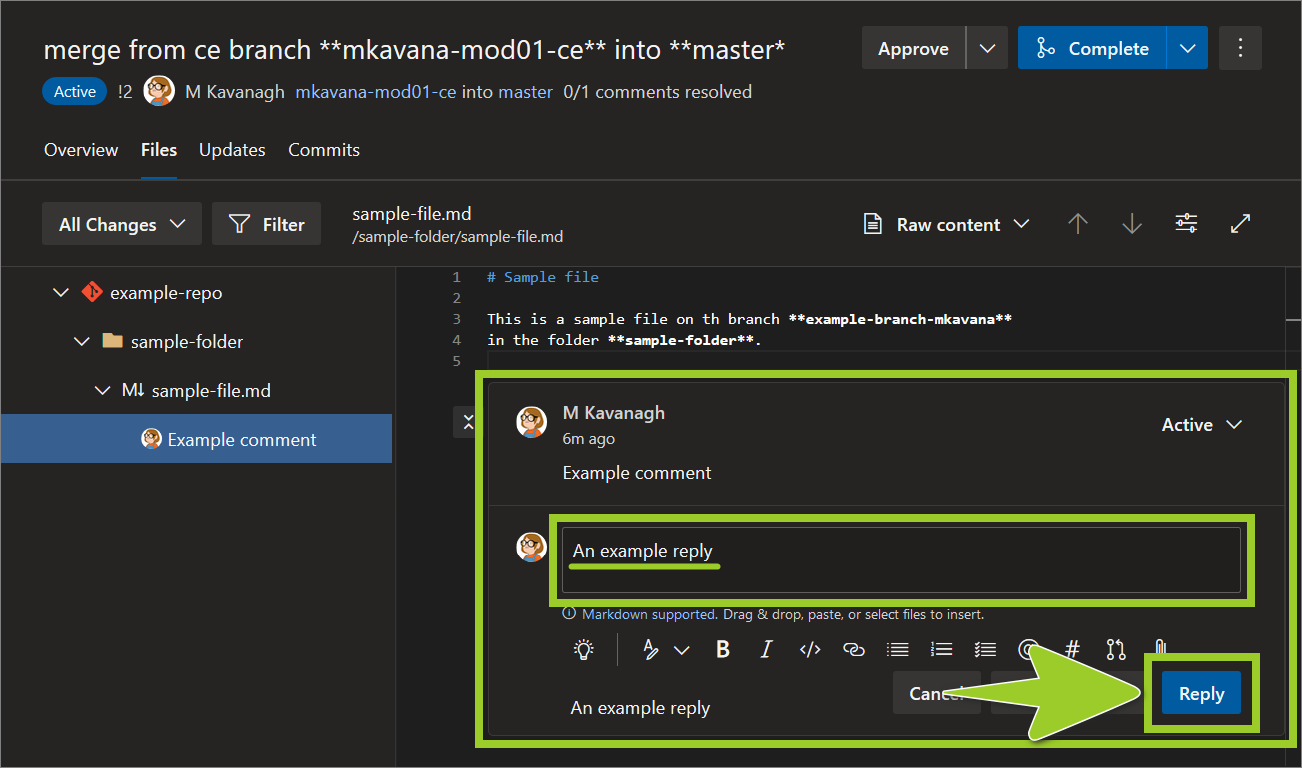
To reply to a comment, select the comment you want to reply to, enter your reply text, and then choose Reply.
Note: Comments and replies facilitate discussion between stakeholders about a proposed file change. Generally, only comment on a proposed file change that you want clarified, or disagree with. Comments are not required for file changes you consent to.
For example, in the following image, the reply text An example reply is entered.
-
Close or end a discussion by selecting Reply and resolve.
For example, in the following image, the comment A resolving comment and Reply and resolve option is select.
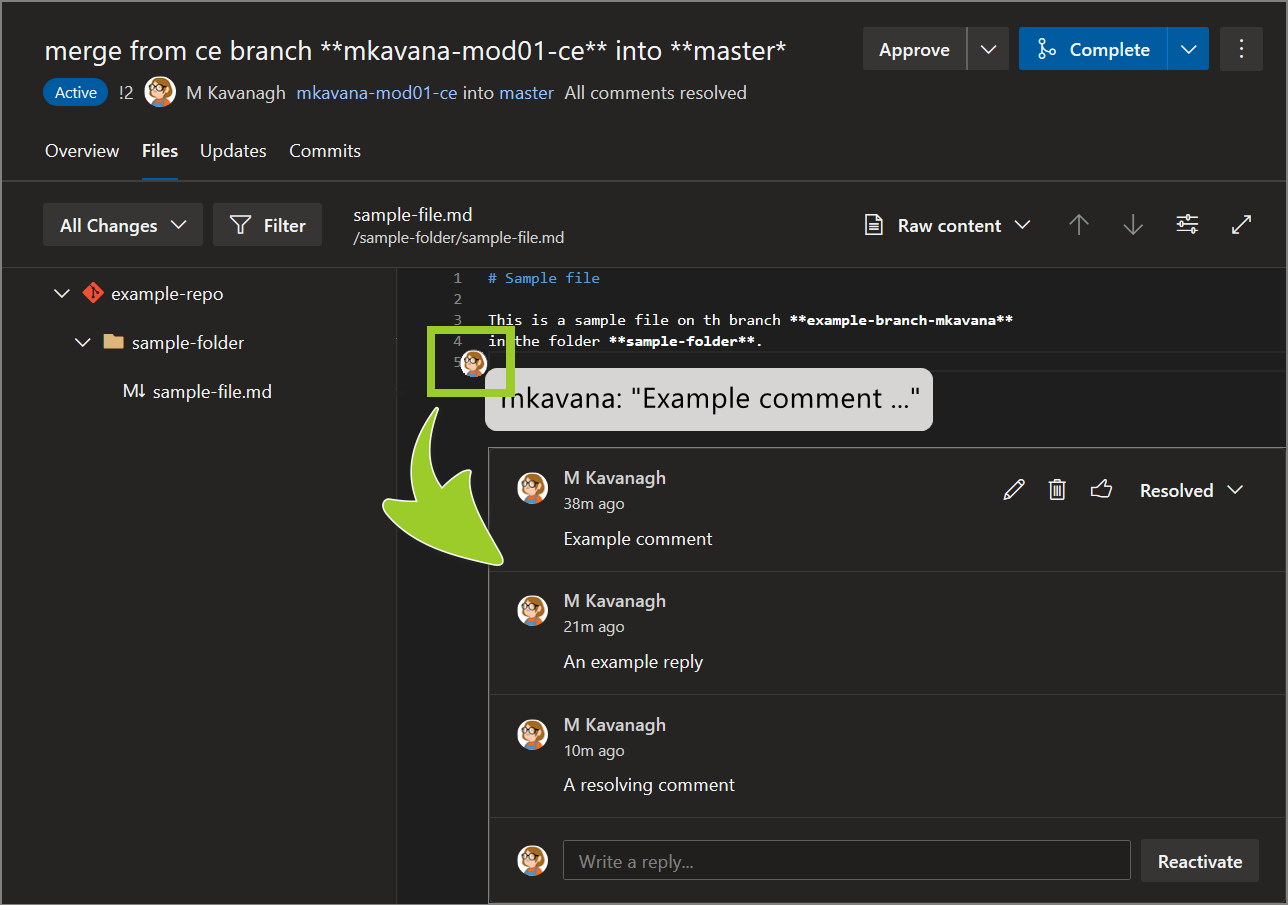
-
Expand a previously resolved comment within a file by choosing the user’s avatar, beside the comment.
For example, in the following image, the avatar for the user M Kavanagh is selected to expand the resolved comment A resolving comment.
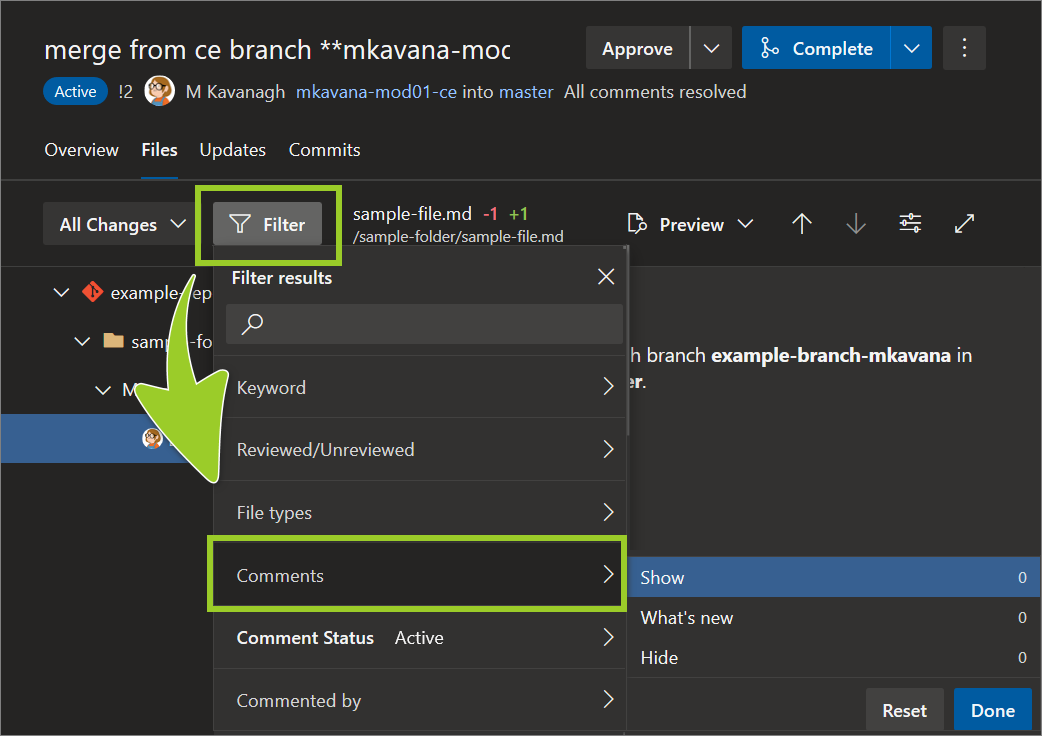
-
To manage comments, select Filter, then choose Comments, and set the type of comment you want to access.
Note: To designate a file as Reviewed, refer to Mark a file as reviewed in an AzDevOps PR.
You’ve added and resolved AzDevOps PR review comments successfully.
Open an image file in an AzDevOps PR and add comments
Complete the following steps to open an image file in an AzDevOps PR, and add comments.
-
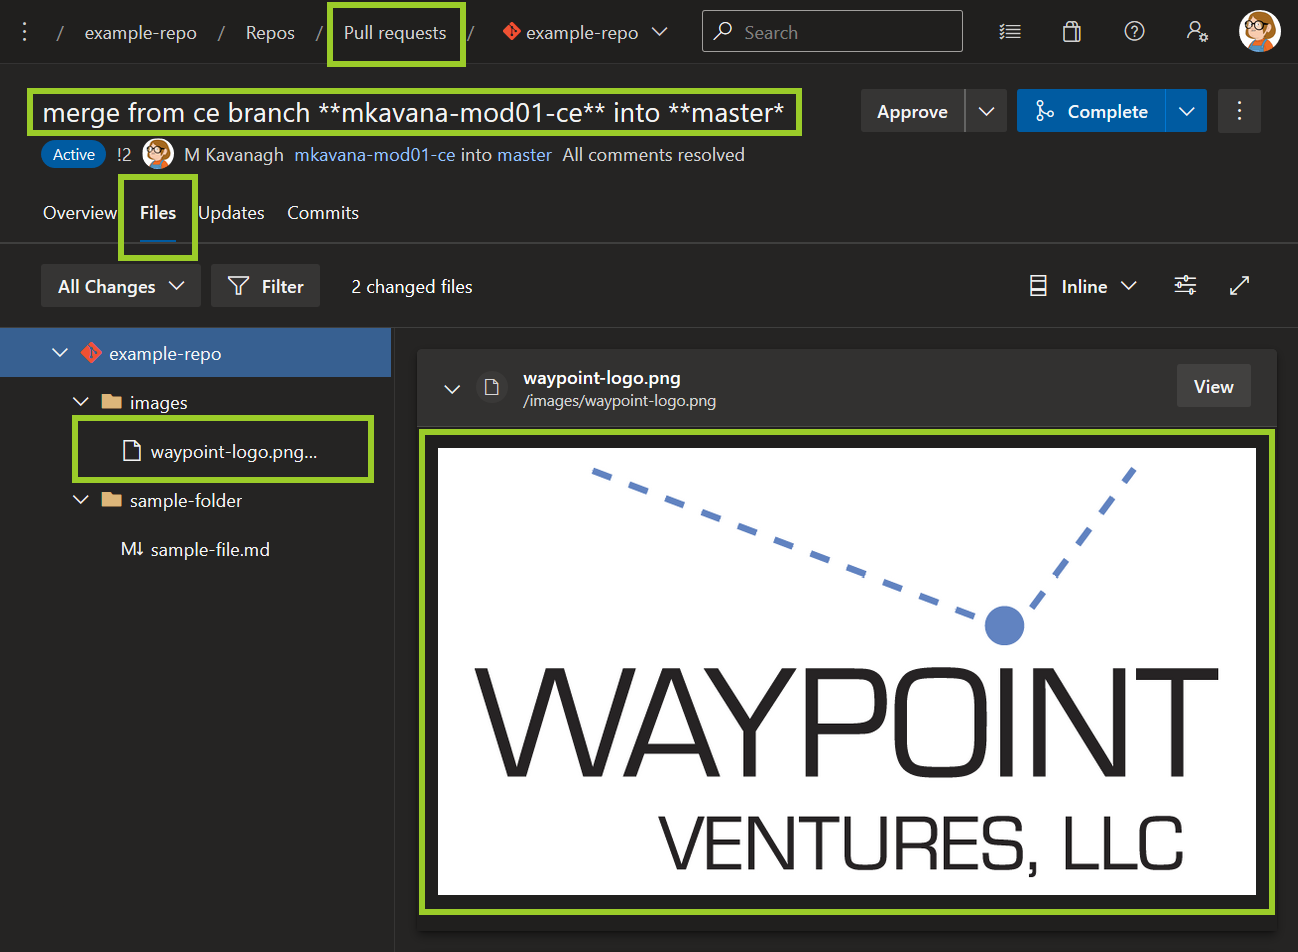
Open an image file in an AzDevOps PR by referring to Open a file in an AzDevOps PR.
From within the PR, choose Files, and then select an image file. AzDevOps will display a preview of the image.
For example, in the following image, the PNG image file waypoint-logo .png is selected from the Files menu of the PR merge from ce branch **mkavana-mod01-ce** into **master**.
-
In the Files pane, select the vertical ellipsis (
⋮) icon beside the image file you want to add a comment to.For example, in the following image, the vertical ellipsis (
⋮) icon is selected beside the PNG image file waypoint-logo .png.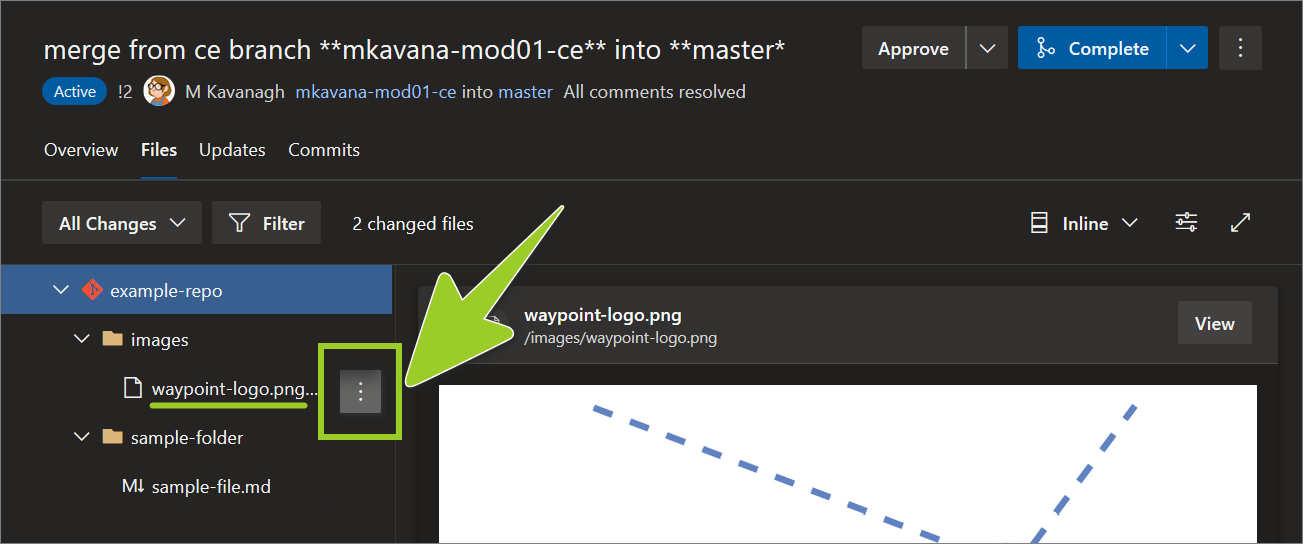
-
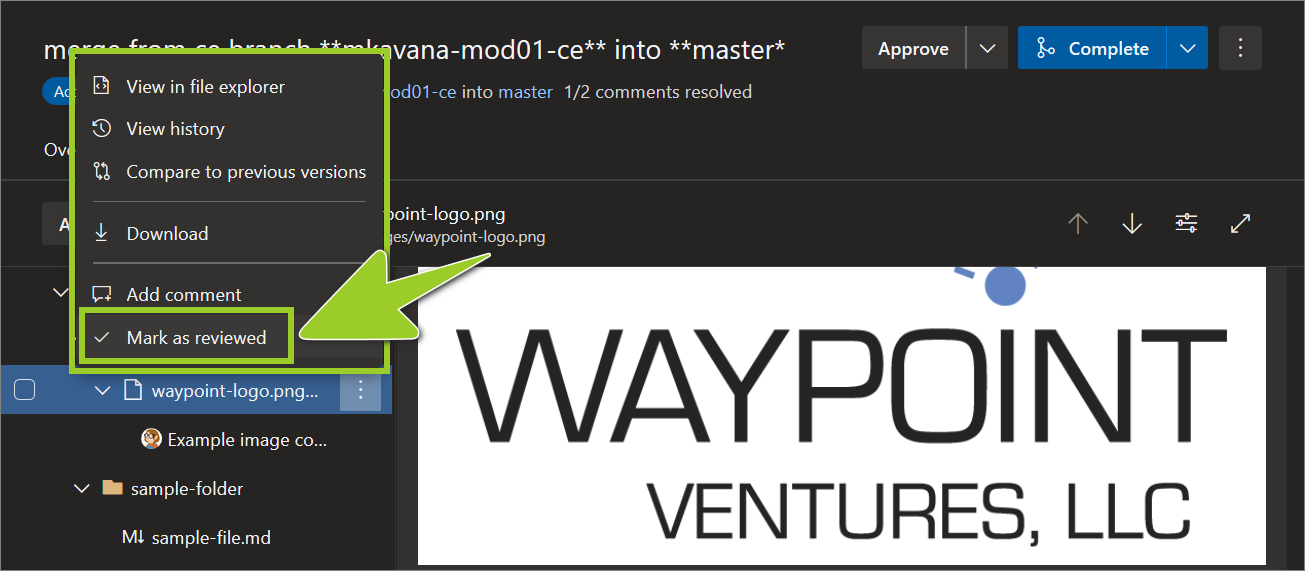
To add a comment to the image file, from the context menu, choose Add comment.
For example, in the following image, the option Add comment is selected from the context menu for the PNG image file waypoint-logo .png.
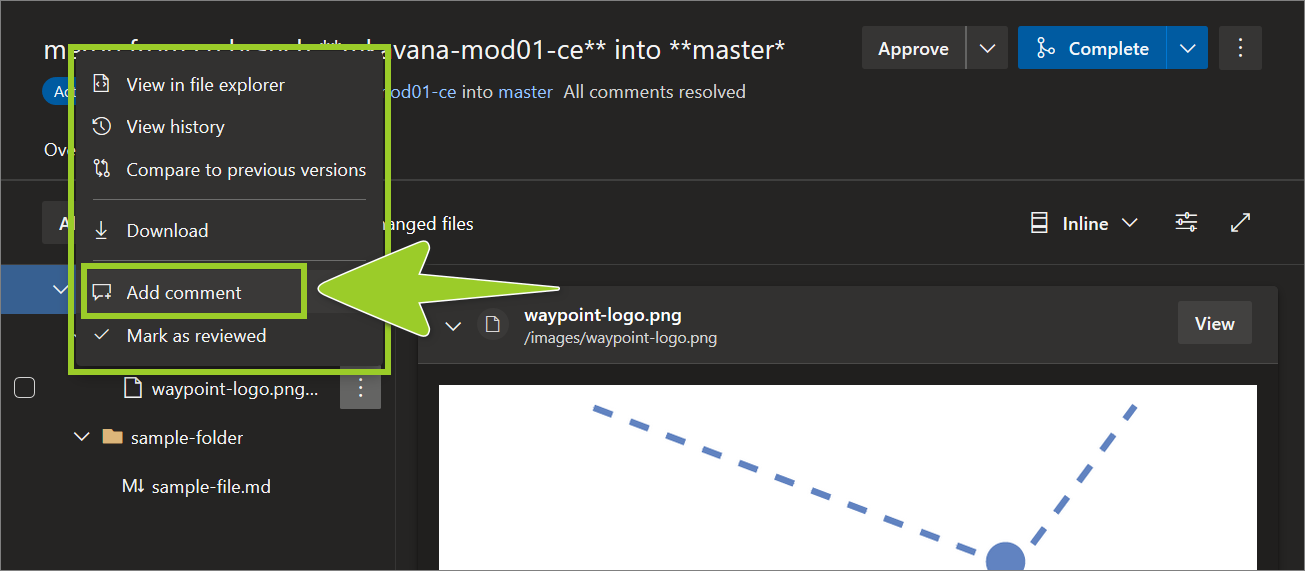
Note: Other context menu options include: View in file explorer, View history, Download, and Mark as reviewed.
-
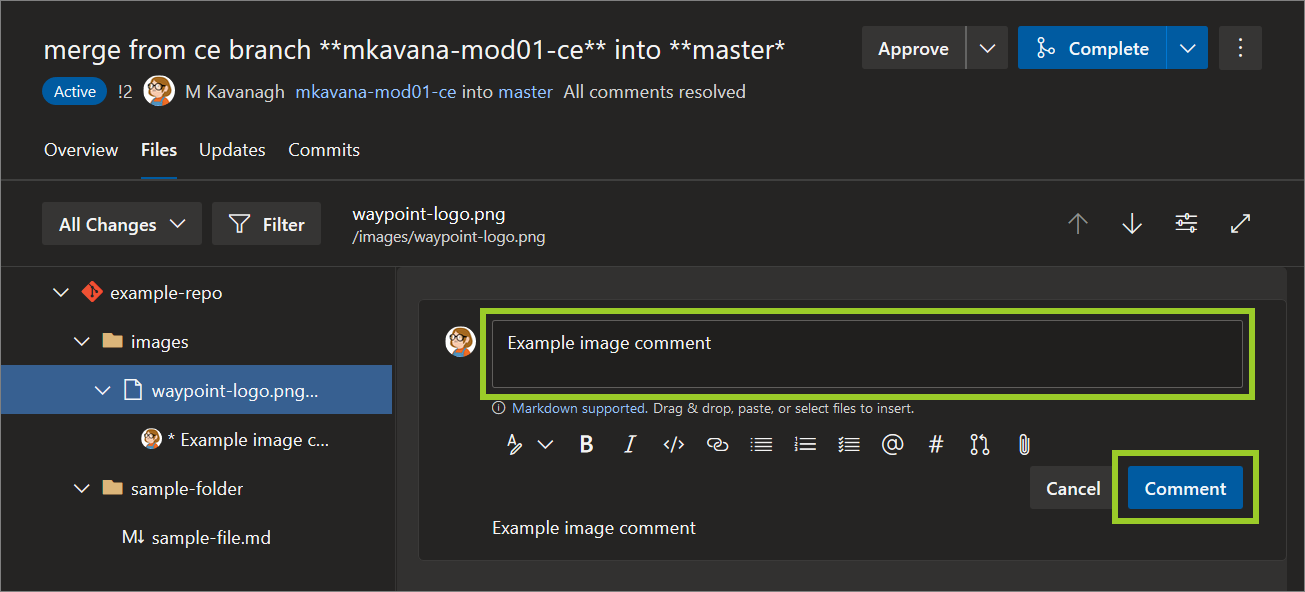
Enter your comment text, and then select Comment.
For example, in the following image, the comment Example image comment is added to the image file waypoint-logo .png.
Note: Use comments and replies to facilitate discussion between stakeholders about image files, and to propose file changes. To reply to comments and resolve comments, refer to Add and resolve AzDevOps PR review comments. To designate an image file as Reviewed, refer to Mark a file as reviewed in an AzDevOps PR.
-
Your comment is listed in the Files pane above the image file.
For example, in the following image, the comment Example image comment is listed in the Files pane, above the image file waypoint-logo .png.
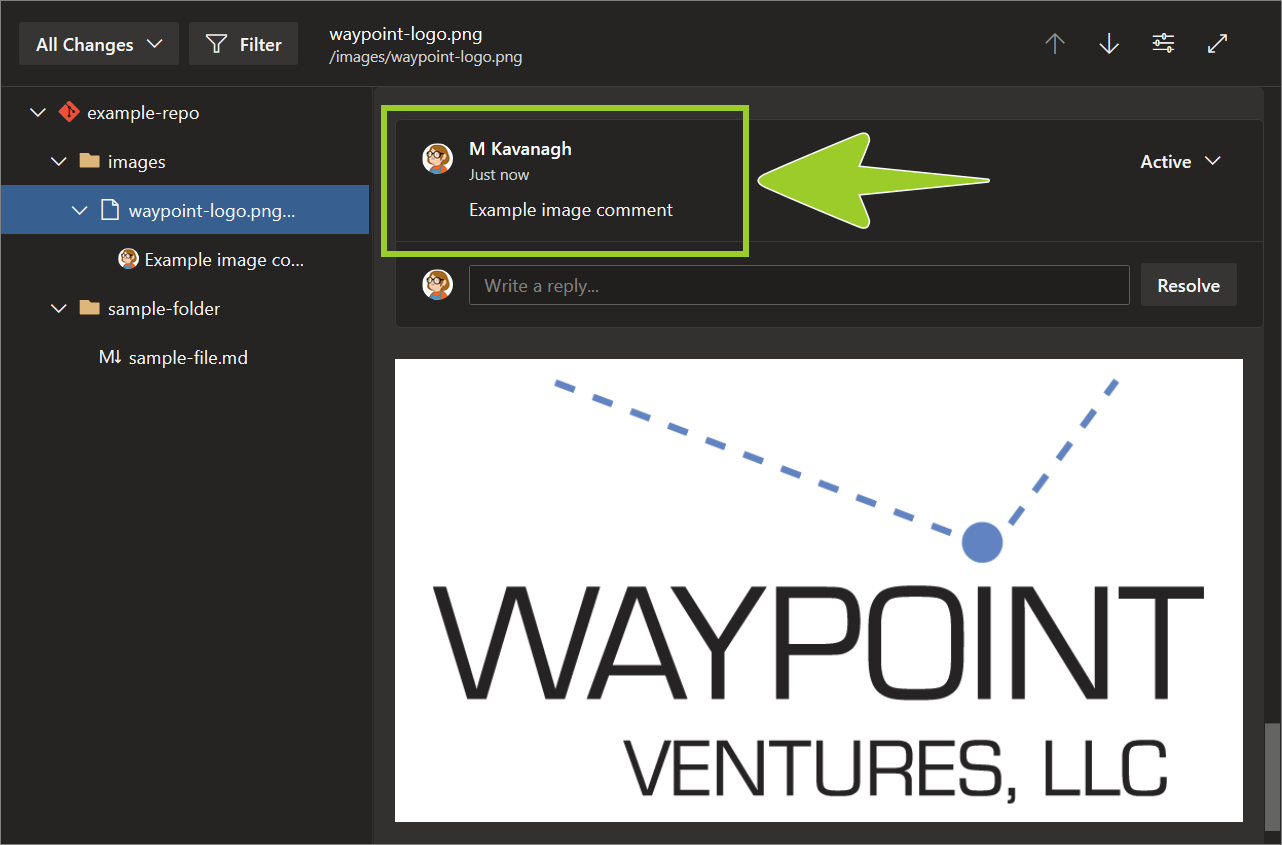
You’ve opened an image file in an AzDevOps PR and added a comment successfully.
Mark a file as reviewed in an AzDevOps PR
Complete the following steps to mark a file as Reviewed in an AzDevOps PR.
-
Open a file in an AzDevOps PR by referring to Open a file in an AzDevOps PR.
From within the PR, in the Files pane, select the vertical ellipsis (
⋮) icon beside the file to designate as Reviewed.For example, in the following image, the vertical ellipsis (
⋮) icon is selected beside the image file waypoint-logo .png in the PR merge from ce branch **mkavana-mod01-ce** into **master**.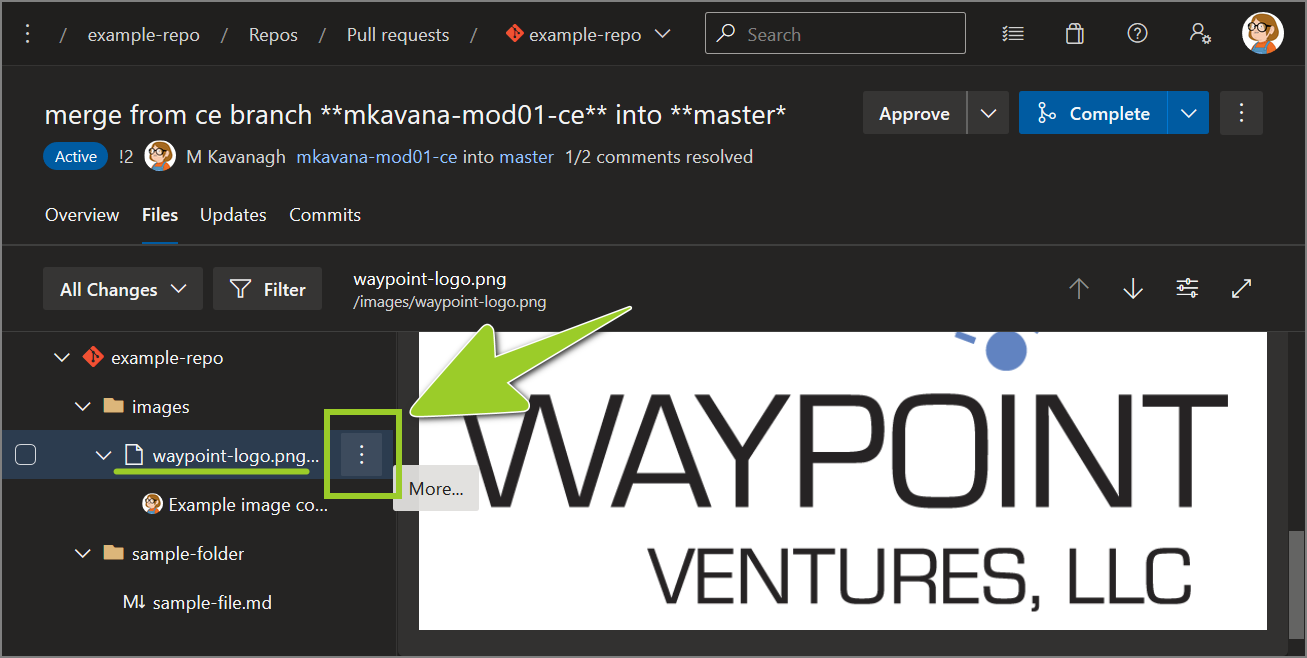
Note: In the previous image, a PNG file is used as an example. You can mark any type of file in an AzDevOps repo as reviewed.
-
In the context menu, choose Mark as reviewed.
For example, in the following image, the image file waypoint-logo .png is set to Mark as reviewed in the context menu.
-
In the Files pane, the checkbox beside the file indicates that the file is designated as Reviewed.
For example, in the following image, in the Files pane, the checkbox beside the image file waypoint-logo .png indicates the file is set to Mark as reviewed.
Note: AzDevOps does not indicate the name of the user who designates a file as Reviewed. If an AzDevOps repo has many reviewers, ensure that only files that have actually been reviewed are designated as Reviewed.
You’ve marked a file as reviewed in an AzDevOps PR successfully.
Note You’ve evaluated a PR on AzDevOps successfully, and your PR will be merged according to the guide Merge a pull request.
14: Merge a pull request
This guide describes how to use a merge commit to combine the changes from a Pull Request (PR) into a branch on AzDevOps.
Note: This guide assumes you’ve an open AzDevOps PR that contains the changes you want to merge, and that you know the number of the AzDevOps PR you’re merging.
Topics in this guide
Examples of when to use an AzDevOps merge commit
This topic provides examples of when to use a merge commit to merge an AzDevOps PR.
When all your file changes are implemented, and you’ve opened an AzDevOps PR for your changes, the files in the AzDevOps PR must be merged back into the originating branch (like the master or authoring branch) using a merge commit.
The following are examples of when to use a merge commit to merge an AzDevOps PR.
Authors
As part of the content authoring process, an author might create a new authoring branch from the master branch. When the author has finished developing content, the changes applied to the files on the authoring branch must be merged back into the master branch. The author pushes the files on their authoring branch “up” to AzDevOps. Then, an AzDevOps PR is created to request merging the authoring branch back into master. When the proposed file changes within the AzDevOps PR have been approved by an AzDevOps reviewer, the contents of the AzDevOps PR are combined with the contents of the master branch using an AzDevOps merge commit.
Reviewers
During the review process, a reviewer might modify an author’s content. To compartmentalize the reviewer’s changes, the reviewer might create a reviewer’s branch based on the originating author’s branch. When the reviewer has finished making changes, the reviewer’s branch must be merged back into the originating author’s branch. An AzDevOps PR is created to request combining the reviewer’s branch with the originating author’s branch. When the changes have been approved by an AzDevOps reviewer, the contents of the AzDevOps PR are combined with the contents of the originating author’s branch using an AzDevOps merge commit.
Note: Beyond the examples cited in this guide, the steps described in Merge an AzDevOps PR can be applied to combine files from an AzDevOps PR with files on a branch (like master) using an AzDevOps merge commit.
AzDevOps merge commit operations are usually performed by a designated Waypoint team member who is responsible for merging AzDevOps PRs. Your project manager can identify the appropriate Waypoint team member for you.
Handoff email
When an AzeDevOps PR is ready to be merged, the person who created the PR must send an email to the Waypoint team member responsible for merging AzDevOps PRs.
The email must state the following information:
- Module number. The number of the module/ unit that the AzDevOps PR to be merged relates to.
- Task type. The task performed on the files in the PR (for example, ID review, content authoring, etc.).
- AzDevOps PR number. The number of the AzDevOps PR to be merged or a link to the PR.
- Merging branch name. The name of the branch that the files are being merged from. For example, the name of your author’s/ reviewer’s branch or a link to the PR.
- Target branch. The name of the branch the files are being merged into. For example, master or the name of an originating author’s branch or a link to the PR.
- Confirmation. Confirmation that all file changes have been implemented, the files have been reviewed, and the PR is ready to be merged into the originating branch.
Merge an AzDevOps PR
The Waypoint team member responsible for merging AzDevOps PRs will complete the following steps to merge an AzDevOps PR.
-
Open a web browser, go to the AzDevOps website at https://dev.azure.com, and sign in.

-
On the Projects tab, locate the project repo you require, and select the Repos icon.
For example, in the following image, the Repos icon for the project example-repo is selected.

-
Select Pull requests from the left side menu.

-
In the Pull requests pane, on the right side, choose the Active tab for a list of open PRs. Then, select the PR you want to open merge.
For example, in the following image, the PR merge from ce branch **mkavana-mod01-ce** into **master** is selected from the list of open PRs in the Active tab.

-
Select the Files tab.
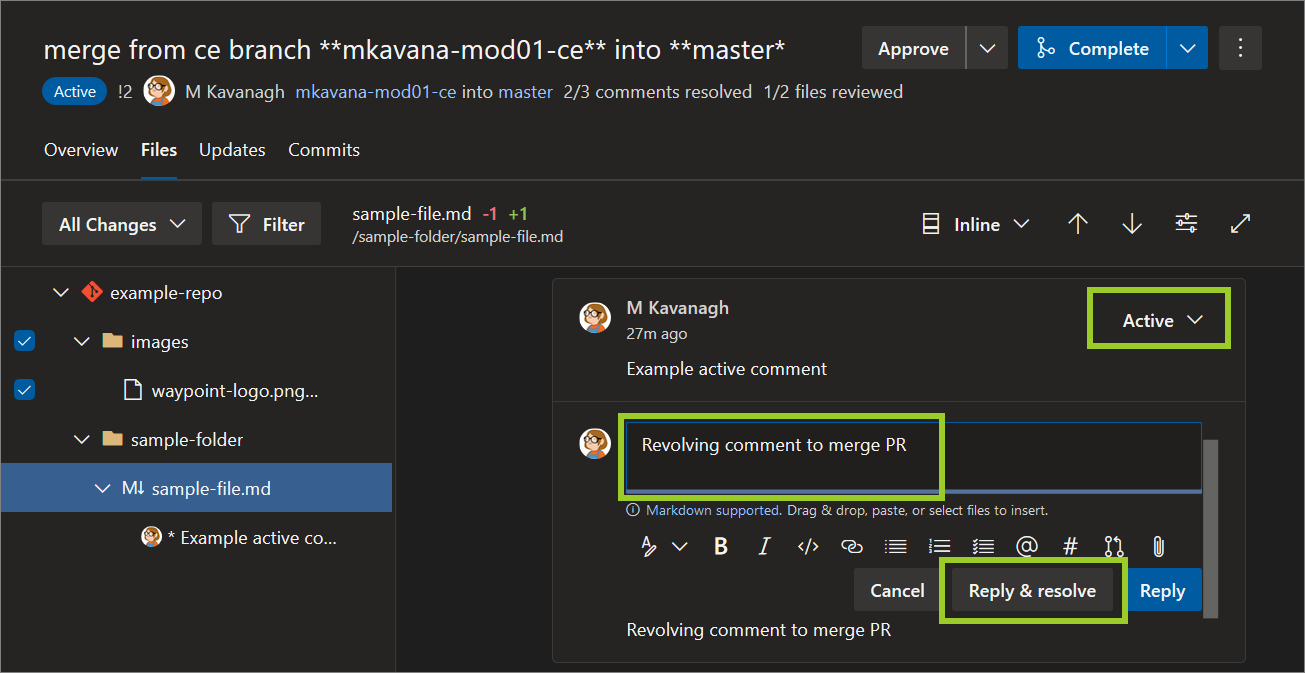
Note: Resolve any active comments, indicated by Active (0), by adding comment text, and choosing Reply & resolve. For example, in the following image, the resolving comment text Resolving comment to close PR is added.
-
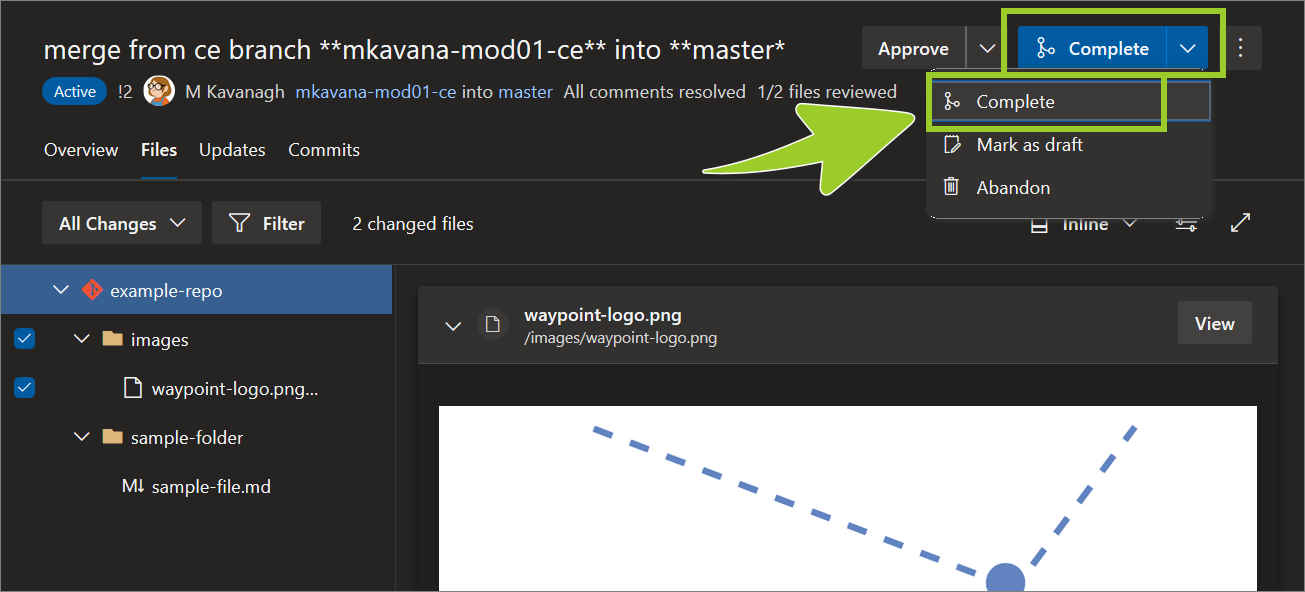
Set the Complete dropdown option to Complete, and then select the Complete dropdown/ button.
Note: Ask the branch owner to approve merging the PR into their branch, if you’re merging into a branch that requires the branch owner to approve merge operations. For example, merging into master usually requires the branch owner’s approval.
-
In the Complete pull request pane, set the following (default) values, and then select Complete merge.
- Set the Merge type dropdown option to Merge (no fast-forward).
- Set the checkbox to enable Complete associated work items after merging.
- Set the checkbox to enable Delete the review branch after merging
- Set the checkbox to disable Customize merge commit message and accept the default comment. Alternatively (optional), enable Customize merge commit message, and then enter a descriptive comment for your merge action.
Note: Ask the owner of the branch you’re merging from to confirm that you can delete their branch after the PR’s been merged.

-
Ensure the status of the PR changes to Competed (in green), to confirm that the merge is complete.
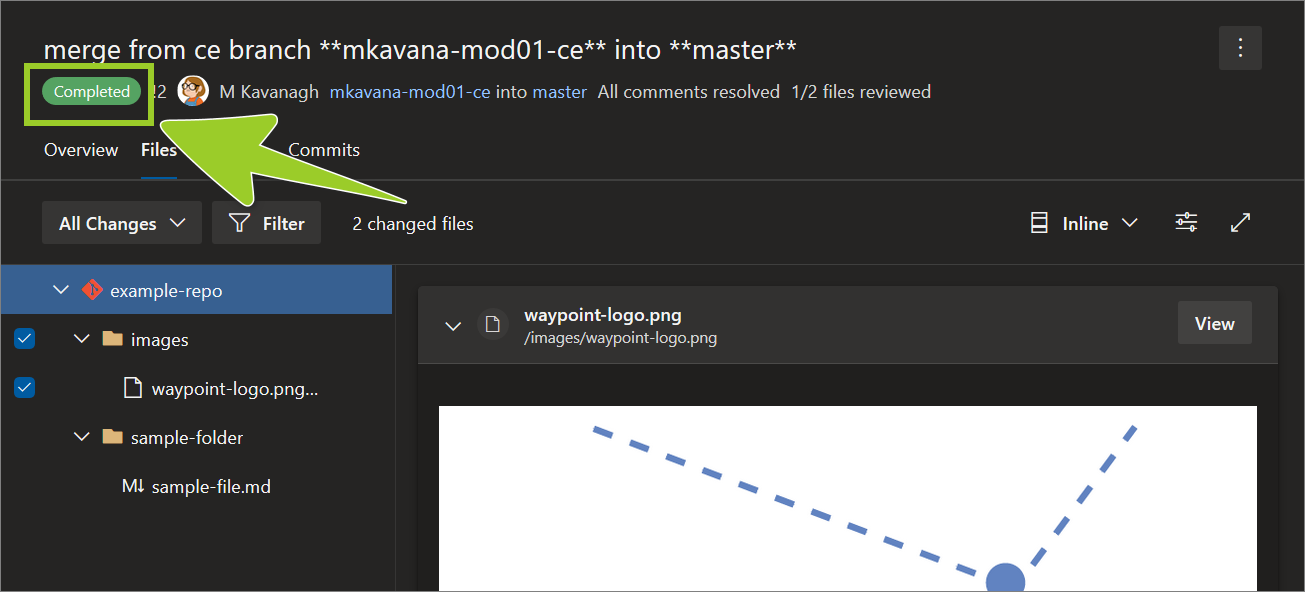
You’ve merged an AzDevOps PR successfully.
Note: The new/ updated files merged from the PR are present in destination branch. A merged PR is accessible from the Completed tab in the Pull requests pane.